Einleitung
Diese Anleitung zeigt dir, wie du die Rückkamera in deinem Nexus 5 ersetzen kannst.
Was du brauchst
-
-
Löse mit einem Plastic Opening Tool die Clips oben und auf jeder Seite der Rückabdeckung.
-
-
-
Entferne die sechs 4,0 mm Kreuzschlitzschrauben #00, mit denen der Mittelrahmen am Smartphone befestigt ist.
-
Um das LCD und den Touchscreen zu ersetzen, entferne die zusätzlichen vier 4,0 mm Schrauben der Daughterboard-Abdeckung mit dem gleichen Schraubendreher.
I had a bit more success with the Phillips #000.
Step 4 (removing the screws in the protecting plate) needs to happen before Step 2 ( removing the connectors)
-
-
-
-
Entferne den Mittelrahmen vom Smartphone.
-
-
-
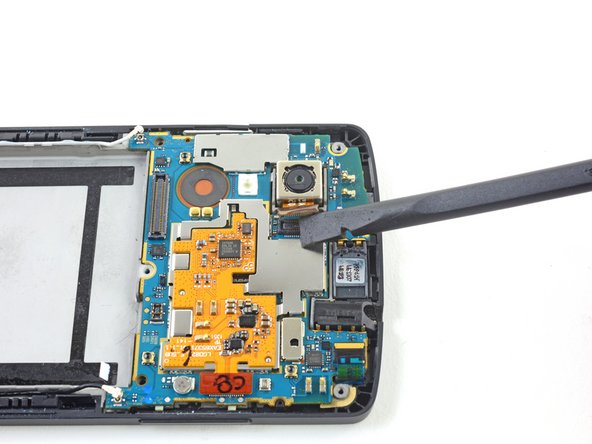
Benutze einen Spudger, um die Rückkamera vorsichtig vom Kleber abzulösen.
-
Ziehe die Kamera seitlich zu ihrem Flachbandkabel, um die Platine unter dem Motherboard zum Vorschein zu bringen.
-
Wenn du die gesamte Kamerahalterung sehen kannst, kannst du sie nach oben ziehen und entfernen.
-


Arbeite die Schritte in umgekehrter Reihenfolge ab, um dein Gerät wieder zusammenzubauen.
Arbeite die Schritte in umgekehrter Reihenfolge ab, um dein Gerät wieder zusammenzubauen.
Rückgängig: Ich habe diese Anleitung nicht absolviert.
26 weitere Nutzer:innen haben diese Anleitung absolviert.
Besonderer Dank geht an diese Übersetzer:innen:
100%


Diese Übersetzer:innen helfen uns, die Welt zu reparieren! Wie kann ich mithelfen?
Hier starten ›
Team

USF Tampa, Team 13-4, Staggers Fall 2014 Mitglied von USF Tampa, Team 13-4, Staggers Fall 2014
USFT-STAGGERS-F14S13G4
3 Mitglieder
13 Anleitungen geschrieben
Ein Kommentar
In case anyone else was confused about the end like I was: you don't have to remove the old adhesive, just leave it and put the replacement directly on top of it. It worked just fine for me!
Wireless QI and NFC.
Once I have put everything together with the new battery in place, I have as last replaced the plastic back cover, snapping all the clips back around the edges of the phone. Alas, I was quick to realise the QI Wireless charging has ceased to work.
I almost blamed the battery, or worse, me.
QUICK TIP: there is actually another clip in the middle of the plastic back cover - just press with your thumb just above the 'S' in NEXUS emblem and, voila! Snaps back in.
Wireless charge and NFC - works, once again.
cwioro - Antwort
you just saved me like 30 bucks. thank you so much.
Robert Nolan -
+ 1, had the same issue and pressing just near the S fixed it! Thanks a lot!
nicco82 -
Just a me too, I had to press above the S and it was quite a snap
Erik Karlin -
There seems to be two contacts that snap into place. One is in line with the led pretty much in the middle of the phone and the second one in line with the camera lens on the opposite side to the lens. The middle one for me snapped pretty lightly, but the side one required a bit more pressure. After that the nfc started working again. Thanks for posting this!
Dennis Millner -
Is it hard to remove the battery door? Worried I might damage it.
Ash - Antwort
When I openend the back cover I damaged two clips. One about 2.5cm (1 inch) below the volume controls and one on the other side about same height. The cover fits good without those two but on one side there is a small gap where the clip broke. But I have a hard cover protector on my phone so it's not that bad.
simonlwheeler - Antwort
The case around the sim slot is pretty thin and easy to break, best to avoid using the pry tool at this point.
Aled Morris - Antwort
Excellent tip, should be included in the main guide.
fprades - Antwort
Hey Author, i need to ur expert advice...i replaced my nexus 5's back cover. since the new one did not have the vibrators battery i had to take it from the old one and connect it to the new one...on removing i noticed that it was stuck to the cover by a glue
Question: what glue to use to hold the battery to the cover?
suwaid akbar - Antwort
Any adhesive will do. I used a hot glue gun. You shouldn't need expert advice to figure that out. Use your head.
tjt263 -
The case around the volume control is also pretty thin.... I broke mine prying so avoid the pry there too.
Also my back had glue at the bottom and I haven't seen mentioned
kornerson - Antwort