Einleitung
Diese Austauschanleitung für das Nexus 5X zeigt, wie du nur das LCD-Display und den Digitizer deines Nexus 5X austauschen kannst - und nicht die [Produkt|IF293-008|ganze Displayeinheit]. Wenn dein Ersatzteil den Kunststoffrahmen enthält, musst du zusätzliche Teile (LED, Vibrationsmotor, Ohrhörer, Kopfhörerbuchse, Strom-/Lautstärketasten und Näherungssensordichtungen) auf deine neue Rahmeneinheit übertragen. Lies dir die Schritte und Kommentare sorgfältig durch, bevor du mit dem Austausch beginnst.
Wenn dein Glas (Digitizer) gesprungen ist, beschädigt wurde oder nicht auf Berührung reagiert, hilft dir diese Anleitung, das beschädigte Glas zu ersetzen und die Funktionsfähigkeit des Geräts wiederherzustellen.
Wenn dein Bildschirm tote Pixel hat, verzerrte oder verschwommene Bilder zeigt oder überhaupt nichts anzeigt, hilft die diese Anleitung beim Austausch des beschädigten LCD-Display.
Die Klebekraft und der Gerätezustand können variieren; bitte sei vorsichtig, wenn du Komponenten aus deinem Gerät entfernst.
Was du brauchst
-
-
Setze ein Auswurfwerkzeug für SIM-Karten in das Loch im SIM-Kartenfach an der linken Kante des Telefons.
-
Drücke das Auswurfwerkzeug hinein, um das SIM-Kartenfach auszuwerfen.
-
Entferne das SIM-Kartenfach.
-
-
-
Setze ein Plektrum in die Öffnung des SIM-Karteneinschubs und verdrehe es zur Seite, um die erste Plastikklammer zu lösen, mit der die Rückabdeckung befestigt ist.
-
Schiebe das Öffnungswerkzeug um die Oberkante des Gerätes, um die Plastikklammer zu lösen, mit der die Rückabdeckung befestigt ist.
Here’s a photo of the location of the 18 tabs that hold the back cover in place
Twisting sideways didn’t do it for me, but sliding along the edge did. However, at first I didn’t realize that the pick was between the motherboard and midframe, rather than between midframe and back cover like it was supposed to. This led to breaking off a spring-loaded connector on the motherboard, connecting to an antenna (I guess) in the back cover. So far I haven’t noticed any reception issues, but I can’t say for sure.
In essence: be careful to get the pick towards the back cover, and not “straight in” under the midframe.
-
-
-
Schiebe das Plektrum um alle Seiten des Smartphones herum, um alle Klammern zu lösen, mit denen die Rückabdeckung befestigt ist.
-
-
-
Kippe das Plektrum, um die Rückabdeckung ein wenig anzuheben.
-
Beim Fingerabdrucksensor befinden sich noch zwei weitere Plastikklammern. Löse sie, indem du die Rückabdeckung behutsam wegziehst.
-
Entferne die Rückabdeckung.
-
-
-
Entferne die zehn 3,6 mm Kreuzschlitzschrauben #000, mit denen der Mittelrahmen befestigt ist.
-
-
-
Setze ein Plektrum in den SIM-Karteneinschub ein. Drehe es zur Seite hin, damit sich die Kunststoffraste löst.
The photo seems to show that the person is opening from the top, which is the opposite of your advice. So, just want to be clear.
yes, open from bottom first... the pic above shows the finished product after reaching top of phone. I found it best to actually start close to the right of the usbC connector. Pushing inbetween the 2 tabs and up will release the shell.. then work clockwise.
Chris, your advice to start to the right of the usbC connector was excellent, thank you!
I found that my middle panel was already broken at the narrowest part just to the left of the 2-D scan code on the battery, perhaps from some ham-fisted previous repair. This seems of little consequence, there do not seem to be any electrical connections running through this part.
After a long amount of prying, I discoved that, if used gently, a jimmy can really help get the plastic off
I could not remove the cover with the opening tool but had success with the opening picks (the triangle parts). Just slide them under the cover and gently bend and twist the pick to release the cover from the locks. By the way: it’s perfectly normal for the bottom cover part to come loose from the top cover part. It’s designed that way (they interlock).
Here’s a photo of the location of the 20 tabs that hold the middle assembly in place, and the pry angle needed.
This is the scariest part but it is the same process of taking a bike tire off the rim: lift up one part of the cover then put a wedge under the lifted section to hold it up then continue around the frame lifting it up and holding it up with the blue picks. You’ll find that after you life the bottom you can wriggle free the rest by hand.
The 10 screws came out quickly using the IFIXIT.com magnetic screwdriver.
-
-
-
Schiebe das Plektrum weiter um den oberen Teil des Mittelrahmens, um die Plastikrasten zu lösen.
-
-
-
Öffne mit dem Plektrum die Plastikrasten an der langen Kante des Mittelrahmens und an der unteren Kante.
-
-
-
-
Stelle sicher, dass alle Rasten gelöst sind.
-
Entferne vorsichtig den Mittelrahmen.
-
-
-
Verwende die Kante eines Spudgers, um das Akku-Kabel, welches sich unten rechts auf der Hauptplatine befindet, hochzuhebeln und zu trennen.
-
-
-
Verwende einen iOpener, um den Klebstoff unter dem Akku zu lösen. Legen den iOpener für mindestens zwei Minuten auf der Rückseite des Telefons auf.
And all that in 3 minutes.
No way!!!
Yeah, three minutes is probably not very realistic. I updated the time estimate to something a bit more conservative. :)
The adhesive on mine was also really strong.
I had to use a heat gun at about ~110F while applying pressure to get the battery to release
Seriously? All this, just to change the battery?
Your comment only makes sense in 2017.
Krzeszny -
I was able to spudge the battery out from the bottom edge using a “custom” tool made from an old credit card cut to a width slightly less than the bottom of the battery.
Great tip - I used a credit card too without the need for a heat gun.
No need to remove the battery if you only want to get the mainboard out. Just release all the connectors
I’d recommend trying to remove the battery without using heat as my phone failed with the infamous “boot loop” problem less than a week after I changed the battery.
Following these helpful comments, I used isopropyl alcohol and the spudge to get the battery loose, no heat.
Another data point: to be safe, I used the iOpener according to instructions (30s, ~900W microwave, the iOpener just started to expand a bit) and added some isopropyl alcohol. The battery came out without too much effort in a few minutes. No reheating needed, used the spudger from the kit.
The pre-exiting adhesive seemed good enough still, so I didn’t bother removing and re-applying.
I also used isopropyl alcohol only without heat. I got the spluger into the corner just a little to give a small space between the battery and the surrounding plastic enclosure for the battery. Then soaked a corner of a paper towel with a little alcohol. Tipped the phone and squeezed some of the alcohol into the space and let it drain down the edge of the battery. Waited about 60 seconds and then pryed gently with the spluger on that side. It came up pretty easily. Once I got one side of the battery up, I soaked the paper towel again tipped the phone so the edge that was still stuck was down, and squeezed alcohol all along the edge that was freed to let alcohol get down to the tape that was still holding. Waited another minute and then pried gently again and the rest of the battery came right up. The whole procedure took maybe 4-5 minutes.
-
-
-
Setze das flache Ende eines Spudgers unter die linke untere Ecke des Akkus und heble vorsichtig nach oben.
-
Wenn der Akku sich nur schwer anheben lässt, ist der Klebstoff möglicherweise noch zu fest. Du kannst etwas Isopropylalkohol unter jede Ecke des Akkus träufeln und einige Minuten einwirken lassen, um den Klebstoff zu lösen.
-
-
-
Setze das flache Ende eines Spudgers unter die rechte untere Ecke des Akkus und heble vorsichtig nach oben, um den verbleibenden Kleber zu lösen.
-
-
-
Entferne den Akku.
If you use the ifixit heat-pad to remove the battery and gently lever the battery away from the internal glue then the original glue will still be functional.
-
-
Schritt 15 Hauptplatinen-Baugruppe entfernen
Achtung: Die Schritte 15-18 stammen von einer Anleitung, die derzeit bearbeitet wird.
-
Erwärme einen iOpener und lege ihn zum Aufweichen des Klebers unter der Rückkamera 30 Sekunden lang über den oberen Teil des Smartphones.
-
-
-
Setze das flache Ende des Spudgers unter die linke Seite der Rückkamera und heble sie behutsam hoch. Achte darauf, dass der Kleber darunter komplett gelöst ist.
-
-
-
Fasse die Hauptplatine unten an und hebe sie vorsichtig hoch.
-
Ziehe die Hauptplatine behutsam zur Unterkante hin, so dass sie sich aus der Kunststoffraste nahe der Rückkamera löst.
-
Hebe die Hauptplatine vorsichtig aus dem Rahmen heraus.
-
-
-
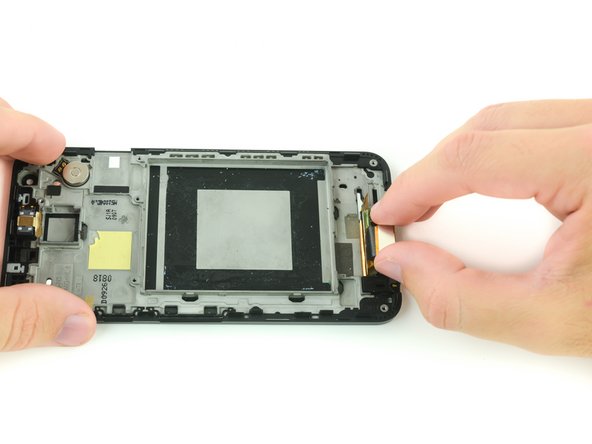
Das Flachbandkabel zum Touchscreen ist mit dem Kunststoffgehäuse verklebt. Weiche den Kleber mit einem iOpener oder einem Heißluftgebläse auf.
-
Schiebe deinen Spudger mit dem flachen Ende behutsam in den Spalt zwischen Akkugehäuse und dem Flachbandkabel zum Touchscreen ein, oder löse das Kabel sorgfältig mit den Fingern ab.
-
-
-
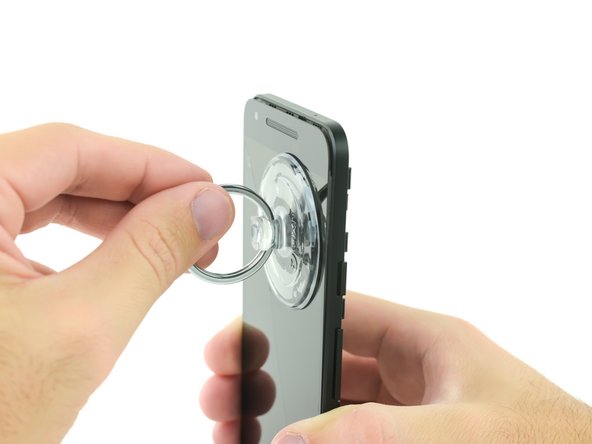
Weiche den Kleber unter den Kanten des Displays mit einem iOpener oder einem Heißluftgebläse auf.
-
Wenn du mit einem Heißluftgebläse arbeitest, dann halte es etwa 20 cm vom Display entfernt. Bewege es dabei etwa zwei Minuten lang vor und zurück.
-
-
-
Befestige einen Saugheber und ziehe das Display vom Rahmen weg, so dass ein schmaler Spalt entsteht.
-
-
-
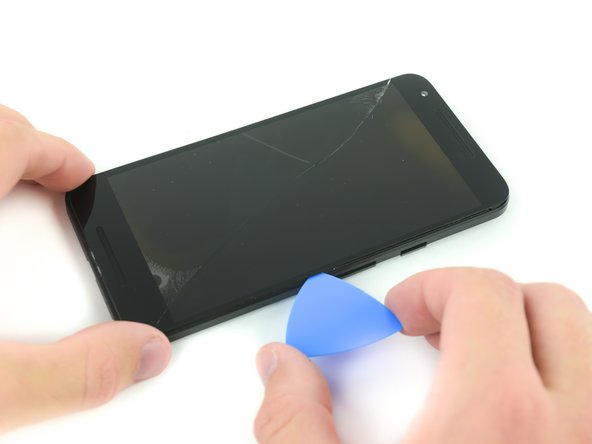
Setze ein Plektrum in den Spalt zwischen Display und Kunstoffgehäuse ein.
-
Schiebe das Plektrum unter dem Displayrand entlang, um den Kleber abzulösen.
-


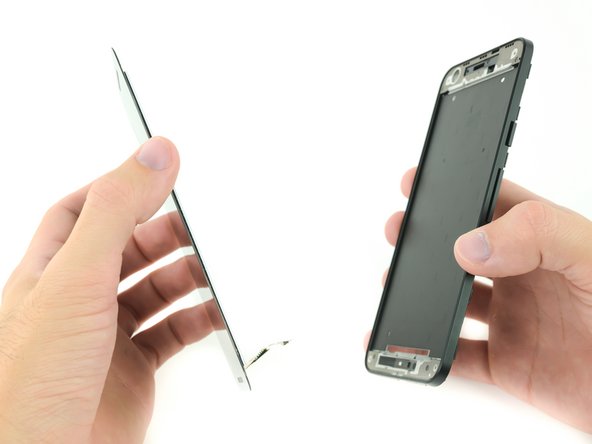
Um dein Gerät wieder zusammenzubauen, folge den Anweisungen in umgekehrter Reihenfolge.
Um dein Gerät wieder zusammenzubauen, folge den Anweisungen in umgekehrter Reihenfolge.
Rückgängig: Ich habe diese Anleitung nicht absolviert.
36 weitere Nutzer:innen haben diese Anleitung absolviert.
Besonderer Dank geht an diese Übersetzer:innen:
100%


Diese Übersetzer:innen helfen uns, die Welt zu reparieren! Wie kann ich mithelfen?
Hier starten ›


23 Kommentare
Good guide, but not the end all - this guide doesn't accurately reflect how difficult the cameras and battery can be to remove. Also, if you are replacing the LCD+digitizer+frame, you will need to remove the LED, headphone jack, and vibration motor
Hello Jay! Thank you for your comment. I've added some of the details you mentioned to help our readers. Guide specifics can vary since it's not always possible to judge the state of a reader's particular device, but that's the beauty of a repair wiki! We can all pitch in and create a comprehensive guide.
You are correct—additional components and/or parts may need to be transferred or removed depending on the replacement. You certainly can remove the LED panel, headphone jack, and vibration motor, but it is not required to free the LCD screen and digitizer in this guide. The cameras are removed in this guide due to their fragility and the potential for component damage during the replacement.
Always research replacement kits and parts before ordering, and make sure you've got everything you need for a successful repair!
Richard -
This guide helped tremendously, things got a little confusing after step 10 (my replacement screen came with the frame, which I think is the better option). As Jay Miley pointed out there are several other steps required for moving components from the old frame (and unfortunately it's easy to overlook some of the smaller pieces), but it was still nice to have this guide to reference.
Hiya Craig! I'm glad to hear that your replacement went well even though you had the +frame replacement part. There are two screen replacement options for the 5X; the +frame replacement part for the 5X requires additional components and gaskets to be transferred from your old frame. I'll try to get a guide up for the LCD & digitizer +frame replacement part in addition to this guide.
Richard -
I had a pre-assembled screen / frame so the only real difference was:
* heatgun and remove headphone jack
* power / volume buttons also needed to be switched over (very small flat head screw driver to pop-up)
if you are having signal problems, and you got a new lcd/digitizer with a new frame:
you have to be 100% sure you have transferred ALL the shielding tape (grey/black metallic tape) from the old frame to the new frame
I thought I did and had signal issues still, until I realized I missed one -
There are two pieces of shielding tape UNDERNEATH the digitizer board (little rectangular board at bottom, that ribbon cables into your nexus 5x pcb underneath the battery).
these are very easy to miss.
once i added in those two pieces, my signal boosted to normal levels.
I apologize if im missing something in this guide, but why do you need to remove the cameras from the mid-frame if your just replacing the screen. seems like extra work?
Great question, Andrew! I personally removed these components due to their fragility. Smartphone cameras are often sealed with very small and delicate gaskets that can be compromised if too much heat is applied [during screen removal]. This can lead to a loss of waterproofing, an obstructed lens due to gasket movement, or damage to the lens itself. If you're comfortable skipping right to the screen assembly, go for it!
Richard -
The replacement itself isn't easy. But how you written how you have to remove the camera isn't very good. I tried to remove it with the spudger, but now the connector is broken for a part.
Now I’m looking where to buy a new camera :/
Same thing happened to me. Very frustrated.
Robert T -
If you’re replacing your screen, READ ALL THE COMMENTS:
There are two small rubber gaskets at the top of the phone for the proximity sensor (one rectangle gasket sitting directly on top of another gasket with two circle cutouts) — if you’re replacing your screen and you miss these two pieces you’re not going to be able to access your screen while a call is active (the screen goes completely black on a call, and it doesn't know when to turn back on if the proximity sensor doesn't work). I almost completely reassembled the phone before I tested this and realized the problem.
The other comments here about also transferring the LED, vibration motor, ear speaker, headphone jack, and power/volume buttons are accurate, but neglected to mention these rubber gaskets for the proximity sensor.
I did the frame replacement and now cannot get audio to work from the speaker. The headphones work well and i get ringtones to work but not audio from the earpiece speaker. I checked the connections and made sure all rubber gaskets were in place but still no luck. Any ideas anyone?
Hello, i’m having the same problem now. Followed the guide exactly, and no audio besides ringtones work. Am i missing something?
Thanks.
Hi, I just replaced my screen and am facing the same issue. Did you have any luck fixing it?
Found the solution to my problem. Apparently I must have pressed down on some pin when removing the headphone jack, causing the phone to think it always had some headphones plugged in. Inserting and removing some real headphones a couple of times fixed this. My audio is now working perfectly again.
For the life of me I cannot soften the glue to separate the glass from the LCD. I’ve heated the %#*@ thing up to the point you cant touch it with bare hands but when i put the suction cup on it wont budge - at all. its been driving me nuts for 3 days now. Has anyone else run into this?
Hi there,
Any chance you may have took details on the part number of LCD panel on the nexus 5x. I have a LCD panel from a motherboard dead 5x, i want to use it as display interfaced to my RPi, if possible. If i have part number i may be able to get the datasheet on that panel.
Thanks
I replaced my screen, but had a replacement screen/digitizer with the frame. Also, I did not have a heat gun available. The trickiest part was to get the battery out without heat. I ended up using the can opener/flat head screw driver of my Victorinox Swiss Army knife to get the battery out very carefully. Also, I used the Swiss Army knife’s minuscule flat-head screw driver (that sits in the corkscrew) to get the little components like vibrator motor, cameras and power/volume buttons out. Be careful to transfer all components from your old to your new frame. A few parts are not mentioned in this guide, like the various gaskets at the top as well as the notification LED at the bottom or the power and volume buttons. As mentioned, it is possible to do this without a heat gun - if you have a replacement screen that comes with the frame.