Einleitung
Diese Anleitung zeigt dir, wie du den Bildschirm des Nexus 6 wechselst.
Was du brauchst
-
-
Verwende ein SIM-Karten-Auswurfwerkzeug (eine Büroklammer funktioniert auch), um in das Loch am oberen Ende des Gerätes zu drücken und die SIM-Kartenhalterung zu entriegeln. Dies sollte nicht sehr viel Kraft erfordern.
-
Entferne die SIM-Karte und die SIM-Kartenhalterung.
-
-
-
Lege ein weiches Tuch auf deine Arbeitsfläche, um Kratzer auf dem Bildschirm zu vermeiden.
-
Verwende ein Plastic Opening Pick, um das Rückgehäuse aufzuhebeln.
-
Nimm das Rückgehäuse mit deinen Händen vorsichtig vom Rest des Geräts ab. Da das Rückgehäuse leicht verklebt ist geht dies schwerer als gedacht – wunder dich nicht, wenn sich das Rückgehäuse dabei leicht biegt.
Dave Lee on YouTube has a much more helpful note on removing the back cover. That video is available at: https://youtu.be/Yk1CGk0TZAw?t=1m20s
the adhesive is actually quite strong (mild is the wrong term here), even after lots of heat I still struggled to remove the back cover easily. BE CAREFUL of the volume/power flex cable at the side and top left, it is completely exposed when you attempt to pry the back plate off. I got lucky.
I would recommend using a utility kniofe (make sure you have a new blade) to pry open the back case just a bit, and then slide in a playing card, fingers, pick tool or whatever else you have.
The YouTube video note about sticking a needle through a hole in the SIM slot would have worked fine if I had a needle...
I second the method of getting the back off by inserting an appropriate shaft through the hole just inside the sim slot. I had zero success using suction cups or trying to get something into the edge at the bottom, but very easily pushed on the back from the sim slot hole enough to get a plastic spreader in. The YouTube video by David Lee shows this.
-
-
-
Entferne die 22 2,3 mm Torx T3 Schrauben.
Thanks for the heads up. about to start the surgery on the old baby. Turns out that on my phone its T3. Makes me wonder if they varied the screws from batch to batch at the factory, certainly looks like it
If you're using iFixit's tools then T3 should be the correct size, but T4 may work as well. There's probably a bit of variance in the sizes and manufacturing tolerances depending on who made your tools. Bottom line, try a T3 and if that doesn't feel right, move up a size (which is a good rule of thumb for any screw you encounter).
I got this kit: https://www.lowes.com/pd/Kobalt-73-Piece... as I thought I had bits small enough already, so didn’t order them with the battery. Rather than wait for shipping after finding out I was mistaken, I just ran out and grabbed this since it had T3 and T4 (nothing else I found in store or online for Lowes or Walmart did).
The T3 bit fit all my screws snuggly; the T4 bit was too big. So clearly, this is a “YMMV” based on the screws either being different depending on manuf. batch, or based on different tolerances between bits. Hence why I linked the exact one I used (Item #856840 @ Lowes).
After you take out the screw by the buttons, the retainer bar and buttons can fall out. I recommend you just explicitly remove the button retained and buttons, so they don’t fall out unexpectedly.
I tried T3, and then T4. Both of them stripped most of the screws. The screw quality is garbage. Just a heads up for anyone looking to try this. If your phone has over-tightened screws like mine, you’re SOL. I managed to get 5 screws out from the 22 total.
Really wish these comments were made more apparent when going through this guide, had 18 screws come free with T3 just fine, ended up with 5 that stripped the instant I turned my driver once with T3, T4 wasn’t enough to fill the gap, now they’re stuck and I’m out $75 from buying a new display for a device I can’t fix without last resort trying to Dremel a slot into the heads of these teeny tiny screws
-
-
-
-
Entferne mit einer Pinzette den Gummischutz unten rechts am Gerät.
-
Löse mit einem Spudger den freigelegten ZIF-Anschluss. Schaue hier für Infos, wie man ZIF-Anschlüsse löst.
-
Trenne die Akku-Seite komplett von der Seite mit dem Logic Board, indem du sie vorsichtig händisch auseinanderziehst.
This step MUST also include a note to disconnect the power and volume ribbon cable and cover at the top left of the device.
Hi Taylor. I just completed this guide and it was not required to disconnect the power and volume ribbon at this step. Both connected ribbon are part of the mid frame.
Gaetan -
Hi Gaetan, Taylor is right, you need to document that the power switch & volume connector (left top under the rubber) is to be disconnected from the motherboard when you disassemble. - Worse if you do not comment on it, this becomes an serious issue when you assembly the phone again! Most people will ignore the fact, they have to connect the cable again. Otherwise the power switch will not work. People will get mad, because they don't identify the root cause, why the phone does not start again), as the rubber does not show, the disconnected cable. It took my a least an hour before I worked through all connectors, after I already tried to run through all the 'Nexus 6 does not start' comments on the Internet, which aren't the root cause here.
Yes, I realised this after I’d put the phone back together and the power and volume ribbon cable had been disconnected in the process without me realising it. My Nexus 6 is nearly 4 years old now but the phone is back to new! Thanks for the advice guys.
The bottom right cable is not a ZIF (Zero Insertion Force) connector, it does not have a latch, the connectors are little copper clips and the connector needs to be pulled with some force upwards to disconnect.
This is definitely not a ZIF connector. Not only does it require a fair amount of force (relative to the connector size) to push on, it can be extremely stubborn to remove--especially with nearly two years of age on the fragile plastic available for pulling. There is a pull tab (of sorts) on the connector, but mine snapped right off. Luckily, the parts that are likely to break are all part of the battery assembly. The new battery comes with a new cable.
To separate the battery section and motherboard sides you don't pull up the black swiss cheese plastic cover, just run your fingernail along the side in between the blue metal and the black edge of the screen.
thanks a lot kevin you saved me. This guide should be a bit more precise...
guyom -
As Taylor said, by the camera lens there is another rubber peice, take that out and disconnect that cable, and make sure to reconnect it afterwards. That cable connects your buttons to the mobo.
I did exactly everything described in this guide and my Nexus 6 front camera still does not correspond with the camera app. Is there something I am missing and is there anyone else with a similar problem to mine. I am thinking of cleaning the connector with rubbing alcohol or something similar.
-
-
-
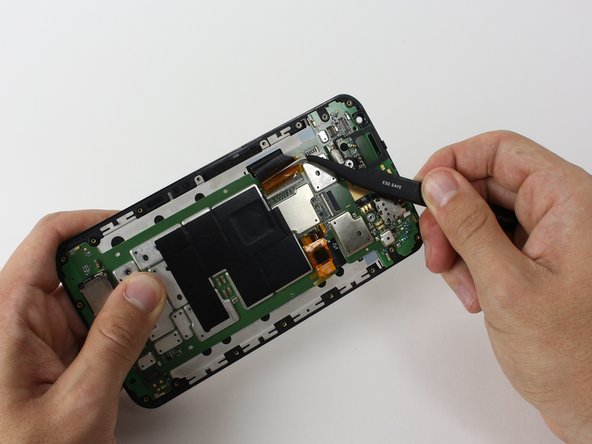
Löse mit einem Spudger den kleinsten ZIF-Anschluss in der Mitte. Schaue hier für Infos, wie man ZIF-Anschlüsse löst.
-
Lege das Kabel mit einer Pinzette frei.
It would be instructive to add that one needs to remove the whole ribbon assembly by lifting the whole thing from its semi-fixed position on the motherboard. I did so using the blunt end of a spudger to lift the two small flaps along the right edge of the motherboard and lifting the whole complex off the motherboard with tweezers.
-
-
-
Löse mit einem Spudger den kleinsten ZIF-Anschluss in der Mitte. Schaue hier für Infos, wie man ZIF-Anschlüsse löst.
-
Lege das Kabel mit einer Pinzette frei.
This ZIF connector is covered in amber anti-static tape, which needs to be released from the connector side before the ribbon can safely be pulled free.
The white/cream colored ZIF connector completely snapped off when I tried to close the connector after reinserting the cable. Be careful! Maybe I wasn’t gentle enough.
-
-
-
Entferne die 2,3 mm Torx T3 Schraube an der Oberseite des Geräts.
The aluminum bracket fell off freely from my phone. You will notice the photo in Step 10 doesn’t show the bracket.
-
-
-
Trenne den Bildschirm vom Logic Board.
Any chance of getting some further breakdown for the phones glass screen? In case someone happens to break theirs?
Is it possible to remove the lcd from the glass?In case only my glass broke can i replace just glass alone?
-


Arbeite die Schritte in umgekehrter Reihenfolge ab, um dein Gerät wieder zusammenzubauen.
Arbeite die Schritte in umgekehrter Reihenfolge ab, um dein Gerät wieder zusammenzubauen.
Rückgängig: Ich habe diese Anleitung nicht absolviert.
80 weitere Nutzer:innen haben diese Anleitung absolviert.
Besonderer Dank geht an diese Übersetzer:innen:
100%

Jasper Fleischhauer hilft uns, die Welt in Ordnung zu bringen! Wie kann ich mithelfen?
Hier starten ›
Team

Cal Poly, Team 70-3, Forte Winter 2015 Mitglied von Cal Poly, Team 70-3, Forte Winter 2015
CPSU-FORTE-W15S70G3
4 Mitglieder
30 Anleitungen geschrieben
8 Kommentare
its not antistatic tape its actually just Kapton tape and its ment only to protect the ZIF housing and keep the tabs from accidentally opening while being assembled along the line
Is there any way to buy just the digitizer if so where and how much
The digitizer and screen are a single unit. You can usually find the screen/digitizer for around $135-$140.
Si può sostituire solo il vetro esterno o tutto il display?
Shortly after I initially bought this device, there was a screen defect and I wanted to get it fixed. My insurance guided me to a local store that was ‘certified’ for Motorola device repairs. I talked to them on the phone before the trip, but when I got there, the tech freaked out and said, ‘The nexus 6 is the only one we don’t do because it’s so complex.’ Needless to say I was disappointed. My insurance then let me send it out to them and they took care of it. Well fast forward to last week when I cracked the screen and OMG!! All I could think about was that tech. Insurance coverage had lapsed so it was try on my own or fork over a kidney for something new. I was totally not looking forward to this. I found this guide and I can’t believe how easy it was to replace the screen!!! This was a life saver!!
Thank you so much!!
Reginald K.
One step is missing during reassembly. After putting the battery half back to the screen and securing the parts together with the 22 torx screws, remove the rubber protective cover on the upper left of the assembly and ensure that the power/volume flex cable is still connected to the board. Then reinstall the rubber cover and finish by installing the back of the phone.
There should be a step inserted between steps 5 & 6. Or an addition to step 5. *After releasing the small ribbon cable from the mother board, the piece just to the right of that small ribbon needs to be unsecured from the mother board as well. It is glued down and can easily be pulled from the board. I almost ripped it off of the because I thought it was supposed to remain attached to the mother board as that step is not documented here. If one is just going to throw the frame and digitizer away, this would not be an issue, but I am going to place it on another phone after replacing the front glass.