Einleitung
Ein zerbrochenes Display ist ein Schrecken für jeden Tableteigner. Diese Anleitung zeigt dir, wie man eine fehlerhafte, beschädigte oder zerbrochene Display Einheit (inklusive LCD und Touch Screen) austauscht.
Was du brauchst
Einführungsvideo
-
-
Führe vorsichtig ein Plastic Opening Tool am oberen Ende des Nexus 7 zwischen Vorder- und Rückseite ein.
-
Führe das Opening Tool am oberen Ende entlang, um die beiden Hälften des Nexus 7 zu trennen.
My Nexus 7 looks nothing like this. These instructions are horrible as they do not work.
someone help? my nexus looks completely different
-
-
-
Führe an der Seite in der Nähe des Power Buttons vorsichtig ein Plastic Opening Tool zwischen Vorder- und Rückseite ein. Löse so einige Klammern entlang der rechten Seite.
-
-
-
Führe vorsichtig ein Plastic Opening Tool an der linken Seite des Nexus 7 zwischen Vorder- und Rückseite entlang, so wie in früheren Schritten beschrieben.
-
-
-
-
Benutze die Spitze eines Spudgers. Wackle abwechselnd erst an einer, dann an der anderen Seite des Akkukabels, um es senkrecht aus seinem Sockel zu ziehen.
I have the newer version of Nexus and the battery connection inside is different from pictured here. I can't seem to get any part of the connector backed out. Any further details about how to accomplish this step?
After my post I tried it again, and realized the connector comes straight UP, not OUT. Once I went this direction, the process was simple.
I followed this, everything worked fine. Even though the battery is now charging, the OS doesn't recognise when the USB cable is connected to a wall socket or a PC. The battery icon when the tablet is shut down shows charging so it works, but the OS in itself doesn't seem to know about it...any ideas?
/D
Thanks for your guide. It makes the process very straightforward. Easier than I was expecting.
Yes, this is a really helpful guide. I wouldn't have had a clue without it, but it all turned out to be very simple. Thanks a lot!
Step 6 could be much clearer. I thought it meant to pry the connector upward, away from the surface. When I did this, all the pins broke off. The correct procedure would appear to be to slide the connector along the surface toward the wire side and battery, leaving the pins at parallel to the surface.
Unfortunately I don't think my Nexus 7 is salveagable now.
Watching a YouTube video helped. Dislodge the battery first, then pull the battery away from the connector and the connector will become dislodged quite easily.
-
-
-
Ziehe das obere schwarze Klebeband komplett vom Nexus 7 ab.
-
Ziehe auch das untere Klebeband ab, aber nur bis zur Kupferfolie.
-
-
-
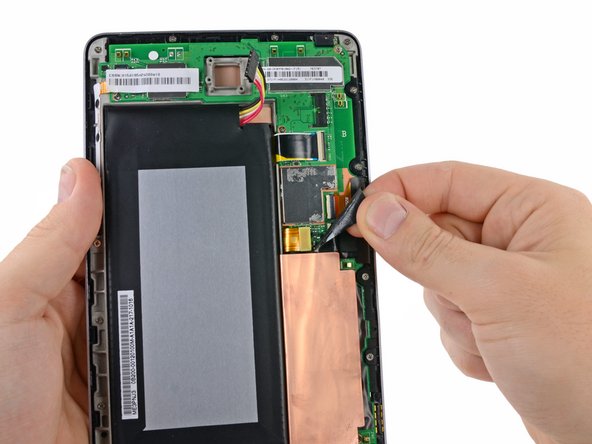
Benutze das flache Ende eines Spudgers, um das Displaykabel senkrecht nach oben aus seinem Anschluss auf der Hauptplatine zu ziehen.
-
-
-
Benutze das flache Ende eines Spudgers, um vorsichtig die Halteklappen an den ZIF-Anschlüssen des Touch Screen Kabels zu öffnen.
-
Benutze das spitze Ende eines Spudgers, um vorsichtig das Touch Screen Kabel senkrecht nach oben aus dem Anschluss zu ziehen.
-
-
-
Entferne folgende Kreuzschlitz Schrauben die die Displayeinheit am Metallrahmen befestigen:
-
Dreizehn silberne 3,2 mm Schrauben
-
Zwei schwarze 4,25 mm Schrauben
-
In 3G-Modellen sind die mittig oben liegenden Schrauben etwas tiefer und am oberen Ende der Hauptplatine.
-
Beachte, dass die Einheit des nicht 3G-fähigen Modells nicht in das 3G-Modell passt. Wenn du die Einheit für 3G suchst, schaue nach 'ME370TG' und achte darauf, dass in Bildern von der 3G-Version die oberen mittigen zwei Schrauben etwas tiefer sitzen als die rechts und links.
Hi, just tried to replace the display (but using the same frame). Got the original frame off the old lcd/digitizer combo and followed the rest of the steps on here. But now when I try to turn the nexus on I just get a red flash across half the screen and then nothing else. Any ideas what I did wrong/how to fix that?
-
-
-
Führe den Spudger am linken unteren Ende des Akkus ein.
-
Fahre nun mit dem Spudger nach oben, dabei löst sich der Kleber.
As well as missing screws, mine had no adhesive whatsoever holding the main assembly to the display. (I purchased my 1st gen Nexus 7 in the last month before the 2nd gen came out, so I'm guessing it was likely one of the last few produced. Perhaps that's related to the peculiarities?)
-
-
-
Drehe den Metallrahmen vorsichtig weg von der Display Einheit, achte dabei darauf, keine Kabel zu beschädigen.
-
Die Display Einheit bleibt übrig.
To remove the bezel from the LCD/Digitizer combo, just heat the bezel with a hair dryer or heat gun. You can see that in the following Youtube video: http://www.youtube.com/watch?v=OtIFkIKtY...
It's even to separate the digitizer from the LCD (even if most people say that it is not). See this posts on the XDA-Forum:
I put it face down on top of a toaster oven and toasted repeatedly. After four or five toasts most of the adhesive separated from the glass and I levered it off with one of those little tools in the iFixit kit. I was able to reuse the adhesive in the sense that it was mostly still intact.
I used a hair dryer to separate the plastic bezel from the screen/digitizer assembly. Work carefully and slowly and you'll get it. Some glass remained but tweezers and a hair dryer worked for those. Remember to put those shards someplace where they won't bow around next time you reheat with the hair dryer. Note also that the adhesive tape is sticky and sturdy. If it sticks to the old glass, you can heat, pull it off and stick it to the bezel before applying the new screen. All told, this repair went as well as I could expect.
I have used a heat gun and a hair dryer and i think the hair dryer is the best to use between the two. The heat gun gets too hot, i found this out by actually melting the plastic bezel and i had to order a new one.
-


Um dein Gerät wieder zusammenzusetzen, führe die Schritte in umgekehrter Reihenfolge durch.
Um dein Gerät wieder zusammenzusetzen, führe die Schritte in umgekehrter Reihenfolge durch.
Rückgängig: Ich habe diese Anleitung nicht absolviert.
227 weitere Nutzer:innen haben diese Anleitung absolviert.
Besonderer Dank geht an diese Übersetzer:innen:
100%

Diese Übersetzer:innen helfen uns, die Welt zu reparieren! Wie kann ich mithelfen?
Hier starten ›


43 Kommentare
great but where can i get nexus 7 digitizer, in stock reasonable price in uk please?
eBay is a good source. I paid £14 for mine and it came with tools.
I don't feel that this guide is complete, how do you separate the display from the frame?
That's because this guide is for the "Display Assembly". I just tried to remove the LCD itself, extremely difficult. I didn't succeed. Now looking for a whole assembly
I've managed to do it using a heat gun. Be careful not to apply to much heat as I warped the frame slightly in one place. Use a prying tool from the top rather than trying to push from the back as the glue is quite tough and peeling it away is easier. You need to reapply heat as you work, it then comes out quite easily. I repurposed the glue strips from the old screen, however taking out bits of glass was a bit tough. The new display fits neatly after that.
Nadim M -
I'm trying to replace the display assembly on a cellular model, and those two screws at the top/center don't exist. Instead, something else is holding it in place, and I cannot figure out how to release it!
If there are no more screws it is likely there is double sided tape that will eventually release. I seem to recall that on a non cellular device.
Scratch that, update on it.
Be warned, the display on the $200 16gb wifi model is NOT compatible with the 32gb cellular model. This does not work! Do not attempt to swap screens for these two, this is very important!
I just discovered that when I tried to replace a 3g screen with a non 3g device screen.
The comments do not show up yours should be on by default.
Dave
Dave -
When you are buying the display it does not mention for which model of nexus 7. Will that be a problem.
Hi there,
I just got this issue. I've got a 3g version and my replacement assembly has got a different layout for the screws at both short sides and one close to the sim-card tray. But is it just a mechanical issue or are they also electrical different? My hope is, that I can mechanically modify (remove wrong screw position with a plier). More than the half of the srew positions are ok.
Peter -
Ah, this happened to me. I have the 32GB 3G version of the N7, and bought the ifixit part listed above full screen+digitizer. All was going well until final reassembly and the screws don't match up. Maybe 1 or 2 of them. Just emailed ifixit support to see if I can swap the part, or if they even have this part at all. Anyone have a workaround for this?
Jack -
Is there any reason why, in step 11.12, that the battery is not removed for easier access to the adhesive on the copper?
To separate the display from the frame, I put them in boiling (or just hot) water for a couple minutes, and then gently pried them apart, starting with the thin edge. I put them back in the water every minute or so, since they were cooling off. All the adhesive stayed on the frame, and it was sufficient to stick the new display to the frame.
I accidentally tried to pry up the zif sockets, not the locking tabs, as it warns about - the locking tabs are the white pieces on the far end, not the black pieces over the cable. It took me less than an hour to do the repair, and I got the part for $85 direct from China. I also needed the display data cable from step 8, from the old display assembly - make sure to save it (it is in a zif socket, with retaining tab, on the display end).
Hi,have anyone manage to find a "display assembly" online that one can buy??
Is this guide actually for repairing the tablet or just taking one apart, leaving the display in the assembly?
I bought the LCD/digitizer on Ebay, the UK sellers are the cheapest.
After some forth and back mailing (the wrong address was used so the screen was shipped twice) I received it. The disassembly went smoothly although it took me a while to find out that the flat cables were locked in place with a retaining tab. Therefore I busted the data display cable. The screen came up in two halves, lots of snow, yellow or red. After straightening the display cable the screen was perfect but bending the cable back in place brought back the snow and discolorisation. For 10 Euro a new cable (also Ebay) and it works like a charm. Total cost 85 euro, 75 for the screen and 10 for the display cable.
Thanks for the guide.
I have changed the screen.... but it does not display the content right.
The tablet is responding to touches and it makes sounds. Sometimes you can see some forms like login but it is all completely scrambled.
http://s12.postimg.org/8hqaz43zh/DSC_011...
I have 3g model.
Anyone has an idea what might be the problem???
Hey
I have the same problem. Did you manage to solve it, or does anyone know how to solve this issue?
i also have the same problem.
my screen has a crack but on the bottom left and the crack stretches to just over the touch capcitive buttons.
the screen is responsive but becomes unresponsive for 1-2 minuter every 5 minutes or so.
so which parts should i bur and replace?
Digitizer?
LCD Panel?
Glass Screen?
pls help.
You need to buy and replace the LCD/Digitizer and Glass. You can buy the glass separately but i don't think it's worth the effort and cost savings for the average person.
My new screen did not have a ribbon cable so I pulled the one off the broken screen. It is NOT held in with a ZIF connector- just slide it back. When I got it all put back together, I though I had the wrong screen. I pulled it apart and adjusted the cable and faintly saw "Goo" on half of the screen. I then pulled the screws, and like a bad repair guy, left it hooked up and carefully moved my board while powering it on. There is an angle I can hold it at where everything will light up, but it won't stay on, so I went ahead and ordered a new ribbon cable. I've looked at my current cable with a microscope, and I can't really see a problem, but it is definitely there.
Summary - the cable is a friction fit, and very delicate. Even if it doesn't look broken, if you're having problems when you put it all back together, look at the screen under high light when you try to power it on. If you see any part of a "ghost image", try the cable. If you're wondering if the screen is the correct one, compare the numbers.
I have discovered that lots of replacement screens/bezels have screw holes that are incompatible with the screws from the original Nexus 7 2012. The screws appear to be of a different pitch from the new holes. Does anyone have specs on the screws required by all these new bezels? The sellers do not appear to have such information.
I've seen a video, where you remove the lcd+digitizer from the "replancement assembly" and then you can just use this part. I'm not sure, if there electrical identical, but there is no reason for.
Peter -
The bezel of the WiFi (ME370T) only version is far different than the 3G Version (ME370TG). I bought the wrong one, too!
Does this work with the 2nd generation Nexus 7? I'm seeing comments about it not working with the 3G one - is this the 2nd gen?
Fixed my nexus using this guide, and it works. That said, the guide is pretty good, but it might be good to include a step on disconnecting the LCD flex cable to use it on the new display assembly. I figured it out myself, but it would have been nice to have.
I'd just like to comment on a slightly different way i have done this digitizer replacement. I managed to remove the digitizer & LCD without actually undoing a single screw from the frame. I did it with the help of a normal, every day, rubber HOT WATER BOTTLE. I filled the Hot Water Bottle 1/3rd full of boiling water & sat the N7 on a sheet of polystyrene packaging. The kind your replacement digitizer is sent in. I then placed the Hot Water Bottle on top of the glass of the N7 & left it for around 15 minutes. Once the heat had transferred through the glass & the frame, i then gently lifted the glass with one of the triangle plectrums & very gently slid it around the joint between the digitizer & the bezel. When i came to a section that was difficult to separate i left the plectrum in place & returned the N7 to the Hot Water Bottle for a few minutes to reheat the adhesive. Then tried to move the plectrum again.
Once getting to the corner of the bezel i left the plectrum in place & used another to continue my run. I did this up until the next corner & repeated the reheating & using another plectrum until there were 3 in each corner. When i put the 4th plectrum under the glass i returned the N& back to the Hot Water Bottle & then released the Digitizer cable & the LCD cable from their respective connectors. While the N7 was still warming i then gently separated the charging cable from the adhesive that was on the underside of the LCD.
I did have to refill the Hot Water Bottle once, so's to keep the temp high. Then i turned the bezel & screen over & used a medium sized sucker to gently pull the loosened screen from the bezel. Keeping an eye on the ribbon cables so they didn't snag as the lot came away. The only trouble i had was the lower part of the screen assembly required a little coaxing with my scalpel due to the thickness of the adhesive there. But everything came away easily.
gazza667 -
If the digitizer is broken but not the LCD panel, should I still replace the whole assembly including the LCD panel or just the glass plate and digitizer? I'm asking because the digitizer + glass is quite cheap without the LCD but it might be harder to replace if I want to use my original LCD panel. Can anyone advise me on how doable this is?
This guide is missing critical information.
I only found this out after my LCD and DIGITIZER shattered while I was trying to separate them. While dealing with the millions of tiny glass shards, I threw away too much. Without good info, ordering replacement parts was guesswork.
So, it is important to realize that, if you need to buy replacement parts, the following are all distinct from one another:
1. LCD display (only visible in step 13 above)
2. DIGITIZER (glass surface)
3. FRAME (or bezel, that holds everything together)
4. LCD RIBBON CABLE (discussed in step 8 above)
You can buy an "LCD ASSEMBLY," which includes the LCD and DIGITIZER as one unit, but it will not include either a FRAME or RIBBON CABLE.
The original metal FRAME is likely much nicer than any replacement you can find (which will probably be plastic). You should try to save it at all costs. The RIBBON CABLE is easy to remove and save, if you think to do it.
These are important things to know.
Finished putting new screen put on, but it has dead spots like it won't respond to touch, looks fine though, could this be a loose connection? Maybe it was just dropped too hard before I replaced it.
Thanks for the guide, it was very helpful!
BTW I used the hair dryer and guitar pick to lever the glass away from the bezel, it was slow but worked well and kept the bezel in perfect condition, the adhesive tape too. There's a bloke on YouTube called Andrew McNeil who shows how it's done, a useful complement to this guide.
Suggestion for those like myself, who own Nexus 7 3G versions (the ones that use SIM cards), not the WiFi only versions -- Unless you are very patient and have the skills to use the heat gun or blow dryer to remove the glass LCD from the bezel frame, DO NOT BUY the screen assembly part listed here, which is the complete assembly for the Wifi version of Nexus 7, 2012. The 3G screen assembly is not sold on iFixit.
You'll see a note for this part that if you have the 3G tablet you'll need to remove the glass from the assembly, and reattach to your original bezel frame. I underestimated how tough that process was to be. I personally had a tough time with the process of separating the glass LCD from the bezel frame, and cracked the new glass!
Others have commented already, that the plastic bezels & frame piece, have different screw placements between the 3G and WiFi versions.
I found a complete screen assembly w/frame for 3G version on Ebay, for roughly $32-37 and will give that a try.
replace touch screen on nexus 7 2013 and all looks good, but screen is not responsive. Any Ideas/
In the last stage using a hairdryer at high heat mode works well to remove the LCD from the touch panel. Heat it for 5 minutes and one can remove it without the use of any tools just by hands, but be careful or else you may break the LCD or its contacts. Heat it properly on the corners.
By the way can anyone suggest from where to buy the full dispay assembly at cheapest price or is anyone having dead nexus tab with working display assembly?
Nexus 7 (2012) Gen 1 tablet
16 GB WiFi
ME370T- Model
https://ru.aliexpress.com/item/For-ASUS-... ,958 RUB=16 USD
Mine doesn't look like this. There is no metal band around it. The only opening looks like its between the front glass and back which is on the front. I'm afraid to try it for fear of breaking it. Any suggestions?
Kim McCauley - Antwort
There is no front or rear panel. There’s no sign of any seam whatsoever. The front and back are one solid piece of plastic.
Proud Liberal - Antwort