Einleitung
By following these nine simple steps, one can successfully replace the multi selector wheel of the Nikon COOLPIX P7700 camera after having removed the casing.
Was du brauchst
-
-
Turn camera to the left side and remove the two 4.3 mm black side screws using the Phillips #00 screwdriver.
-
Remove the side panel.
-
-
-
Open the touch screen, and remove the three 4.3 mm black screws inside using the Phillips #00 screwdriver.
If you fix the p7800, the right down screw is different, its not a countersink, its flush.
-
-
-
Remove the 4.3 mm black screw on top of the camera, right above where the screen folds out. Use the Phillips #00 screwdriver.
-
-
-
Remove the two 4.3 mm black screws on the right side of the camera using the Phillips #00 screwdriver.
-
-
-
Remove the 4.3 mm black screws on the bottom of the camera using the Phillips #00 screwdriver.
-
-
-
Begin separating the camera into two parts.
This is the most scary moment as I did not know how to remove the orange flat cable. I would not come off and I broke off a little plastic. Somehow it came off accidentally as I moved the backcover. The cable was later re- inserted with care, from the right towards the left via a very thin slit.
"It is okay to remove the orange ribbon. This will be easily put back into place when re-assembling." Easily put back? Yeah, right (not!). It is actually anything but easy. I managed doing it after several attempts, but it was more by luck than skill. The ribbon is tiny, the contacts even more so and the slot into which the ribbon must be reinserted - I cannot even see it properly. A pair of small tweezers is a must for this step.
-
-
-
Remove the back casing.
Step 4: I had to remove the blank screw as well..
Hi,
Thank you for your most professional advice.
How can I clean the sensor??
-
-
-
Remove the four 4.3 mm screws located on the far right metal plate. Use the Phillips #00 screwdriver.
-
-
-
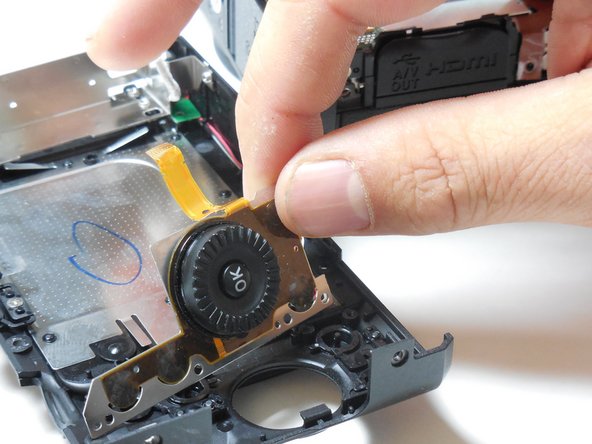
Remove and replace wheel.
No need to replace the wheel assembly. Just use a spray for cleaning electronic parts eg WD-40 specialist contact cleaner (not the oily one) or CO2 spray, to spray generously through the gap at the wheelbase, whilst rotating the wheel. This removes dirt, etc. and it should work very well. Save you a lot of trouble in getting a replacement and you can do it again in a year or two.
My P7700 has epileptic fits in some mode settings, with the ev and other dispayed values changing all on their own. Do you think this sounds like a dirty mode ? It can have these fits in any mode setting, but seems much less likely in U1,2,3..... While I try the mode switch cleaning, what other cleaning might help ? I have a magnifier that will help me look for broken pieces or fuzz that got it critical spots.
I have provided above some comments regarding the cleaning of the multi-function control wheel. Since then, the downward position of the control wheel has been found to be inactive. Based on the past experience, I have since found a better way of "fixing" the erratic/ inactive behavior of the wheel (that could apply to the other wheels eg mode setting, etc.). The core problem is suspected to some dirt getting into the wheel mechanism (through the side gaps). After some experiments here is the "general" fix: get a can of fast-drying contact cleaner (CRC or WD40, not the oily one). It comes with a thin red plastic nozzle tube. Now remove the battery and SD card, and then flip the monitor LCD out and hold the camera vertically ie the control dial being on the downside (to avoid spilling any cleaning fluid into the lens or the LCD). Now spray into the gaps of the wheel, push buttons and where your problem occur. Keep the room well ventilated. After the generous spray, vigorously operate the wheel and buttons.
I thought that I had to throw away the P7700 since it was such a headache, but now I really love it (after further discovering the wide range of capabilities eg color control, rapid shooting, etc. that could be set from the control wheel at the top (left side). Previously I just use the basic functions since I have many other cameras, but having discovered the quick fix and additional features, I wish I could buy another one. All the erratic symptoms could be caused by a weak design of the control wheels (eg those on the Casio EX-100 /100F are so much more robust than those on the P7700, but similar control wheel problems occur on my Samsung EX-1). I have also problems with the Play button on the P7700. I sprayed into the side gaps and vigorously operate the button. Now it is behaving obediently.
-


To reassemble your device, follow these instructions in reverse order.
To reassemble your device, follow these instructions in reverse order.
Rückgängig: Ich habe diese Anleitung nicht absolviert.
7 weitere Nutzer:innen haben diese Anleitung absolviert.
Team

Colorado Springs, Team 2-7, Panko Spring 2015 Mitglied von Colorado Springs, Team 2-7, Panko Spring 2015
UCCS-PANKO-S15S2G7
3 Mitglieder
10 Anleitungen geschrieben
8 Kommentare
Step 9: I believe that the multi-selector wheel component is soldered, 3 wires just visible in the photo for step 8. This will surely add to the time taken and difficulty.
I have a problem with this component. Firstly it's almost impossible to obtain the replacement parts, but if I could this guide would be invaluable; pictures are worth a thousand words! Thanks.
where can I get the item ( wheel ) ?
Best regards and thank you for the good explanation
Where i can find this wheel for replacement?
Please see my comment on the "general" method of fixing the wheel (using fast-drying contact cleaner) without ANY component replacement or unscrewing. It works really well but you may have to do it 1-3 times until all the dirt inside the wheel mechanism is removed. I have managed to restore my P7700 (after "fixing" the erratic Control Wheel and the dis-obedient Play button). Since then I have used the same method to fix the control wheel on my Samsung EX-1 camera (the control wheel was replaced twice by Samsung but the problem came back after a year or so). The root cause is probably a weak control wheel design (maybe tiny metal springs rotating over a base-plate with printed circuits). Now I know how to save money and trouble (for any compact camera with a similar control wheel design).
Thank you for your tip about the contact cleaner. It worked beautifully, without even taking anything apart. I guess the button contacts just got dodgy and didn’t work right any more. To anyone that has the same problem: try the contact cleaner method! it worked for me, no replacemet parts needed.