Zum Hauptinhalt wechseln

Nikon Coolpix S3100 Camera Disassembly

Was du brauchst

  1. Nikon Coolpix S3100 Camera Disassembly, Nikon Coolpix S3100 disassembly: Schritt 1, Bild 1 von 3 Nikon Coolpix S3100 Camera Disassembly, Nikon Coolpix S3100 disassembly: Schritt 1, Bild 2 von 3 Nikon Coolpix S3100 Camera Disassembly, Nikon Coolpix S3100 disassembly: Schritt 1, Bild 3 von 3
    • Remove 8-2.46 mm screws from both sides and bottom of camera using a #000 Phillips screwdriver.

    • Remove 2 screws from left side. (picture 1)

    • Remove 4 screws from bottom. (picture 2)

    • Remove 2 screws from right side. (picture 3)

  2. Nikon Coolpix S3100 Camera Disassembly: Schritt 2, Bild 1 von 2 Nikon Coolpix S3100 Camera Disassembly: Schritt 2, Bild 2 von 2
    • Remove black cover pulling up with left thumb. Hold silver cover with right thumb.

    • Remove silver cover lifting up with left thumb. Hold the camera with right thumb.

    • Once internal circuit board is exposed, the red and blue wire terminals at top center can provide a nasty shock from the charged flash capacitor (silver can to left of terminals). BE CAREFUL!

  3. Nikon Coolpix S3100 Camera Disassembly: Schritt 3, Bild 1 von 2 Nikon Coolpix S3100 Camera Disassembly: Schritt 3, Bild 2 von 2
    • Remove 2-2.10mm screws in the front of the camera using a #000 Phillips screwdriver.

    • Remove the two screws.

    • Gently pull up to detach the frame. (picture 2)

  4. Nikon Coolpix S3100 Camera Disassembly, Nikon Coolpix S3100 Camera Disassembly: Schritt 4, Bild 1 von 2 Nikon Coolpix S3100 Camera Disassembly, Nikon Coolpix S3100 Camera Disassembly: Schritt 4, Bild 2 von 2
    • Remove 2-2.10mm screws using a #000 Phillips screwdriver.

    • Gently pull the orange board to the right. (picture 2)

  5. Nikon Coolpix S3100 Camera Disassembly: Schritt 5, Bild 1 von 3 Nikon Coolpix S3100 Camera Disassembly: Schritt 5, Bild 2 von 3 Nikon Coolpix S3100 Camera Disassembly: Schritt 5, Bild 3 von 3
    • Lift screen up holding the corners.

    • Gently pull to the left to release from ZIF connector. (picture 2)

    • Gently pull the orange board to the right. (picture 3)

  6. Nikon Coolpix S3100 Camera Disassembly: Schritt 6, Bild 1 von 2 Nikon Coolpix S3100 Camera Disassembly: Schritt 6, Bild 2 von 2
    • Remove 4-2.10mm screws using a #000 Phillips screwdriver.

    • Gently pull the shutter up. (picture 2)

  7. Nikon Coolpix S3100 Camera Disassembly: Schritt 7, Bild 1 von 2 Nikon Coolpix S3100 Camera Disassembly: Schritt 7, Bild 2 von 2
    • Lens is now separated from body.

    • Remove 3-2.12mm screws using #000 Phillips screwdriver.

  8. Nikon Coolpix S3100 Camera Disassembly: Schritt 8, Bild 1 von 3 Nikon Coolpix S3100 Camera Disassembly: Schritt 8, Bild 2 von 3 Nikon Coolpix S3100 Camera Disassembly: Schritt 8, Bild 3 von 3
    • Use a nylon or metal spudger to release the lens.

    • Repeat step 4 to the opposite side of the lens. (picture 2)

    • Lens is now separated from metal.

  9. Nikon Coolpix S3100 Camera Disassembly: Schritt 9, Bild 1 von 3 Nikon Coolpix S3100 Camera Disassembly: Schritt 9, Bild 2 von 3 Nikon Coolpix S3100 Camera Disassembly: Schritt 9, Bild 3 von 3
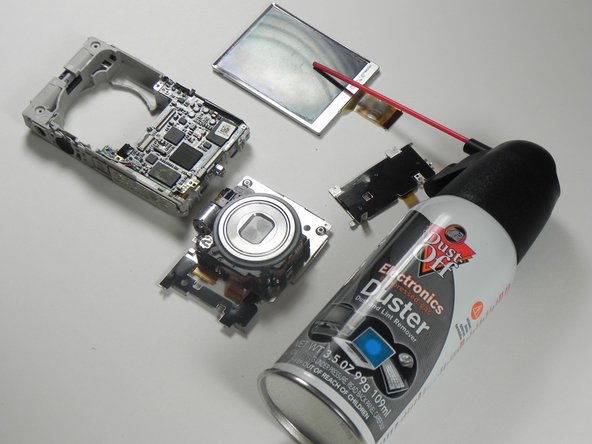
    • Once you have all the parts separated, start cleaning them with an air compressor bottle. (as shown)

    • Using the provided straw, start spraying the parts. (pictures 2 and 3)

Abschluss

To reassemble your device, follow these instructions in reverse order.

2 weitere Nutzer:innen haben diese Anleitung absolviert.

Jorge

Mitglied seit: 03/11/15

1.170 Reputation

7 Anleitungen geschrieben

Team

Colorado Springs, Team 2-4, Panko Spring 2015 Mitglied von Colorado Springs, Team 2-4, Panko Spring 2015

UCCS-PANKO-S15S2G4

2 Mitglieder

13 Anleitungen geschrieben

Ein Kommentar

accidentally touched the wires for the cap even though i read the warning, can confirm, not fun

zettabyte - Antwort

Kommentar hinzufügen

Seitenaufrufe:

Letzte 24 Stunden: 1

Letzte 7 Tage: 5

Letzte 30 Tage: 35

Insgesamt: 2,973