Zum Hauptinhalt wechseln

Nikon Coolpix S6300 Display Replacement

Was du brauchst

  1. Nikon Coolpix S6300 Display Replacement, Battery: Schritt 1, Bild 1 von 1
    • Place the camera facing upwards.

    • Press down on the battery cover and slide towards the front face of the camera.

  2. Nikon Coolpix S6300 Display Replacement: Schritt 2, Bild 1 von 1
    • Rotate the orange battery clip in the camera to release the battery.

  3. Nikon Coolpix S6300 Display Replacement, Buttons: Schritt 3, Bild 1 von 3 Nikon Coolpix S6300 Display Replacement, Buttons: Schritt 3, Bild 2 von 3 Nikon Coolpix S6300 Display Replacement, Buttons: Schritt 3, Bild 3 von 3
    • Locate the eight outer PH 2mm screws on the device.

    • Using the PH00 screwdriver remove all of the screws from the camera.

  4. Nikon Coolpix S6300 Display Replacement: Schritt 4, Bild 1 von 3 Nikon Coolpix S6300 Display Replacement: Schritt 4, Bild 2 von 3 Nikon Coolpix S6300 Display Replacement: Schritt 4, Bild 3 von 3
    • Using a plastic opening tool, gently pry off the front and rear plates.

    • Be patient with this step, do not force the clips holding the plates together.

  5. Nikon Coolpix S6300 Display Replacement: Schritt 5, Bild 1 von 1
    • Using a Phillips #00 screwdriver, remove the PH 2mm screw located to the right of the screen, above the OK dial.

  6. Nikon Coolpix S6300 Display Replacement: Schritt 6, Bild 1 von 1
    • Remove the two clasp using a plastic spudger

    • Be careful when removing the clasp to prevent ripping of the clasp

  7. Nikon Coolpix S6300 Display Replacement: Schritt 7, Bild 1 von 1
    • You may now remove the internal panel of the buttons

  8. Nikon Coolpix S6300 Display Replacement, Display: Schritt 8, Bild 1 von 1
    • Remove the clasp from the ribbon cable using the plastic spudger.

    • Make sure to be gentle when removing the clasp to prevent it from ripping.

    • You may now remove the display.

Abschluss

To reassemble your device, follow these instructions in reverse order.

Hung

Mitglied seit: 09/01/15

383 Reputation

2 Anleitungen geschrieben

Team

USF Tampa, Team 1-2, Remmell Fall 2015 Mitglied von USF Tampa, Team 1-2, Remmell Fall 2015

USFT-REMMELL-F15S1G2

5 Mitglieder

10 Anleitungen geschrieben

2 Kommentare

Step 8 could have better pictures and explanation of the clasp...or picture of the clasp. I think it was some white tape looking stuff that I did break. Looking for better instructions elsewhere. I think I just made the situation worse

Lisa F - Antwort

I have this problem with my coolpix (see images and video):

https://i.postimg.cc/pXk2L4QB/20190201-1...

https://i.postimg.cc/d3wYqjLX/20190201-1...

https://i.postimg.cc/RCLmgyYz/20190201-1...

https://drive.google.com/file/d/1sDr8fPD...

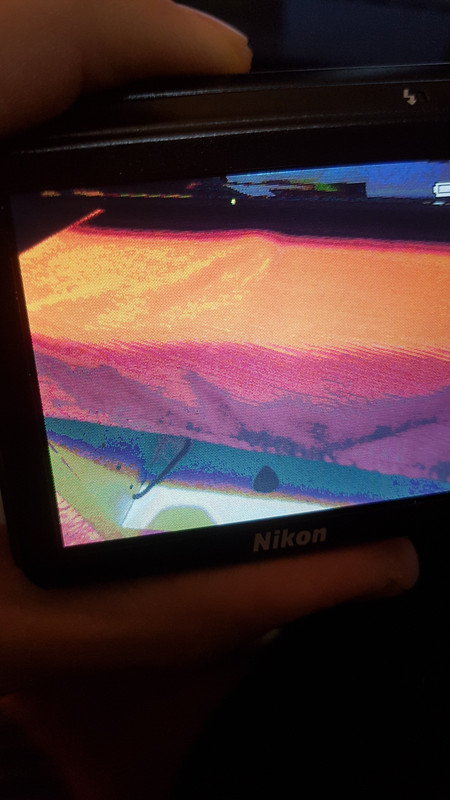
Screen has a posterized effect.

I already replaced the screen with a new one, but the problem remains..

Any idea what is faulty, and how can I fix it?

Geo Nik - Antwort

Kommentar hinzufügen

Seitenaufrufe:

Letzte 24 Stunden: 0

Letzte 7 Tage: 3

Letzte 30 Tage: 16

Insgesamt: 1,407