Einleitung
Ich entschloss mich dazu, zu lernen wie man eine Nintendo DS Lite repariert, da kaputte Nintendos billig auf eBay erhältlich sind (Stand 2017).
Nachdem ich an ein paar Dutzend Geräten gearbeitet habe, fiel mir auf, dass viele Leute Fehler machen. Deshalb habe ich diese Anleitung geschrieben, um sicherzugehen, dass du Gerät bei der Reparatur nicht beschädigst.
Alle Probleme, die mir bei einer DS Lite bisher untergekommen sind, können mit Ersatzteilen von knapp 2 Euro (wenn du einen neuen Digitizer brauchst) bis zu rund 10 Euro (falls du das Motherboard einer anderen Einheit brauchst) repariert werden (Preise von 2017). Die Preise sind seit 2017 gestiegen. Dennoch ist es immer noch relativ rentabel DS Lites zu reparieren.
Nachdem du gelernt hast, wie man den DS Lite zerlegt, solltest du in der Lage sein jede Nintendo Handheld Konsole (GameBoy, GameBoy Color, GameBoy Advance, DS, DSi, DSi XL, 3DS, 3DS XL, New 3DS XL, Switch, und Switch Lite) angehen zu können.
Ich habe diese Techniken selbst mehrfach erfolgreich eingesetzt, um diese Konsolen zu zerlegen und betreibe zeitweise einen eBay Shop, wo ich diese reparierten Konsolen verkaufe.
WARNUNG: Versuche niemals ein elektronisches Gerät zu zerlegen, solange der Akku noch verbunden ist (unmöglich für den DS Lite) oder ein Stromkabel verbunden ist.
Was du brauchst
-
-
Das häufigste Problem mit dem Nintendo DS Lite ist ein kaputtes Scharnier. Ein neues Gehäuse kannst du für etwa 10 Euro direkt in China kaufen.
-
-
-
Entferne die Schrauben des Batteriefachs mit einem PH000 Bit. Möglicherweise musst du das Akkufach aufbrechen, da die Abdeckung mit der Zeit verklebt. Das Fach ist oft ziemlich eng, also musst du eventuell den Akku mit dem Spudger vorsichtig heraushebeln.
-
-
-
Sehr oft sehe ich diesen Teil der DS Lite beschädigt. Folge diesen Schritten, um die Füße zu entfernen, ohne sie kaputt zu machen.
-
-
-
Entferne die zwei goldenen Schrauben unter den Gummifüßen und die zwei silbernen Schrauben im Akkufach mit dem PH000 Bit. Als nächstes entferne die drei silbernen Schrauben und die kleine schwarzen Schraube mit dem Y00 Bit. Lege den Y00 Bit auf die Seite, wenn du mit ihm fertig bist.
If you get an essential starter tool kit then the Y000 bit is to small for the Y00 however if you plan on getting more bits you can file down the Y000 bit and it works perfect.
-
-
-
Durch unvorsichtiges Entfernen des Gehäuseunterteils entsteht oft einiger Schaden, also nimm dir Zeit und fahre vorsichtig mit dem Plastik Spudger am Rand entlang. Scheint das Gehäuseunterteil angeklebt zu sein, dann entferne es, wenn das Gerät geschlossen ist, so kannst du Kratzer am Bildschirm vermeiden.
-
-
-
Greife und entferne vorsichtig die Schulterknöpfe. Versuche, die Federeinheit zusammenzuhalten, damit du kein Teil verlierst. Ohne funktionierende Schulterknöpfe wäre der DS Lite ziemlich nutzlos. Der Draht der Feder kann durch die Haut stechen. Vorsichtig arbeiten. Bitte tragt immer Schutzbrillen, um jegliche Verletzungen zu vermeiden.
It's recommended to hold the springs with tweezers to protect your hands, because the springs have really sharps edges that can easily puncture your fingers.
-
-
-
Du solltest die WLAN-Platine entfernen, sonst riskierst du Schäden am Digitizer. Ist mir ein paar Mal passiert. Ziehe fest an der Platine, der Kleber ist sehr stark. Du kannst auch versuchen, die Tochterplatine mit Alkohol oder Wärme zu lösen, ich halte das für risikoreicher und habe es nie so gemacht.
What do you mean by "Damage the digitizer"? Is it required to be removed first electrically somehow? Could you please be more specific?
Based on the next step, they probably mean pulling it out too harshly could cause damage to the connector right above it (and the digitizer's ribbon cable)
elwood -
No matter what I do or use, the doughterboard is not coming off. It can be detached from its slot, but its glued extremely hard to the board
-
-
-
Löse den Stecker am Flachbandkabel des Digitizers vorsichtig von dieser Seite mit einem geeigneten Werkzeug. Arbeite langsam und so vorsichtig wie möglich, der Stecker ist empfindlich und geht leicht kaputt. Der Digitizeran dieser Konsole muss rechte oft ausgetauscht werden, es ist sehr empfehlenswert zu lernen, wie das geht.
How do you safely get the cord back in on reassembly
RE: I answered my own question. It’s easiest when the motherboard is screwed back in. Use a plastic needle nose tool to lift the cord out from under the motherboard if it gets trapped. Then face the gameboy end of the device away from you. Make sure the plastic tab is perpendicular to the board. I used the same tool from earlier to adjust the cords height while I nudged it back into the slot. Hope this helps someone that got stuck in the same way.
Step 17 below has the routing of the white wire.
you said you broke 3 of these tabs for the flex, where could I get a replacement?
I found the connector. Look for "NDSL touch screen ribbon port socket" on Ali Express. At the time of this writing,10 pieces for $4.01 with $2 shipping to the US. Make sure you buy at least a handful, and it helps to use a digital microscope.
What is actually being removed here? Is it the small black piece? That seems too be soldered in, though.
I'm gently lifting the small black or dark colored plastic clip. Not removing the lower display module---yet!
-
-
-
Entferne die letzte Schraube, die das Motherboard festhält.
-
-
-
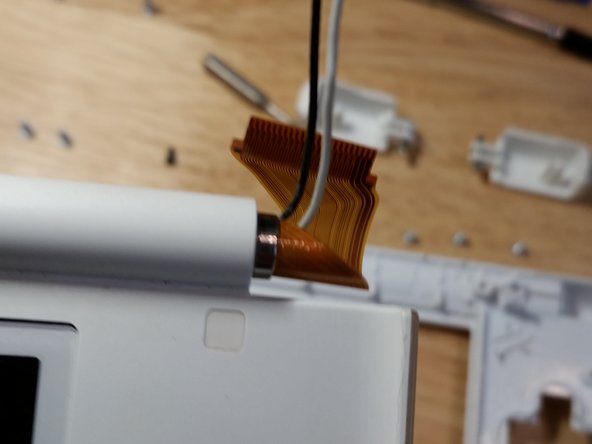
Drehe das Motherboard wie gezeigt um. Sei vorsichtig, da das Flexkabel sehr fragil ist. Beachten die chinesischen Schriftzeichen aus der Nintendo Fabrik.
-
-
-
Entfernen das Flexkabel mit dem Fingernagel. Benutze keinen flachen Bit, da dieser den Anschluss beschädigen könnte. Entschuldige das schlechte Foto, der Schritt ist aber klar. Im vorigen Bild ist es aber gut zu erkennen.
The flat end of the Halberd Spudger is good for this.
For such a critical step this is quite an awful picture… I have no idea what you’re lifting up/sliding
Hi, Marcus, you're no doubt looking at this picture in isolation. If you had a console in front of you it would be more obvious: Use your fingernail to lift the ZIF locking tab. I recommend that you don't use a metal tool for this, but a high quality plastic spudger might work. The iFixit spudger is too thick for this.
Well this was akward. I managed to pull the entire connector from the motherboard. I won't even try to solder this. Where can I get a replacement? EBay?
Before buying a new connector, i'm worried about your motherboard because if you have ripped out the entire connector of it, there is a very high chance that you had ripped out some soldering pads with it, making repair the console much more complicated.
Nothing -
-
-
-
-
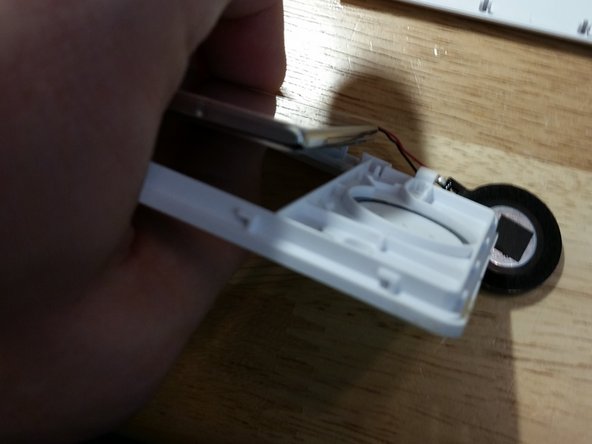
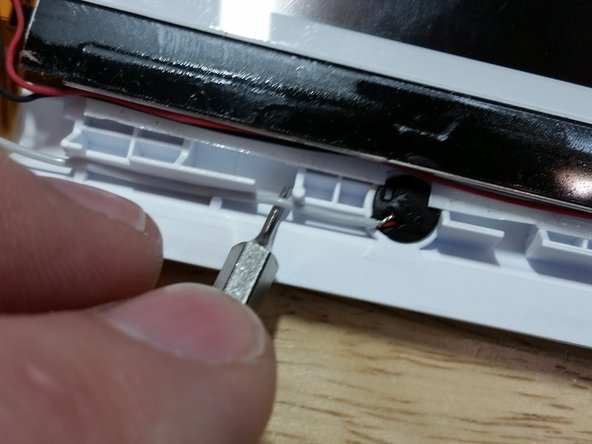
Entferne dieses schwarze Kabel. Du musst es herauswackeln. Neben dem Scharnierproblem ist dieses Kabel eine der doofen Konstruktionen im DS Lite, es ist auch schwer wieder anzuschließen.Versuche nicht, mit dem DS Spiele Slot herumzuspielen. Mit etwas Geduld kommt das schwarze Kabel heraus und wird auch später wieder angeschlossen werden.
I tied a piece of small ribbon around the black wire and pulled it through when I removed it so that I could pull it back when I’m done
Hey, I’m 14 and have been doing this for around two years and I’ve fixed and resold around 15 Nintendo ds lites but I keep forgetting what the black wire is called and the purpose of it is, could you tell me?
Hi, this cable connects the Wi-Fi module of the console to its antenna and it is called "Wi-Fi antenna", because the other part of the cable is soldered directly to the antenna
Nothing -
-
-
-
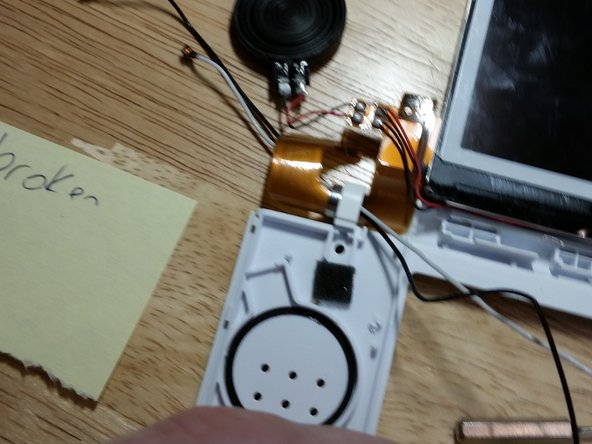
Merke dir, wie das weiße Kabel verläuft. Du musst es beim Zusammenbau genauso wieder einbauen. Entferne es jetzt. Achte darauf, dass das Flachbandkabel zum Digitizer wirklich abgelöst ist. Wenn nicht, musst du das vorher erledigen.
Do not remove the digitizer cable. Its a &&^&^$^ nightmare to reinstall and is completely unnecessary when doing a case swap. I’m basically having to replace the console due to following this step'.
Definitely do be careful. The digitizer is almost always worn out on the DS Lite, though, and it is a common repair. See step 8 for the recommended way to lift the locking tab using a small flathead bit.
-
-
-
Löse das Kabel aus dem unteren Anschluss. Nimm dazu wieder den Fingernagel, wie bei dem oberen Bildschirm.
-
-
-
Entferne die Gummi- und Plastikknopfeinheiten. Dieser Schritt ist ziemlich einfach, aber pass auf, dass du kein Teile verlierst. Jedes Plastik- und Gummiteil kann sofort in heißem Seifenwasser gewaschen werden. Kaputte Teile werden gleich ersetzt.
-
-
-
Dies ist der Hauptentwicklungsfehler der Nintendo DS Lite. Die Scharnierpartien sind viel zu zerbrechlich. Hebe die Schrauben, das Metall und die Plastikteile auf, wenn du das Gehäuse ersetzt.
-
-
-
Der häufigste Grund, warum sich die DS Lite nicht mehr ordentlich zusammenbauen lässt, ist dass dieses weiße Kabel nicht korrekt verlegt ist. Folge dem Schema auf dem Bild, wenn du das Gerät wieder zusammenbaust und die Nintendo fühlt sich an, wie frisch aus der Fabrik.
Wire routing is definitely something I tend to forget to note during disassemblies. Great write up.
Side note, the white wire in mine is slightly pinched and it was definitely not routed exactly this way. Must have been a Monday or a Friday at the factory, because I bought it new and this is the first time I have opened it.
-
-
-
Stelle sicher, dass beide Kabel durch die Mitte des Flexkabels verlaufen und verlege dann das Flexkabel durch den Schlitz. Das Flexkabel ist extrem fragil, aber es wurde in späteren Modellen verstärkt. Nimm dir Zeit für diesen Schritt, auch wenn es 10 Minuten dauert. Das ist es Wert, um zu verhindern, dass das Kabel beschädigt wird.
In case anyone else struggles with this, i found it easiest to pull the lower face piece just so you could see a space between it and the metal piece. I gently pulled the wires out, being very careful to not let them pull against the flex cable, before sliding the flex cable through the small slit in the plastic piece to separate them.
-
-
-
Nimm den kleinsten Flachkopfbit, fahre damit unter den Kunstoffpropfen und hebe sie heraus . Es ist fast unmöglich dabei den ABS-Kunststoff nicht zu verkratzen. Mit einer Rasierklinge hatte ich letztens mehr Glück.
-
-
-
Heble die obere Abdeckung mit einem Nylonsspudger hoch. Entferne nicht die Gummiteile auf der Seite oder spiele an ihnen herum. Sie müssen nicht entfernt werden, sie gehen sonst leicht kaputt oder verloren . Wie in den Kommentaren geschrieben, verschiebt sich das Display 1 - 2 Millimeter nach unten, so dass sich die Teile leicht trennen lassen.
This part is extremely delicate! I Snapped small chips off the top of my unit 3 times. Thankfully I’m only stripping it to put it in a brand new case. I suggest running an opening pick along the edge. They’re so thin and plastic they work quite well here.
I found a simple trick to make the disassembly of the top much much easier. After you took out the 4 Screws holding the part in you can just slide the top part (the part with the DS Logo) upwards a few millimeters and the part will be coming right off. So theres no strain on the little clips.
This is how it needs to be disassembled/reassembled. These are not tapered clips, they are "L" shaped.
-
-
-
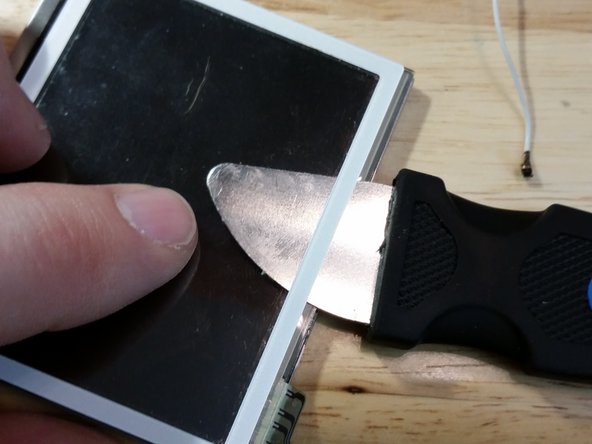
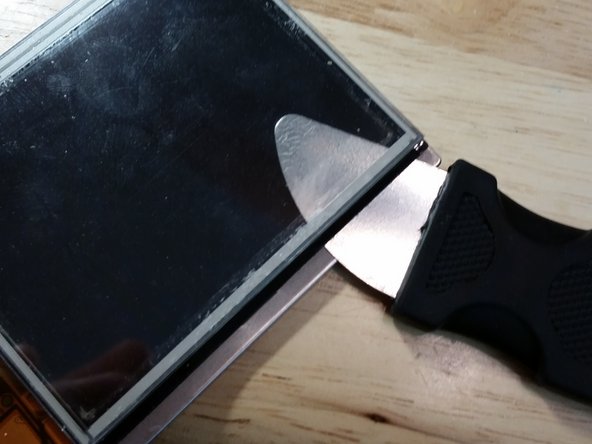
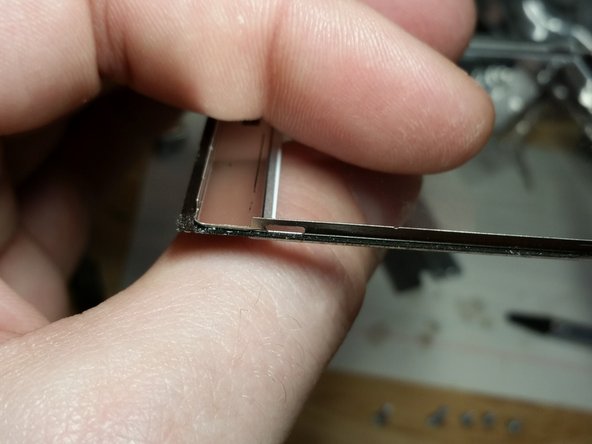
Beginne wie hier gezeigt, am oberen Bildschirm zu drücken und arbeiten dich dann den ganzen Weg um den Bildschirm. Sei vorsichtig, aber beachte, dass das LCD-Display von einem Plastikschild vorne und einem Metallschild hinten geschützt wird.
-
-
-
Merke dir den Verlauf des schwarzen und weißen Kabels für das Zusammenbauen später. Entferne das Mikrofon und die WLAN-Antenne, indem du die Kabel vorsichtig durch die Mitte des Flexkabels ziehst.
-
-
-
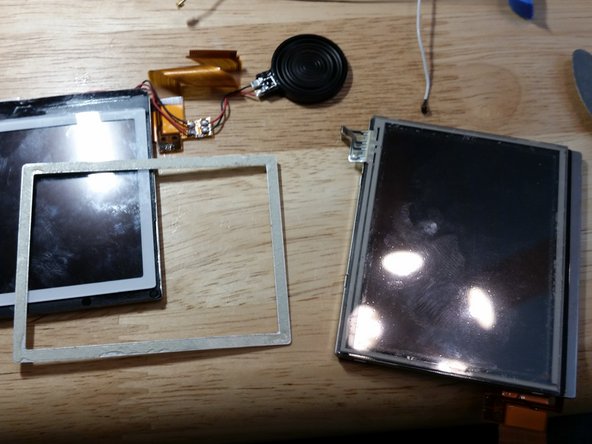
Sie sollten entfernt und mit der glänzenden Seite nach oben ersetzt werden.
-
-
-
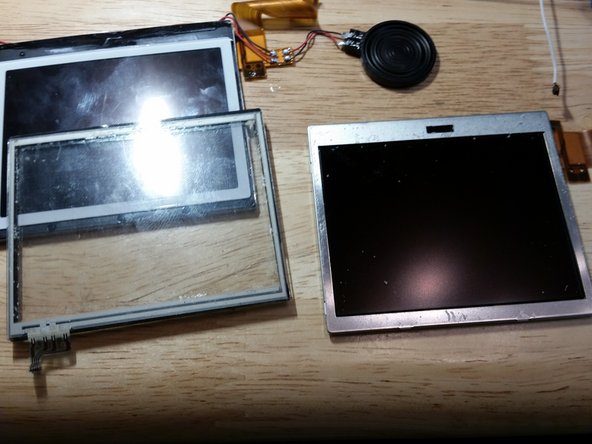
Wenn das Flexkabel beschädigt ist, kostet ein neues etwa 8 Euro. Passe sehr gut auf dieses Teil auf und rolle es zu einem Zylinder zusammen. Sollte das Flexkabel beschädigt werden, ist das gesamte LCD Display auch kaputt, da es keinen Weg gibt, diesen zu reparieren. Entferne die Metallteile und lege sie auf die Seite.
-
-
-
Entferne die drei goldenen Schrauben von der Halterung des Stylus und die zwei goldenen Schrauben von der Metallabdeckung. Den Anschaltknopf und die Lautstärkeregler musst du vorsichtig abhebeln. Reinige alle Plastikteile in heißem Seifenwasser. Nutze Alkohol für den hartnäckigen Dreck.
-
-
-
Wenn du das Gehäuse mit einer anderen Farbe ersetzen willst, entferne den Sticker. Mit dem iFixit Metall Spudger ist das ganz einfach.
-
-
-
Schiebe den Metallspatel unter den schwarzen Klebestreifen und arbeite dich vorsichtig um die ganze Einheit herum, vermeide dabei die Flachbandkabel. Reinige danach die Teile gründlich mit Alkohol.
-
-
-
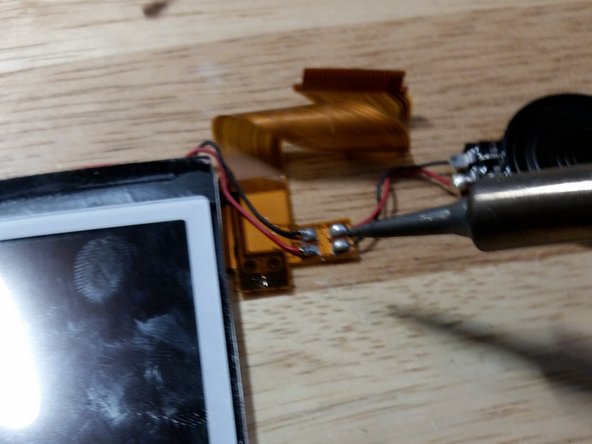
Dieser Schritt ist nur notwendig, wenn das obere Display kaputt ist. Leider passiert das oft. Trage Flussmittel auf die Kontakte auf. Dann entlöte alle vier Kabel. Merke dir, welches Kabel wohin kommt. Ich empfehle beim Zusammenbau neues Lötzinn.
-
-
-
Reinige die Kontakte, wie du es bevorzugst. Ich nutze eine kleine Entlötlitze und trage dann neues Lötzinn auf.
-
-
-
Die Plastikabdeckung ist unter die Metallabdeckung geklemmt und wird von Klammern gehalten, die sich je nach Produktionszeitraum unterscheiden. Oft sind es zwei Klammern auf jeder Seite. Löse sie, ohne die Metallabdeckung zu entfernen. Das musst du nur tun, falls du die Farbe deines Gehäuse ändern willst.
-
-
-
Optional: Teste die auseinandergenommene Einheit. Verbinde zuerst die WLAN-Platine. Dann verbinde die beiden Displays - ohne Digitizer - mit dem Motherboard. Dann halte den Akku fest und schalte das Gerät an. Wenn du Isoliermaterial entfernet hast, dann sei besonders vorsichtig, es könnten sonst leicht Schäden entstehen.
NOTE: If you’re replacing the lower LCD screen, BE SURE TO COVER THE BACK OF THE SCREEN WITH ELECTRICAL TAPE. Otherwise, you will blow one of the fuses when you attempt to test/reconnect the DS.
I have added a note based upon your comment.
-


Um dein Gerät wieder zusammenzubauen:
1) Stelle sicher, dass das weiße Kabel ordentlich verlegt ist, bevor du das Motherboard wieder einbaust.
2) Baue die Schulterknöpfe vorsichtig wieder zusammen. Das benötigt Übung.
3) Stelle sicher, dass der Einschaltknopf und die Lautstärketasten korrekt ausgerichtet sind, bevor du das Gehäuseunterteil ersetzt. Beachte, dass eine falsche Ausrichtung das Motherboard beschädigen wird und du daher das Gerät nicht mehr einschalten kannst.
Rückgängig: Ich habe diese Anleitung nicht absolviert.
55 weitere Nutzer:innen haben diese Anleitung absolviert.
Besonderer Dank geht an diese Übersetzer:innen:
100%

Diese Übersetzer:innen helfen uns, die Welt zu reparieren! Wie kann ich mithelfen?
Hier starten ›

14 Kommentare
Great work pal! Congratulations.
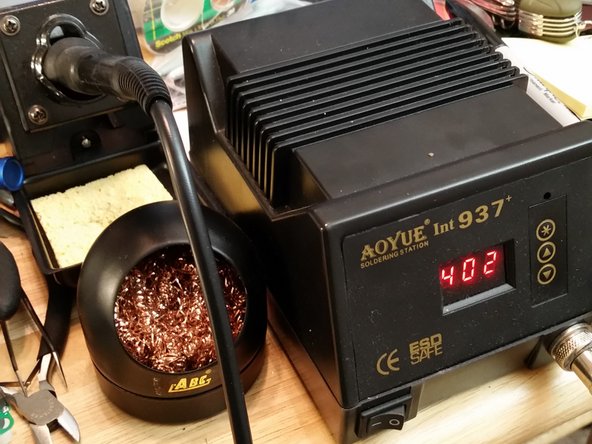
I find this very specific and helpful! I will favorite this guide, once i have every materials required… especially the soldering part in this guide. Far from what i know… The guide deserved the best credits as the author included the soldering heat meter! However, i do not understand why the 2nd/middle picture (from right to left) at Step 28…
Step 28; Removing the Speaker things.
Pictures: links, the picture on the machine says… 402, not 400. - Picture is from step 28.
This step is only necessary if your upper LCD is bad. Unfortunately, this is a common problem. First, wet the contacts with flux. Then, with your iron at 400 degrees C, melt the solder and remove all four wires. It might help to add fresh solder with lead. The lead-free solder used by Nintendo sucks.
I usually do my soldering between 300 and 350C. If you do a fair amount of soldering, pick up a knockoff Hakko FG-100 tip thermometer and then get the official sensors. This will set you back around $50 total on Amazon, but considering that the official FG-100 is over $200, it’s a steal. Anyway…check your iron for accuracy. The key here is heat transfer. Use the largest tip that fits in/on the pad. A larger tip will retain heat better and will heat a larger area at once. Now as posted above, add some fresh leaded solder to the joint. This will help to lower the melting temperature of the rest of the solder. Final tip is: Don’t forget the flux. Flux is your friend. You can never have too much flux. Flux will save you from bad joints, burned parts, and a lot of swearing. Get yourself some flux in liquid and paste form. Clean up the excess when you’re done with the highest concentration isopropyl alcohol you can find.
I am new to soldering, so i can’t say i am fair to soldering, but i am going to give it a try especially since my Nintendo DS Lite is way old and in need of fixs and therefore cant spend alot for the time being… but ill still buy it either way! Thanks for the help! reasons i am in need of it is good materials and parts is because i want it to be completely like new for myself.
I removed the solder temperature. What settings you should use will vary depending upon your situation. Desoldering the speakers is not very difficult at all, provided that you use flux, and many different techniques should work.
Quick tip for putting the shoulder buttons back in place. Don’t try to flex the spring and maneuver it into place. You will just wind up with a missing spring and a scratched cornea. Push the pivot pin down so most of it is hanging out of the bottom of the button. Now you can get the pivot pin in the hole of the case while the spring is straight and not loaded. Your shoulder button will be sticking straight up at this point. Now swing the button down into place and it will flex/load the spring. Problem solved…no missing spring and no eyepatches.
Always wear safety glasses when working on electronics.
Anyone know if the plastic screen covers are interchangeable between the top and bottom screens?
Not interchangeable. The bottom "cover" is the digitizer while the top cover is just simply a clear plastic cover.
Thanks for all of the likes and feedback!
Remember that this guide is a complete teardown of the Nintendo DS Lite. Depending upon what you’re up to, you can get by with following only a portion of the steps outlined. This teardown covers everything I’ve done to repair somewhere around 100-200 DS Lites in terms of disassembly. I do not cover mainboard component removal, but you can learn about this by searching for user john_gotts on Instagram. You can see how I fix DS Lite mainboards, and how I fix other consoles such as the DSi and 3DS lines.
It is true that you can remove the mainboard, lower screen, digitizer, and screen cover as one assembly. If there is nothing wrong with this assembly, then I recommend doing that. However, you should be comfortable with removing the flex cables on the DS Lite. As illustrated, use the smallest flat head bit you can find and be very gentle and you will have no problems. This is a good skill to acquire if you want to tackle other Nintendo handheld consoles.
I have updated the guide thanks to all of your feedback. If you've mastered these steps, then you can graduate to disassembling almost any Nintendo handheld. The one that I've had the most trouble with is the new 3DS XL. Newer and older models, including the Switch, are not much more difficult than the DS Lite, except the ribbon cables. They can be a real challenge.
I’m pretty sure I messed up my DS’s reassembly. What exactly goes wrong with the DS’s motherboard if you misalign the power and volume switches? Does it cause general physical damage to the board? Or are there specific board-level components that can be replaced?
Can i check commonly another problem is a big spreading bubble from the middle of the screen, is this a digitizer or lcd problem? Not sure if its due to humidity in Asia. Just need to verify what i need to buy and change..