Einleitung
Diese Anleitung zeigt dir, wie du das Display austauschen kannst.
Was du brauchst
-
-
Lege den Game Boy mit dem Akkufachdeckel nach oben.
-
Entferne die einzelne Kreuzschlitzschraube am Akkufachdeckel.
-
Entferne den Akkufachdeckel.
-
-
-
Entferne die sechs Trio-Point Schrauben, die das untere Gehäuse zusammenhalten.
-
Heble die Gehäuseteile auseinander. Wende aber keine Gewalt an, du könntest den Game Boy zerbrechen.
-
Lege die untere Hälfte für später zur Seite.
-
Achte darauf, dass du nicht die kleine quadratische Mutter verlierst, mit der das Akkufach verschraubt ist. Du kannst das Akkufach sonst nicht mehr zusammenhalten.
-
-
-
-
Entferne die drei Schrauben, mit denen die Hauptplatine am Gehäusemittelteil befestigt ist.
-
Achtung! Entferne die Hauptplatine noch nicht, sie ist immer noch mit einem Flachbandkabel angeschlossen.
-
Stelle den Game Boy so, wie im dritten Bild gezeigt.
-
-
-
Klappe die Hauptplatine so wie im ersten Bild nach unten. Achte darauf, dass das Gehäuse über der Hauptplatine ist
-
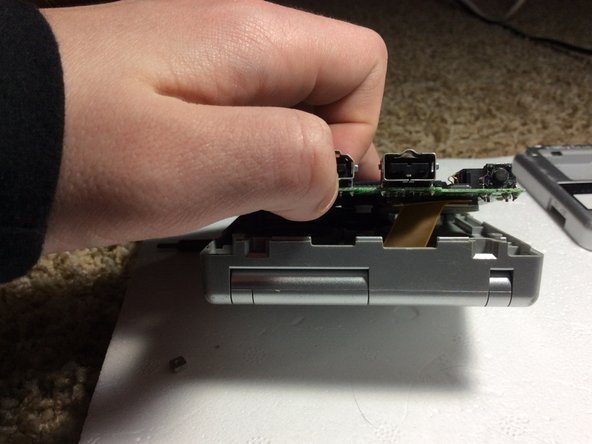
Löse den ZIF-Verbinder mit einem Spudger oder einer Pinzette von der Hauptplatine ab.
-
Hole das Flachbandkabel weg von der Hauptplatine.
This section could use some better close-up photos, because it’s very hard to see what’s needs to be done. I had to find a YouTube guide to get through this part.
If you’re looking at the photos and don’t know what to do, look for tiny black bits on the sides of the connector. Those lock the ribbon cable in place, and you have to unlock them first before you can get the ribbon cable out. This is the part that you need the screwdriver or tweezers for - don’t try to pull on the cable with the tweezers before you’ve unlocked the connector! After you’ve done that the ribbon cable will come out easily pretty much by itself.
Tip: opening the clamshell all the way gives more flex cable to work with during this part of the repair when reconnecting and disconnecting the ribbon cable.
In addition to Rathori's post, push the black locking pieces up from the connector to disengage them properly.
-
-
-
Entferne die fünf Gummiabdeckungen über den Schraubenlöchern mit einem kleinen Schraubendreher oder der Spudgerspitze.
-
Entferne die fünf Trio-Point Schrauben darunter.
-
Schließe den Game Boy und drehe die einzelne Kreuzschlitzschraube an der Unterseite heraus.
what do you do from here if your gba somehow has no screen...
dont ask xD i got it like that for free
-
-
-
Wenn du den Game Boy jetzt öffnest, sollten sich alle Teile voneinander lösen. Führe das Flachbandkabel durch die Öffnung und hebe das Display aus dem Gehäuseoberteil heraus.
-
Du hast es geschafft!
Observe the ribbon cable & how it’s curled inside the hinge. When rebuilding make sure to curl the ribbon cable inside the hinge.
-


Um dein Gerät wieder zusammenbauen, folge den Schritten in umgekehrter Reihenfolge.
Um dein Gerät wieder zusammenbauen, folge den Schritten in umgekehrter Reihenfolge.
Rückgängig: Ich habe diese Anleitung nicht absolviert.
34 weitere Nutzer:innen haben diese Anleitung absolviert.
Besonderer Dank geht an diese Übersetzer:innen:
100%
VauWeh hilft uns, die Welt in Ordnung zu bringen! Wie kann ich mithelfen?
Hier starten ›


8 Kommentare
One issue - you never mentioned how to get the hinge off, so getting the ribbon in and out is.. hard.
Last part of step 5, that screw hidden under the ribbon cable, is what holds the hinge in.
hello can i ask something? can you take apart the lcd? because my lcd has fungus
I am pretty sure, as the actual screen can be separated from the plastic cover (the thing that says game boy advance). I’ve never seen fungus in a screen though. That’s interesting.
Hello friend! One question: in the replace screen there is retroillumination? or i have to do something? Thx for your answer!
The light is built in on all GBA SPs.
there is a model with a better backlit display instead of a front lit display, but both have a light.
Heya! I was wondering if it’s possible to use an ag101 screen with an ag 001 motherboard? I’d prefer the better lit screen but ag101 models aren’t common in the uk
Says replacement screen, guide only covers taking the old one out