Einleitung
The Wii was first released on November 19, 2006.
The model number of the original Wii remote I will be tearing apart is RVL-003.
My partner is also going to be showing how to tear down a Wii nunchuk.
The model number of the Wii nunchuk is RVL-004.
Was du brauchst
-
-
Remove the battery cover from the remote and batteries inside.
-
Unscrew the four visible screws on the remote. These are Y1 tri-point screws.
-
-
-
Use a tool to gently pry apart the white tabs near the top of the controller.
-
Once you open up the remote, there should now be two separate pieces.
-
-
-
Go back to the side of the remote with the motherboard.
-
Gently lift and remove it from the base.
-
-
-
Find the white tabs facing where the sensor screen was.
-
Place a tool under one tab and push up until both tabs pop out of place, and remove the B trigger.
-
-
-
Use a tool and place it under the rumble motor. Gently lift and remove it from the plastic housing.
-
-
-
To remove the plastic housing, you have to locate the two white tabs. Use your thumbs to gently pull them apart and remove the plastic housing.
-
Remove the rubber button from the plastic housing.
-
-
-
-
Return the the buttons back to their original spot along with the flexible plastic covering on top.
-
-
-
Place the rubber button under the plastic housing.
-
Align the two white tabs with the two indents on the sides and slide the plastic housing into place.
-
Put back the rumble motor back to its original spot.
-
-
-
Place the B trigger back into its spot and click the two white tabs into place.
-
-
-
Lay the motherboard on top of the back side of the remote and push down gently til in place.
-
-
-
Lay the side of the remote with the motherboard on top of the side with the buttons.
-
Align the sides and press together until firmly in place.
-
Screw back in the screws.
-
-
-
there are two small screws that need to be unscrewed on the bottom of the remote.
-
-
-
Once the screws are removed, you can pop the top off.
-
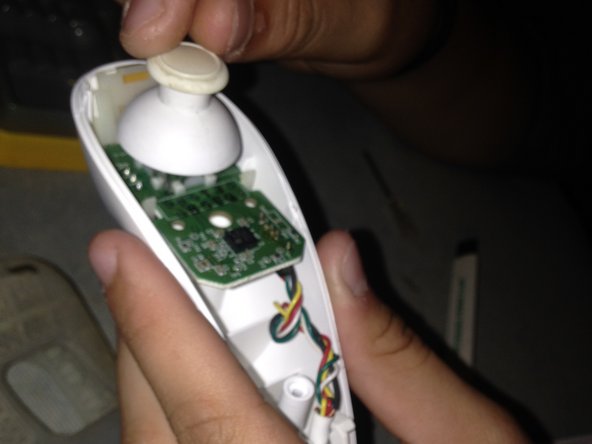
Next take the thumb stick and very gently take it off.
-
-
-
The wire that plugs into the actual remote needs to be pulled apart from the whole nunchuk.
-
-
-
It'll be easier to slide the other piece out to so make sure to gently slide it out.
-
-
-
Now start to attach all of the pieces back starting with the hard plastic first.
-
Make sure not to force the sensor in the spot and slide it upwards.
-
The shoulder buttons are easy to put in but don't push it.
-
Example of my partner.
-
-
-
Lastly she easily popped the top back on and screwed the bottom to back on and got it to work as it used to.
-


To reassemble your device, follow these instructions in reverse order.
To reassemble your device, follow these instructions in reverse order.
Rückgängig: Ich habe diese Anleitung nicht absolviert.
23 weitere Nutzer:innen haben diese Anleitung absolviert.
6 Kommentare
Great guide! I took one of my remotes apart some years ago. Now, with fresh tri-wing driver in hand, I am ready to reassemble the thing. Problem: where to solder the green ground? It currently is fused to the nunchuk connector housing, but where does the other end go??? Wish I'd noted that, back then
Hello do you have tutorials for unassembly nunchuck's connector please?
I want to take the springs off the wii Remotes Back. The ones that are still in the back during Step 10.