Einleitung
Diese Anleitung zeigt, wie der Joystick im Nintendo Wii U GamePad getauscht werden kann.
Was du brauchst
-
-
Lege das GamePad mit der Unterseite nach oben und drehe die beiden Kreuzschlitzschrauben #00 vom Akkufach heraus.
-
Hebe den Akkufachdeckel hoch und entferne ihn.
-
-
-
Lege deinen Finger auf den Akkustecker und schiebe ihn zur Unterkante des Geräts hin, so dass er sich ablöst.
-
Ziehe den Akku an der Unterkante nach oben und löse ihn heraus.
-
-
-
Entferne die zehn 8,9 mm Tri-Wing Y1 Schrauben unter den quadratischen Aufklebern.
-
Hebe die Rückabdeckung an.
I feel like it’s important to mention how deep some of these holes are. Your screwdriver might not reach. Mine sure didn’t.
I had to shove some tissue into the screwdriver bit holder to get it to reach
-
-
-
-
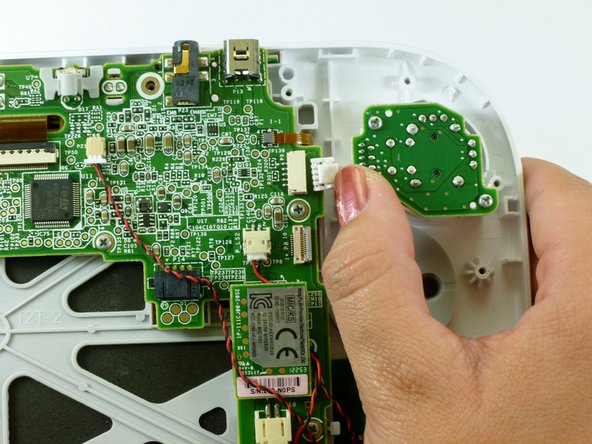
Löse den Stecker, der die Rückabdeckung mit der Hauptplatine verbindet.
-
Entferne die Rückabdeckung.
You don't have to remove just be careful
I tried to remove like at least 6 times but I wasn’t able to. Using tweezer, my nails, long nose pliers. There could be a lock but I gave up since I’m afraid if I put more force I might accidentally pull the wires. I’m able to remove the left and right analog stick with the back plate plugged, as mentioned, just be careful.
-
-
-
Nimm die rechte und linke Schultertaste in den oberen Ecken heraus.
-
Hebe die ZR und ZL Trigger-Tasten hoch, schiebe sie nach außen und entferne sie.
-
-
-
Ziehe die obere Gummiabdeckung aus ihrer Befestigung heraus und entferne sie, um Zugang zu einer der Befestigungsschrauben zu erhalten.
-
Entferne die vier 5,2 mm Kreuzschlitzschrauben #0.
-
-
-
Hebe die Sicherung des blauen Flachbandkabels mit einem Spudger hoch.
-
Entferne den Joystick und die Tastenabdeckung.
-
-
-
Drücke den Stecker mit dem Daumen zur rechten Kante hin und trenne das Kabel zum Joystick ab.
-
-
-
Entferne die beiden 9 mm Tri-Wing Y0 Schrauben.
-
Hebe den Joystick heraus.
Easy peasy. Thanks!
Hi there, I tried to replace the joystick following these instructions but I couldn't remove the connector cable from the old joystick as it is wired into the board. Does anyone know what the connector is called so I can buy one please!
@Spider Gin The joystick and the tiny little control board (the pcb between the red circles in the picture of step 9) are purchased together (or at least that’s how I got mine). The only thing you need to disconnect on the analog stick assembly is the connector shown at the end of the thumb in the picture on step 8. If you are trying to disconnect the stick itself from the control board you are not looking at the right instructions for that.
It seems to me that Nintendo changed the design after a while some had the wires on a connector some were soldered in. I can't find much information about this. Going to have to disassemble what I have to find out what I need
The volume slider came out when I turned the assembly upside down to retrieve a dropped screw. You need to pay attention when putting it back in to make sure you line up the groove on the slider with the tiny little square bump that fits into the groove and allows you to actually control the volume. It’s easy to get it aligned if you know that’s what you trying to do, but at first I didn’t even realize what it was.
Anyway—it worked, thank you!
-


Um dein Gerät wieder zusammenzubauen, folge den Schritten in umgekehrter Reihenfolge.
Um dein Gerät wieder zusammenzubauen, folge den Schritten in umgekehrter Reihenfolge.
Rückgängig: Ich habe diese Anleitung nicht absolviert.
85 weitere Nutzer:innen haben diese Anleitung absolviert.
Besonderer Dank geht an diese Übersetzer:innen:
100%

Diese Übersetzer:innen helfen uns, die Welt zu reparieren! Wie kann ich mithelfen?
Hier starten ›

Team

Cal Poly, Team 17-20, Forte Winter 2013 Mitglied von Cal Poly, Team 17-20, Forte Winter 2013
CPSU-FORTE-W13S17G20
5 Mitglieder
38 Anleitungen geschrieben
35 Kommentare
where can i find replacement analogs for wiiu gamepad and wiiu procontoller?
www.ebay.com
They are available at ebay.com Cost around 7,50 $ Left & Right (different - look what you need). Comes all from china or hong Kong but Quality is 1A (so far i can tell).
Bump previous question because dogs seem to enjoy their texture.
Has anyone tried this?
http://dx.com/p/replacement-3d-analog-st...
I know it says for the pro controller. But based from the images, the pins could be compatible.
Have you tried them? Do they work?
Brandon -
I was able to find the replacement stick on ebay. I believe it was $7.99 (better than the $100 nintendo charges to service the controller). The process was pretty easy, but make sure you have the tri-wing screw driver.
http://m.ebay.com/itm/281325844280?nav=S... for the left stick and.....
http://m.ebay.com/itm/281325844811?nav=S... for the right
Hi all, I'm in UK, and just wanted to say I successfully changed my left gamepad stick (kept going forward on its own) following this guide....got one from eBay http://www.ebay.co.uk/itm/Analog-Stick-w...
worked like a charm.
Thanks to all concerned.
Helpful. My left joystick started to move down for no reason so I ordered a new one and replaced it. Works great now. The only problem I had was with removing that short white cable from the old joystick to the new one. It is really stuck hard on those pins! So be careful not to pull by the cables. I lifted it with my nails a little and then I used a nail fail to lift it up from the sides where a little gap appears.
We can put xbox one sticks in the wiiu gamepad and wiiu pro controller, i have made an easy tutorial on Youtube http://youtu.be/kcynxb2xyLY
Thank you for this detailed tutorial! I just replaced the left analog joystick on my gamepad and the kids are overjoyed.
Left stick was drifting. Purchased both left and right stick on ebay at: http://r.ebay.com/QLJsRg
These excellent directions, and clear illustrations made this easy. The only challenge was removing the short, white cable just like red4rod mentioned above.
I was able to avoid removing the blue ribbon cable (on analog stick and button cover in step #7):
Immediately after step #6, I used my thumb to remove the (white) analog stick cable connector (step #8).
Next, I lifted the button cover slightly up, and to the 'left' (orientation based upon pictures in tutorial), being careful not to pull on the blue ribbon cable.
From there, I was able to proceed with step #9.
Yep, your totally right. I did it the same way and need around 20 minutes less.
My Wii U gamepad has a new wrinkle to this issue: the short white cable still has a connector to the main controller, but no longer has a connector to the joystick's tiny circuit board - instead, it has 5 pins (4 white and one black) soldered directly to the board. So to use a replacement joystick, I needed a replacement cable with connectors on both ends. Searching everywhere I could, finally found a replacement connection cable: on aliexpress.com, item 32394130368. Hope this helps!
I hit the same issue, but the part was out of stock, and the pair I ordered didn't come with cables.
I ordered another pair off Amazon that explicitly showed the cables. The left stick's cable fit perfectly, but the cable that came with the right analog stick did NOT fit into the connector.
In conclusion, buy replacement parts from someone with a return policy, and be prepared in case things don't work out.
Just encountered this problem. Can anyone provide the name of this part (connects stick board to Wii u gamepad board. My original was also soldered onto the original analog stick board. Going to try to find by part number provided here now…
Wiiunerd -
Hello! I've just purchased a replacement from ebay (My stick sometimes doesn't register if you move the stick straight up, tried compressed air cleaning to no avail). It just came, but I noticed that when you move it around, it "sticks" on the extremes, just like on this video: https://www.youtube.com/watch?v=fZ3uq7Wd...
I'm sure mine is a "fake" in the sense it was not manufactured by Nintendo, but I wonder if it works, so I would like to know if the successful replacements made here were with modules that also "sticked" on the corners (which may not happen in normal operation due to the mechanics not letting the stick get to the extremes maybe?).
Any help is appreciated, thank you!
Actually, I have been informed it works like that, so if anyone is wondering: the gamepad will stop the stick from getting to the outer extremes. The "sticky" behaviour is not an actual issue.
cd -
Does anyone out there know the name of the connector on the motherboard that that sticks plug into? I need them but have no clue what they are called.
Just created an account here to say "THANK YOU SO MUCH!" This seemed like a daunting task at first but with the help of this guide I was able to repair my Gamepad in under 30 minutes!
Hello, I have just a quick question. I know it says the difficulty is moderate but all of the comments here are pretty positive but realistically so long as i follow the instructions it should be easy …. right?
changed left stick with this guide. Easy to do in my opinion. Moderate only if you never have touched a tool in your life. Cost me about 35€ to buy the stick replacement and the proper screwdrivers. Nintendo charges 100€. Where I live an average workers earns about 50€ a day so you saved me a lot of money. Thanks ifixit
I changed it but maybe the new stick is foulty, now the gamepad does not turn on. I had to go back to the old stick.
thx ! My Wii U works again ! :-)
Brilliant guide - really easy to follow, and I had my WiiU pad fixed up in no time. Thanks!
Just did the repair, the tutorial was essentially perfect.