Einleitung
Diese Anleitung zeigt, wie die Steuerkreuz-Tasten im Nintendo Wii U GamePad ausgetauscht werden.
Was du brauchst
-
-
Entferne die zehn 8,9 mm Tri-Wing Y1 Schrauben unter den quadratischen Aufklebern.
-
Hebe die Rückabdeckung an.
-
-
-
Löse den Stecker, der die Rückabdeckung mit der Hauptplatine verbindet.
-
Entferne die Rückabdeckung.
You don't have to remove just be careful
I tried to remove like at least 6 times but I wasn’t able to. Using tweezer, my nails, long nose pliers. There could be a lock but I gave up since I’m afraid if I put more force I might accidentally pull the wires. I’m able to remove the left and right analog stick with the back plate plugged, as mentioned, just be careful.
-
-
-
Nimm die rechte und linke Schultertaste in den oberen Ecken heraus.
-
Hebe die ZR und ZL Trigger-Tasten hoch, schiebe sie nach außen und entferne sie.
-
-
-
-
Ziehe die obere Gummiabdeckung aus ihrer Befestigung heraus und entferne sie, um Zugang zu einer der Befestigungsschrauben zu erhalten.
-
Entferne die vier 5,2 mm Kreuzschlitzschrauben #0.
-
-
-
Hebe die Sicherung des blauen Flachbandkabels mit einem Spudger hoch.
-
Entferne den Joystick und die Tastenabdeckung.
-
-
-
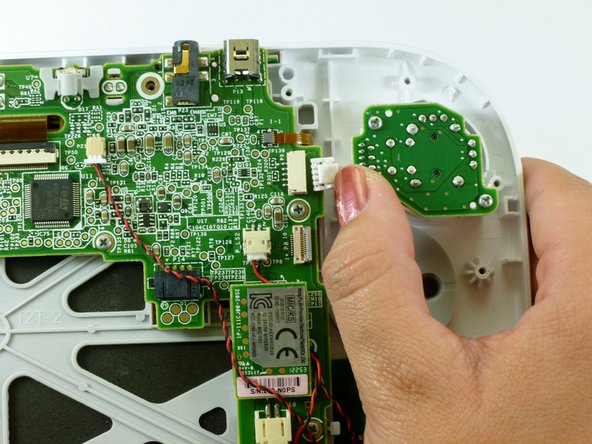
Drücke den Stecker mit dem Daumen zur rechten Kante hin und trenne das Kabel zum Joystick ab.
-
-
-
Entferne die beiden 9 mm Tri-Wing Y0 Schrauben.
-
Hebe den Joystick heraus.
Easy peasy. Thanks!
Hi there, I tried to replace the joystick following these instructions but I couldn't remove the connector cable from the old joystick as it is wired into the board. Does anyone know what the connector is called so I can buy one please!
@Spider Gin The joystick and the tiny little control board (the pcb between the red circles in the picture of step 9) are purchased together (or at least that’s how I got mine). The only thing you need to disconnect on the analog stick assembly is the connector shown at the end of the thumb in the picture on step 8. If you are trying to disconnect the stick itself from the control board you are not looking at the right instructions for that.
It seems to me that Nintendo changed the design after a while some had the wires on a connector some were soldered in. I can't find much information about this. Going to have to disassemble what I have to find out what I need
The volume slider came out when I turned the assembly upside down to retrieve a dropped screw. You need to pay attention when putting it back in to make sure you line up the groove on the slider with the tiny little square bump that fits into the groove and allows you to actually control the volume. It’s easy to get it aligned if you know that’s what you trying to do, but at first I didn’t even realize what it was.
Anyway—it worked, thank you!
-
-
-
Hebe die Gummiabdeckung des Steuerkreuzes hoch und entferne sie.
-
Entferne die Tasten des Steuerkreuzes.
-


Um dein Gerät wieder zusammenzubauen, folge den Schritten in umgekehrter Reihenfolge.
Um dein Gerät wieder zusammenzubauen, folge den Schritten in umgekehrter Reihenfolge.
Rückgängig: Ich habe diese Anleitung nicht absolviert.
11 weitere Nutzer:innen haben diese Anleitung absolviert.
Besonderer Dank geht an diese Übersetzer:innen:
100%

Diese Übersetzer:innen helfen uns, die Welt zu reparieren! Wie kann ich mithelfen?
Hier starten ›

Team

Cal Poly, Team 17-20, Forte Winter 2013 Mitglied von Cal Poly, Team 17-20, Forte Winter 2013
CPSU-FORTE-W13S17G20
5 Mitglieder
38 Anleitungen geschrieben
how do i replace the whole front and back casing?
enbodylin - Antwort
bruh the ifix it screwdriver dont reach down the whole way
Michael - Antwort
I feel like it’s important to mention how deep some of these holes are. Your screwdriver might not reach. Mine sure didn’t.
greatshadowdude - Antwort
I had to shove some tissue into the screwdriver bit holder to get it to reach
Andrew Walker - Antwort