Zum Hauptinhalt wechseln

Nokia 6086 Screen Replacement

Was du brauchst

  1. Nokia 6086 Screen Replacement, Battery: Schritt 1, Bild 1 von 1
    • Turn off the phone.

    • Check if there is a microSD card in the slot behind the door on the side. If so, remove it by first pushing it in, then pulling it out.

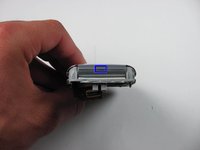
    • Position the phone so that the back side is in view.

  2. Nokia 6086 Screen Replacement: Schritt 2, Bild 1 von 3 Nokia 6086 Screen Replacement: Schritt 2, Bild 2 von 3 Nokia 6086 Screen Replacement: Schritt 2, Bild 3 von 3
    • Remove the back battery cover.

    • Apply pressure on the cover while simultaneously sliding the cover downward.

  3. Nokia 6086 Screen Replacement: Schritt 3, Bild 1 von 3 Nokia 6086 Screen Replacement: Schritt 3, Bild 2 von 3 Nokia 6086 Screen Replacement: Schritt 3, Bild 3 von 3
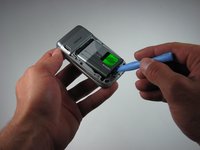
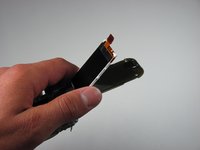
    • Insert the iPod opening tool between the base of the phone and the phone battery.

    • Position the phone so that the battery won't fall out of the phone.

    • The battery lifts out of the phone fast and easily.

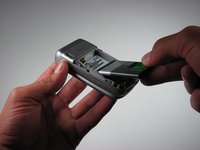
    • Carefully lift the battery out of the phone.

  4. Nokia 6086 Screen Replacement, Top Front Cover: Schritt 4, Bild 1 von 1
    • Close the phone.

    • Face the front cover forward.

  5. Nokia 6086 Screen Replacement: Schritt 5, Bild 1 von 2 Nokia 6086 Screen Replacement: Schritt 5, Bild 2 von 2
    • Locate the 4.5 mm notch at the top of the phone.

    • Place the iPod opening tool into the opening.

    • Slightly prop up the top section by lifting the tool.

  6. Nokia 6086 Screen Replacement: Schritt 6, Bild 1 von 3 Nokia 6086 Screen Replacement: Schritt 6, Bild 2 von 3 Nokia 6086 Screen Replacement: Schritt 6, Bild 3 von 3
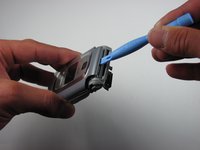
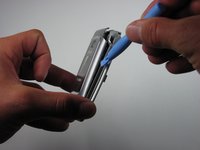
    • Wedge the iPod opening tool between the top cover and the phone.

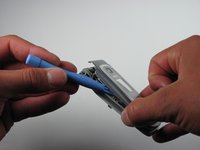
    • Gently lift the top cover away from the phone using the iPod opening tool.

    • This unlatches each hook that connects the top cover to the phone.

    • Repeat for both the left and the right sides of the phone.

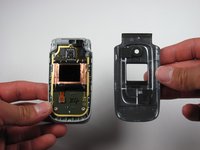
    • Place the top cover aside once the top cover is completely disconnected from the phone.

  7. Nokia 6086 Screen Replacement, Screen: Schritt 7, Bild 1 von 3 Nokia 6086 Screen Replacement, Screen: Schritt 7, Bild 2 von 3 Nokia 6086 Screen Replacement, Screen: Schritt 7, Bild 3 von 3
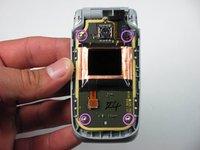
    • Locate the four screws on the phone.

    • The top right screw is located under the black connector piece.

    • To remove the connector piece gently lift it off of its connector.

    • Take the T6 driver and remove the screws.

  8. Nokia 6086 Screen Replacement: Schritt 8, Bild 1 von 1
    • Carefully lift up the motherboard.

  9. Nokia 6086 Screen Replacement: Schritt 9, Bild 1 von 2 Nokia 6086 Screen Replacement: Schritt 9, Bild 2 von 2
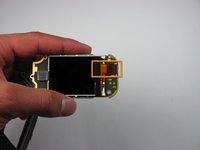
    • Find the orange slip on the motherboard.

    • Peel back the orange slip to expose the screen.

  10. Nokia 6086 Screen Replacement: Schritt 10, Bild 1 von 3 Nokia 6086 Screen Replacement: Schritt 10, Bild 2 von 3 Nokia 6086 Screen Replacement: Schritt 10, Bild 3 von 3
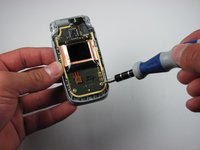
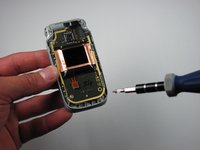
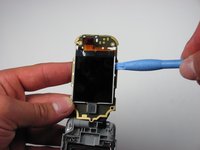
    • Place the ipod opening tool under the screen.

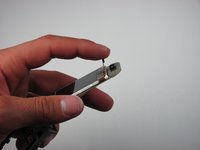
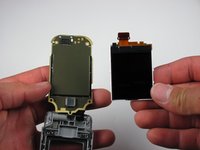
    • Remove the damaged screen with the ipod opening tool.

Abschluss

To reassemble your device, follow these instructions in reverse order.

Ein:e weitere:r Nutzer:in hat diese Anleitung absolviert.

Caitlin Rahm

Mitglied seit: 04/15/10

78 Reputation

4 Anleitungen geschrieben

Team

Cal Poly, Team 26-30, Regan Spring 2010 Mitglied von Cal Poly, Team 26-30, Regan Spring 2010

CPSU-REGAN-S10S26G30

4 Mitglieder

17 Anleitungen geschrieben

0 Kommentare

Kommentar hinzufügen

Seitenaufrufe:

Letzte 24 Stunden: 0

Letzte 7 Tage: 0

Letzte 30 Tage: 1

Insgesamt: 3,372