Zum Hauptinhalt wechseln

Nokia Classic 2600c-2b Display Screen Replacement

Was du brauchst

  1. Nokia Classic 2600c-2b Display Screen Replacement, Replacing Display Screen: Schritt 1, Bild 1 von 2 Nokia Classic 2600c-2b Display Screen Replacement, Replacing Display Screen: Schritt 1, Bild 2 von 2
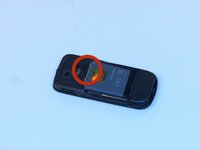
    • Press down on the button located at the bottom of the phone, using the center ridge as a guide.

    • Pull the phone apart from the bottom, keeping the button pressed down.

    • CAUTION! The plastic opening tool may be used to gain leverage. Some force is required to open.

  2. Nokia Classic 2600c-2b Display Screen Replacement: Schritt 2, Bild 1 von 1
    • Remove the back cover to expose the battery.

  3. Nokia Classic 2600c-2b Display Screen Replacement: Schritt 3, Bild 1 von 2 Nokia Classic 2600c-2b Display Screen Replacement: Schritt 3, Bild 2 von 2
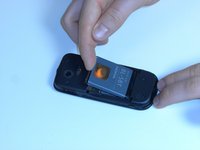
    • Place a finger or plastic opening tool in the gap between the battery and the phone.

    • Gently lift the battery out.

  4. Nokia Classic 2600c-2b Display Screen Replacement: Schritt 4, Bild 1 von 2 Nokia Classic 2600c-2b Display Screen Replacement: Schritt 4, Bild 2 von 2
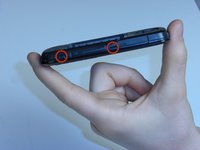
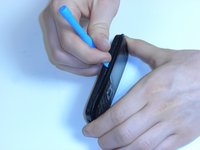
    • Locate the plastic latches on the left and right sides of the phone.

    • Insert the plastic opening tool or a fingernail into each latch and pry them open individually.

    • CAUTION! Some force is required.

  5. Nokia Classic 2600c-2b Display Screen Replacement: Schritt 5, Bild 1 von 1
    • Remove the faceplate with the number pad attached.

  6. Nokia Classic 2600c-2b Display Screen Replacement: Schritt 6, Bild 1 von 1
    • Turn the faceplate so the number pad faces downward.

    • Lift the number pad out of the faceplate.

  7. Nokia Classic 2600c-2b Display Screen Replacement: Schritt 7, Bild 1 von 2 Nokia Classic 2600c-2b Display Screen Replacement: Schritt 7, Bild 2 von 2
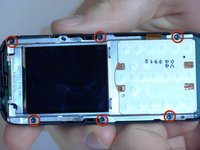
    • Locate the six screws positions along the edges of the motherboard.

    • Unscrew the six screws using the Torx 5 screwdriver (see Introduction for description of a Torx 5 screwdriver).

    • CAUTION! Place the screws in a secure location.

  8. Nokia Classic 2600c-2b Display Screen Replacement: Schritt 8, Bild 1 von 2 Nokia Classic 2600c-2b Display Screen Replacement: Schritt 8, Bild 2 von 2
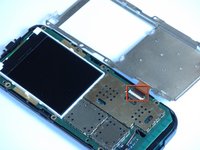
    • Locate the orange ribbon tape connecting the metal display plate to the motherboard.

    • Lift the black latch attaching the tape to the motherboard.

    • Gently pull the tape out of the latch slot to remove the metal display.

  9. Nokia Classic 2600c-2b Display Screen Replacement: Schritt 9, Bild 1 von 2 Nokia Classic 2600c-2b Display Screen Replacement: Schritt 9, Bild 2 von 2
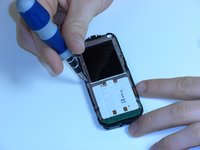
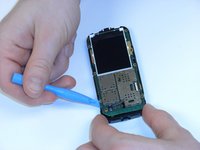
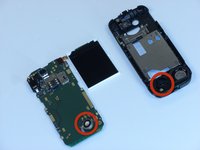
    • Using the plastic opening tool, gently pry off the motherboard from the plastic shell.

    • CAUTION! When pulling the motherboard out, be careful not to damage the battery under the lower left hand corner of the motherboard.

  10. Nokia Classic 2600c-2b Display Screen Replacement: Schritt 10, Bild 1 von 1
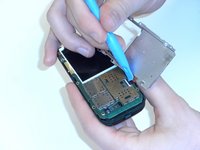
    • Gently pull the orange ribbon tape up to remove the display.

    • Replace display screen.

    • Follow the instructions in reverse order to reassemble the phone.

Abschluss

To reassemble your device, follow these instructions in reverse order.

2 weitere Nutzer:innen haben diese Anleitung absolviert.

Ian VanZandt

Mitglied seit: 02/14/12

654 Reputation

5 Anleitungen geschrieben

Team

James Madison, Team 3-1, Klein Spring 2012 Mitglied von James Madison, Team 3-1, Klein Spring 2012

JMU-KLEIN-S12S3G1

3 Mitglieder

9 Anleitungen geschrieben

3 Kommentare

Pretty accurate, nice guide! Easily repaired and it works!

Dominik Fryč - Antwort

Where can I find the screen?

jackie fincher -

Perfect guide! But Where can i get original components??

Navin Singh - Antwort

Kommentar hinzufügen

Seitenaufrufe:

Letzte 24 Stunden: 0

Letzte 7 Tage: 1

Letzte 30 Tage: 2

Insgesamt: 938