Diese Anleitung enthält neuere Änderungen. Wechsel zur neuesten unüberprüften Version.
Einleitung
Follow the steps for replacing the power switch. This guide will start right after replacing power switch ends.
Was du brauchst
-
-
Lay the popper on its side.
-
Remove the five 12mm Philips #2 screws around the perimeter of the base with the Phillips #2 screwdriver.
-
Remove the two 15mm Philips #2 screws in the center of the base with the Phillips #2 screwdriver.
-
-
-
Flip the base over to view the interior of the base panel.
-
Unscrew the two 10 mm Philips #2 screws from the base panel.
-
Remove the base and set it aside.
-
-
-
-
Locate the power switch connected to the side of the housing.
-
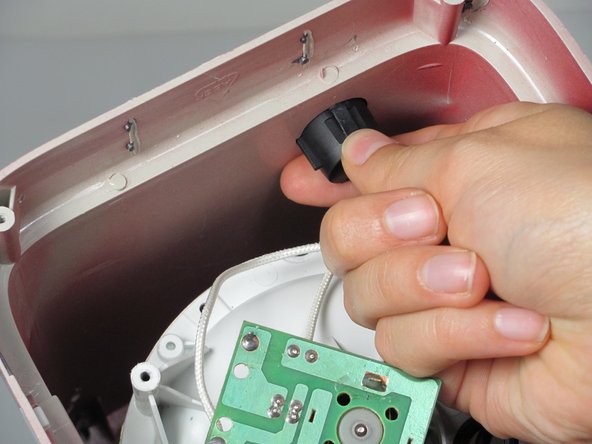
Pinch the sides of the power switch.
-
Push the power button up and out of the housing.
-
-
-
Remove the wires connected to the power switch that should be detached from the housing.
-
Gently pry the wires loose from the power switch with the plastic opening tool.
-
-
-
Remove the power switch from the housing unit.
-
You can now replace the power switch, if necessary.
-
-
-
Now that the power switch is disconnected from the popper, you will need to remove the white top.
-
Gently remove the heating component from the popper.
-
Unscrew the four screws (11mm Philips #2 screws) that connect the white top to the housing.
-


To reassemble your device, follow these instructions in reverse order.
To reassemble your device, follow these instructions in reverse order.
Team

Cal Poly, Team 16-57, Forte Fall 2012 Mitglied von Cal Poly, Team 16-57, Forte Fall 2012
CPSU-FORTE-F12S16G57
5 Mitglieder
6 Anleitungen geschrieben