Einleitung
Diese Anleitung zeigt dir, wie du die Hauptplatine im OnePlus 5 austauschen kannst.
Am schwierigsten ist das Öffnen der Rasten am Rahmen, um die Rückabdeckung abzunehmen
Was du brauchst
-
-
Setze ein SIM-Auswurfwerkzeug, Bit oder eine aufgebogene Büroklammer in das kleine Loch unter dem SIM-Einschub nahe bei den Rückkameras an der Kante des Smartphones ein.
-
Drücke fest drauf, bis der SIM-Einschub herauskommt.
-
-
-
Entferne die beiden 2,6 mm Torx T2 Schrauben, mit denen der USB-C Anschluss an der Unterkante des Smartphones befestigt ist.
What are the reference of the screws ? They are missing in the one I bought !
Hi Yôken,
They help hold the back cover on. Most of the time, the clips are enough to hold the phone together.
Just FYI, for whatever reason my brand new OnePlus 5 had 0,8 mm stars screws instead of T2 Torx.
Definitely T2 for me. Do watch out during assembly. I have a feeling that it’s easy to strip these.
T2 for me too. It was missing in my kit and iFixit sent it later when I asked them about it.
-
-
-
Displaynaht: Diese Naht gehört zur Displayeinheit. Heble nicht an dieser Naht, sonst trennst du die Displayeinheit auf und beschädigst sie.
-
Rahmennaht: Das ist die Naht zwischen Kunstoffrahmen und Rückgehäuse. Heble nur an dieser Naht.
-
Der Rahmen ist mit zwölf Rasten am Rückgehäuse befestigt. Du musst die Stellen, wo sie sich befinden, beim Abhebeln in den folgenden Schritten genau kennen.
-
-
-
Setze einen Saugheber nahe am unteren Rand auf das Displays.
-
Ziehe gleichmäßig und kräftig am Saugheber.
-
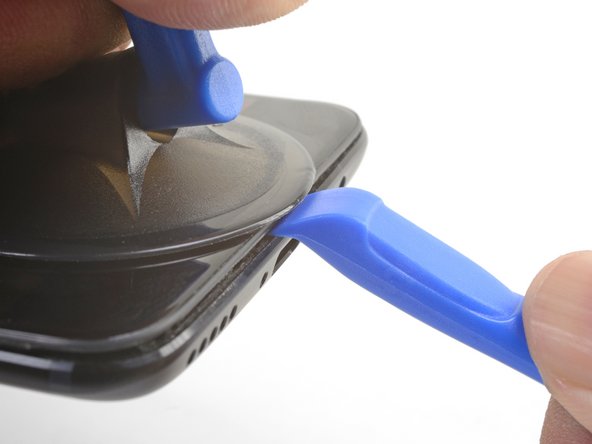
Drücke die Kante eines Plastiköffnungswerkzeugs nahe am Saugheber in die Rahmennaht hinein, bis sie sich zwischen den Kunstoffrahmen und dem Rand der Rückabdeckung hineinzwängt.
I found the suction cup to be more of a hindrance and kept hitting the power button, making it necessary to stop and turn the phone off again. I watched a youtube video where the person didn't use a suction cup at all and decided to try that. I also found that a guitar pick type spudger worked far better than the one shown in the picture. If you're having trouble getting it started, I suggest trying those two things.
-
-
-
Wenn das Plastiköffnungswerkzeug drinnen ist, dann schiebe es behutsam an der Unterkante des Smartphones entlang.
-
Führe das Werkzeug vorsichtig um die linke Ecke des Smartphones herum, wobei es in der Naht drin bleiben muss.
This was extremely difficult & took a lot of force. I needed a thin flat metal spudger and wrecked a couple of plastic ones in the process. I left a few scratches along the join in the process. It would be easier if I had something to hold the phone, in my hand I kept turning it on by accident.
what was the metal spudger did you use? I am having trouble as well. I cannot seem to pry the back cover and it feels like it is shut tightly, there are no crevices I can pry into. What was your strategy may I ask?
At first, I slightly opened the body with a plastic tool, but it was not enough to actually open the back cover. Then I used a thin metal screwdriver for this. It was difficult but nothing special. Just be sure that you are opening the correct seam between the body and the screen and don’t make sudden moves. I bent nothing, everything came back in place when reassembled.
ivan -
Same as David here: the plastic opening tools/guitar picks were doing nothing (not even creating the first "crack") . In the end I managed to open it using Jimmy (the metal knife/spudger), but not without scratching the whole metal cover.
-
-
-
Lasse das Werkzeug an der langen Kante entlang gleiten, wobei du die Rasten öffnest.
-
-
-
Wenn die Unterkante und die linke Kante des Smartphones frei sind, dann kannst du die Rasten an der Oberkante und rechten Kante mit wackelnden Bewegungen befreien.
-
Richte die Oberkante des Rahmens an der Rückabdeckung aus und achte darauf, dass die oberen Rasten richtig hineingeglitten sind.
-
Drücke fest auf die langen Kanten des Smartphones, bis die restlichen Rasten einschnappen.
Reinstalling the back cover stumped me for a second… If you’re struggling with aligning the top edge of the frame, remember that the camera is going to look off/pointed a bit too low until you actually clip the frame back in.
Really stupid but it was the only thing that tripped me up in this guide.
-
-
-
Wenn alle Rasten gelöst sind, dann drehe das Smartphone herum, so dass das Display nach unten zeigt.
-
Klappe die Rückabdeckung auf und lege sie auf den geöffneten Rahmen.
-
-
-
-
Entferne die 2,6 mm Kreuzschlitzschraube, mit denen die Kabelhalterung über dem Akku befestigt ist.
-
Hebe die Kabelhalterung hoch und entferne sie.
-
-
-
Heble das Flachbandkabel der Rückabdeckung mit der Spudgerspitze hoch und trenne es von seinem Anschluss ab.
If the flex cable pins are damaged, the flex cable can be replaced.
If the connecter pins (on the motherboard) are damaged, you might need to do microsoldering (or contact a microsoldering company) to replace the damaged connector.
Brendan -
-
-
-
Heble den Akkustecker mit der Spudgerspitze hoch und löse ihn aus seinem Anschluss heraus.
-
-
-
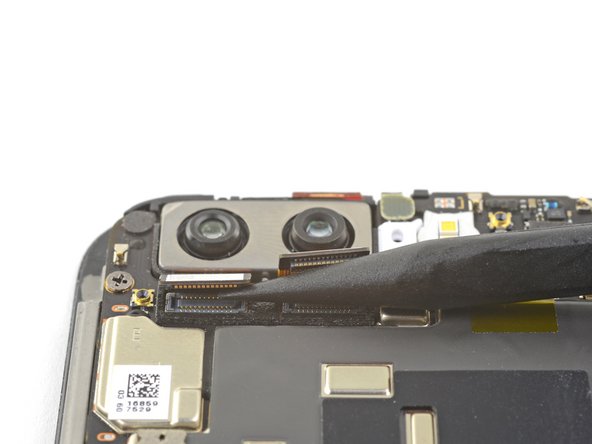
Heble die beiden Stecker der Rückkamera mit der Spudgerspitze hoch und löse sie aus ihren Anschlüssen auf der Hauptplatine heraus.
-
-
-
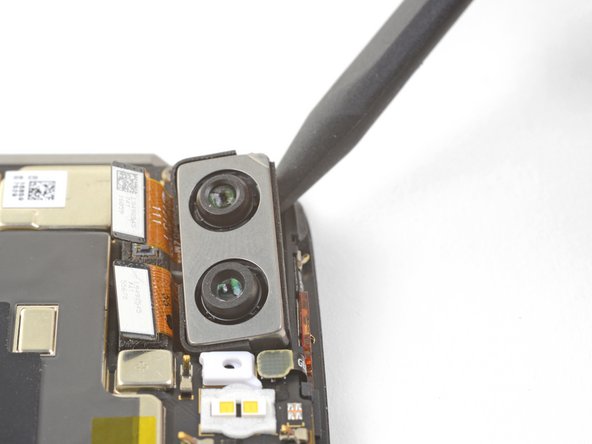
Setze die Spudgerspitze unter die obere linke Ecke des Kameramoduls und heble es nach oben, bis es sich aus seiner Vertiefung löst.
-
-
-
Entferne das Rückkameramodul.
-
-
-
Entferne die sechs 2,6 mm Kreuzschlitzschrauben, mit denen der Lautsprecher am Rahmen befestigt ist.
-
-
-
Setze den Spudger mit seinem flachen Ende in der Ecke der Lautsprechereinheit ein und heble leicht hoch, bis sich der Lautsprecher aus seiner Vertiefung löst.
-
-
-
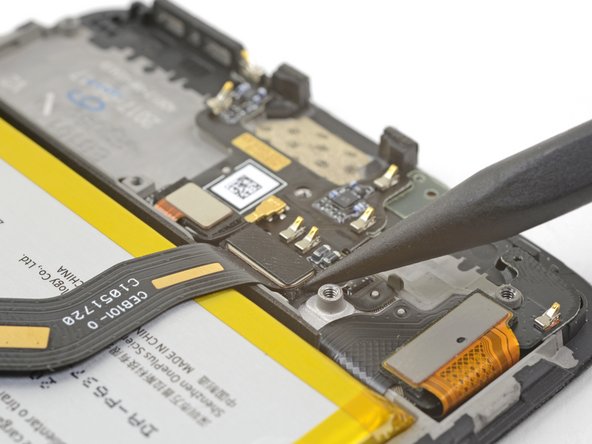
Heble das Zwischenverbindungskabel mit der Spudgerspitze hoch und löse es aus seinem Anschluss heraus.
This step is used in multiple guides, and not all of them require the cable to be bent away. You can just leave it sitting there, disconnected.
This image seems to show the daughterboard removed but there is no corresponding previous step. I see no way to remove the interconnect flex cable without removing the daughterboard. Possibly the volume switch can be removed with the cable still connected but I'm not confident enough to try this so will remove the daughterboard.
David,
Thanks for bringing this up. That's indeed a procedural error! I've added the missing steps in the affected guides.
-
-
-
Heble das Displayverbindungskabel mit der Spudgerspitze hoch und löse es aus seinem Anschluss nahe an der Unterkante der Hauptplatine.
Hallo, hier scheint der Schritt zu fehlen, in dem das Kameramodul entfernt wird.
Hello Norman,
You do not need to remove the camera module for procedure.
Hi Arthur,
You do need to remove the camera module, it’s in the photographs above, but not from step 33 onwards. It needs removing in order to remove the motherboard in steps 34 and 35.
Hi Alex! Thanks for the feedback! Can you relay which replacement guide you found the missing steps in? That would help me very much!
There are no steps 33, 34, 35 in this guide so the above comments must be from some other guide. With this phone I just lifted out the motherboard, carrying the camera with it. It went back the same way - but be careful not to trap the connector cable at the front under it.
-
-
-
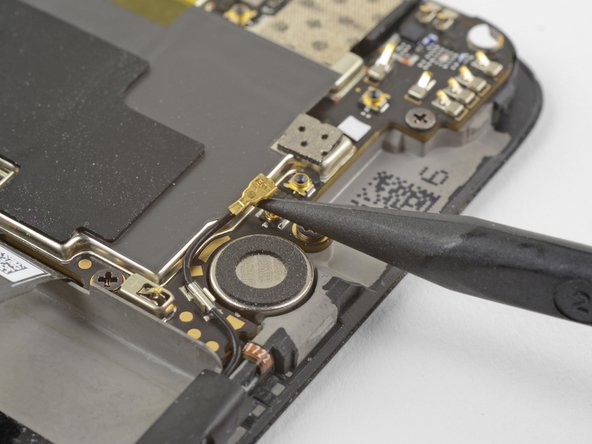
Schiebe die Spudgerspitze unter das Antennenverbindungskabel, welches über dem Vibrationsmotor an der Hauptplatine angeschlossen ist.
-
Heble das Kabel hoch und löse es aus seinem Anschluss.
-
Hole das Kabel aus seiner Erdungsklammer auf der Hauptplatine heraus und biege es aus dem Weg.
Be attentive when reassembling if your unit doesn’t have a tape, which keeps antenna interconnect cable in place — I’ve accidentally got it squeezed with back cover.
-
-
-
Setze die Spudgerspitze unter den kleinen quadratischen Antennenstecker, der nahe an der Oberkante an der Hauptplatine angeschlossen ist.
-
Heble nach oben und löse den Antennenstecker aus seinem Anschluss.
camera step seem to be missing
The cameras should be removed in step 14.
-
-
-
Entferne folgende sieben 2,6 mm Kreuzschlitzschrauben, mit denen die Hauptplatine befestigt ist:
-
-
-
Hebe die Hauptplatine mit den Fingern an der Oberkante hoch.
-
Hebe die Hauptplatine aus ihrer Vertiefung heraus und entferne sie.
The previous steps have not removed the camera although the pictures show it has been removed. I found that I could carefully lift away the motherboard with the camera attached.
When replacing the motherboard take care not to trap the small square antenna connector under the top edge.
-


Um dein Gerät wieder zusammenzubauen, folge den Schritten in umgekehrter Reihenfolge.
Bitte entsorge deinen Elektroschrott bei einem professionellem Abfallentsorgungsunternehmen.
Hat die Reparatur nicht den gewünschten Erfolg gebracht? Auf unserem
OnePlus 5 Antwortenforum kannst du Hilfe bei der Fehlersuche finden.
Rückgängig: Ich habe diese Anleitung nicht absolviert.
5 weitere Nutzer:innen haben diese Anleitung absolviert.
Besonderer Dank geht an diese Übersetzer:innen:
100%

Diese Übersetzer:innen helfen uns, die Welt zu reparieren! Wie kann ich mithelfen?
Hier starten ›

