Was du brauchst
-
-
Entferne den SIM Karten Einschub.
-
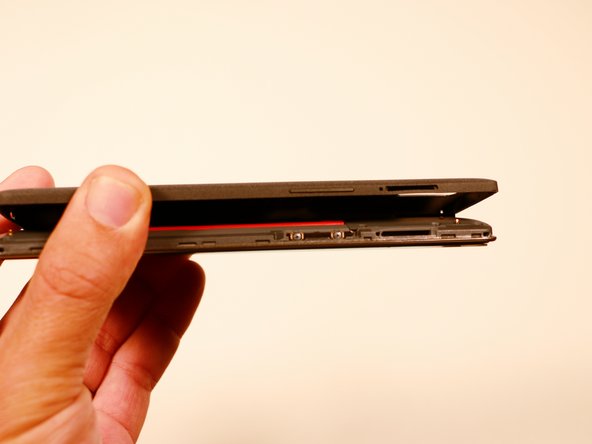
Entferne mit einem Plastik Opening Tool vorsichtig die Rückseite vom Gerät. Sei besonders vorsichtig um den SIM Einschub und an anderen schwachen Stellen.
-
Du spürst möglicherweise manchmal einen Widerstand von den versteckten Rasten entlang der inneren Kanten des Smartphones. Das ist nicht weiter schlimm, bewege dein Werkzeug konstant weiter in eine Richtung und springe nicht von einer Stelle zur nächsten.
-
Sobald du in einer Richtung (egal welcher) das Werkzeug halb um das Gerät bewegt hast, kannst du das Panel ganz einfach per Hand entfernen.
-
-
-
Entferne die Plastikstopfen mit einer Pinzette.
-
Darunter sind nun drei 3,175 mm Kreuzschlitzschrauben #00 sichtbar. Drehe sie heraus.
-
Entferne die restlichen sechs 3,175 mm Kreuzschlitzschrauben #00.
A needle works best to remove the plugs.
I second this. I used a sewing pin and the plugs came out in no time!
Liam Ong -
when I lifted the motherboard cover the battery cable stuck on it so that I lifted both, the plastic cover and the cable - step 4 below was not necessary to perform. Be careful!
anyone know what is the 6 orange screws in step 2 are called?
e.g. M2 x 2
I lost some screws.
So where can I buy some replacement of these screws?
-
-
-
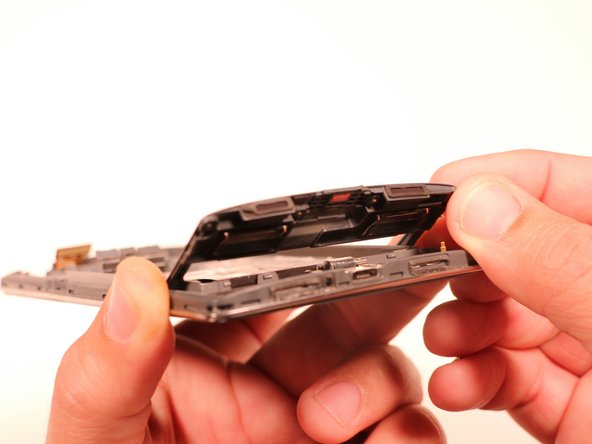
Hebele vorsichtig die schwarze Kunststoffabdeckung mit einem Plastiköffnungswekzeug hoch und entferne sie vom Gerät.
-
-
-
-
Nachdem die Motherboard-Abdeckung entfernt wurde, sehen wir, dass der Akku in Ordnung ist und durch ein schwarzes Flachbandkabel mit dem Motherboard verbunden ist.
-
Verwende einen Spudger, um vorsichtig den Akku nach oben zu hebeln, ausgehend von der Seite gegenüber dem Kabel. Sei dir bewusst, dass starker Kleber die Batterie befestigt, also sei vorsichtig und geduldig.
Is it OK to use the battery if I bent it during removal? I had to 'iron' it flat, but I think it might still be useable...
the best way to remove the battery is to lever the left side up from the bottom and remove it from the glue with an old credit card
Do this! it comes up very easily this way. All the adhesive is on the right side.
Great suggestion with a card to remove the battery!
Thanks for this trick saved me a lot of time
George P -
I second Dangerous Picture's suggestion. I found it very helpful to remove the ribbon from the dock (it was easy to do) before trying to remove the battery.
on my phone extensive use of glue was concentrated on just one side (right hand side). Not impossible to remove, little tricky
I mistakenly removed the battery with force, and the back peeled and brought out smoke, seemingly like it's gonna explode. Help !!!
-
-
-
Wenn der Akku frei ist, dann kannst du mit dem schwarzen Spudger das Akkukabel lösen. Heble dazu den Stecker aus seinem Anschluss hoch.
Thought I was going to snap my battery in half but patience and slight pressure did the trick.
Also agreeing the battery should be disconnected as soon as possible.
From where do I procure a new battery for it?????????
There are several connectors to the motherboard. In the picture above, one connector above and, below the screw thread, three more connectors. Be careful to reconnect any connectors accidentally disconnected while disconnecting / removeing the battery. In my case the connector shown at the top of the row came unconnected.
salut, pour moi le connecteur à la nappe était collé au cache en plastique qui couvrait la carte mère … mais le reste s’est bien passé.
Merci pour le tuto !
Thanks Buddy, I replaced battery of my one plus one and when I switched it on, touch was not working. It was heart sinking panic moment...Then I came across https://forum.xda-developers.com/oneplus... post, simple trick of sliding piece of paper below battery solved and infact improved the touch response. Thanks !
Kifch nikmandha
When putting in the new battery, the battery ribbon cable did not line up with the dock on the motherboard, on the replacement battery I ordered from iFixIt. I was able to carefully peel back the foil covering ribbon cable, align the cable, then press the foil back in place. Now, everything seems to be working.
-
-
-
Wenn der Akku erstmal draußen ist können wir unsere Aufmerksamkeit auf die Rückeinheit richten. Dieses Teil ist von sechs Schrauben zusammen gehalten, mehr in der Info Notiz weiter unten.
-
Zum Glück werden überall gleiche Schrauben benutzt um die Hauptplatine zu befestigen. Es handelt sich 3,175 mm Kreuzschlitzschrauben # 00.
-
Heble mit dem Spudger die Rückeinheit heraus, denke aber daran, dass es noch dieMicro USB Buchse gibt. Du kannst auch ein Plastiköffnungswerkzeug benutzen.
-
-
-
Jetzt hast du Zugang zur USB Buchse. Hebe sie mit dem flachen Ende des Spudgers hoch aus ihrem Verbinder und befreie sie von der Tochterplatine.
-
-
-
Nun kannst du das Flachbandkabel entfernen. Es ist noch mit einem kleinen Stückchen schwarzes Klebeband befestigt, löse es mitdem Spudger ab.
-
Die Micro USB Buchse und das anhängende Flachbandkabel sind frei und können entfernt werden.
-


Arbeite die Schritte in umgekehrter Reihenfolge ab, um dein Gerät wieder zusammenzubauen.
Arbeite die Schritte in umgekehrter Reihenfolge ab, um dein Gerät wieder zusammenzubauen.
Rückgängig: Ich habe diese Anleitung nicht absolviert.
32 weitere Nutzer:innen haben diese Anleitung absolviert.
Besonderer Dank geht an diese Übersetzer:innen:
100%

Diese Übersetzer:innen helfen uns, die Welt zu reparieren! Wie kann ich mithelfen?
Hier starten ›
Team

USF Tampa, Team 3-3, Brown Fall 2014 Mitglied von USF Tampa, Team 3-3, Brown Fall 2014
USFT-BROWN-F14S3G3
3 Mitglieder
20 Anleitungen geschrieben
4 Kommentare
Thanks back up and working should get a few more years out of it
cheers
Pretty easy, just be really careful when removing battery from glue ;)
Thanks a lot for this guide which is really complete !
I was able to successfully follow these instructions. Pretty sure I damaged the battery during removal though. I intended to replace the battery anyways, so I’m not too worried about it, but it would be nice to to have some technique listed for removing it less destructively.
For me USB was not charging because it seems that one of the 2 USB plugs above the battery were loose. I did replace the battery already sometime far in the past so this might have been the cause. If you just want to re-plug on the upper side and lift the port on the lower side, you don't even need to remove the battery. Just make sure that all plugs, not just USB, are tight before screwing everything back together.
Thanks a lot for this guide!
It doesn't mention you have to remove SIM tray first.
pawel - Antwort
I used the #0 for the rear panel screws. The #00 is too small and will slip, stripping the screws if you're not extra careful.
anonymous 2668 - Antwort
where can i buy the battery??
Shaun Davis - Antwort
Has anyone answered this? I am looking too.
Elie Daou -
They sell it on here, although I found mine on eBay.
Roger -
Aliexpress for $9 (original)
David van Ballegooijen -
The last three hidden screws are a !&&* of a time consumer to remove. probably you would need only a certain type of tweezers - I got stuck at midway and now I cannot get go have my phone detect the sim card either probably because the six screws are removed. I can now turn the phone back on but with no service or wifi connections are detected. This phone is a disaster!
Manan Shah - Antwort
Ivdid that too but son in law found I had reinstalled sim card in backwards or upside down.
wildcat75666 -
Where did you buy the micro USB piece? Thanks a lot!
Davide Rota - Antwort
EBay. I bought new battery cause old ibe was dead would not charge. Just ordered new cables fit 9.00 something free shipping. Anyway hope this fixes problem cause new battery did not fix problems.
wildcat75666 -
I was able to open going from the microusb slot and working my way around. The corners are tough, though.
Roger - Antwort
in my phone the battery was glued with double sided adhesive tape, only on the right side. I pried the left side up first, and carefully removed the battery. to lift the battery I used first used a suction cup(?) followed by a plectrum like tool to lift te battery, and keep it lifted
Eelco Busch - Antwort
A word of caution: the back panel is harder to remove than you might think. Especially because you may be removing the *screen* by mistake. When you have a "grip" with the tool make sure the metallic border is not coming off with it, and when you have removed enough to be able to lift the panel, make sure it isn't attached by ribbons - in that case you've been removing the screen. A good idea is to gently press your finger nail against the weak plastic located between the back and the SIM slot, and going up and down and sideways until you hear a click. Then you can start from there with the opening tool. As recommended be very gentle around the SIM slot.
Menahem Julien Raccah Lisei - Antwort
Where do I get the plastic opening tool?
Julie Hejducek - Antwort