Einleitung
Hier wird der Austausch der Micro USB Buchse an der Unterkante des Smartphones gezeigt.
Was du brauchst
-
-
Schalte das Smartphone an der Einschalttaste aus. Das ist die kleinere der Tasten an der rechten Seite.
-
Halte die Taste einige Sekunden gedrückt, bis die Option "Ausschalten" im Display erscheint.
-
Tippe darauf und das Smartphone fährt herunter.
-
-
-
Setze ein Werkzeug zum Entfernen der SIM Karte in das kleine Loch oben rechts am Smartphone ein, direkt über den Tasten der Lautstärkeregelung.
-
Drücke das Werkzeug hinein, der Einschub sollte herausspringen.
-
Entferne den SIM-Einschub vom Gerät.
There is absolutely no reason to remove the sim tray, we're not removing the motherboard.
-
-
-
Erwärme die Rückabdeckung langsam und gleichmäßig mit einem Heißluftgebläse.
-
Während du die Rückseite erwärmst, kannst du mit einem Jimmy testen, ob der Kleber schon so weich ist, dass er sich ablösen lässt.
-
Löse vorsichtig die Rückabdeckung ab. Benutze Plektren um die Teile getrennt zu halten.
-
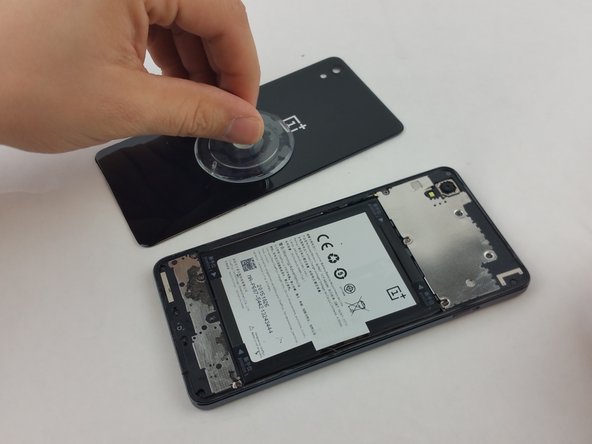
Wenn die Kanten genügend aus der Klebeverbindung befreit sind, musst du einen Saugnapf auf der Glasscheibe anbringen.
-
-
-
Drücke den Saugnapf an der Scheibe an, bis er gut festsitzt.
-
Ziehe mit Hilfe des Saugnapfs die Rückabdeckung vom Gerät ab.
It can't be stressed enough to do this very carefully. I did it very carefully, but not carefully enough. Cracked a corner. Also not just the edges, there's extra adhesive on the lower 2-3 cm's of the back.
Another remark, get in between the black bezel and the back cover, this is a bit unclear on the first picture. Same goes for the front, get in between the bezel and the front assembly.
-
-
-
-
Drehe folgende sieben Kreuzschlitzschrauben #000 heraus:
-
Vier längere Schrauben
-
Drei kürzere Schrauben
-
Wenn die Schrauben alle weg sind, kannst du die Metallabdeckung mit einem Spudger hochhebeln.
-
Sie ist unten mit zwei Laschen direkt über dem Akku befestigt, beginne also an der Unterseite.
Check http://imgur.com/wqD9Dis. Orange circles are the smaller screws (3 out of 7 are smaller than the other 4).
-
-
-
Wenn du die Abdeckung abgenommen hast kannst du den Verbinder des Akkukabels auf der Hauptplatine sehen.
-
Löse den Verbinder vorsichtig mit einem Spudger.
-
-
-
Finde am Akku eine aufgeklebte durchsichtige Zuglasche.
-
Fasse die Lasche fest an und ziehe sie weg vom Smartphone nach oben, um den Akku zu entfernen.
-
Ziehe so lange am Akku, bis er ganz frei ist.
Strictly speaking, you don't need to remove the battery at all. The connector to the front assembly is underneath the speaker assembly.
I agree it's nearly impossible to remove the battery without damaging it. Even a tiny little bending can lower the capacity. And if you heat it up too much to soften the glue it can explode. Also never use metal tools on the battery in case u break through the protection foil it won't catch fire.
The instructions on the pull tab itself are pretty clear and contradict what's said here!
"Tear from position 1, and then pull out the battery from position 2."
The battery sits in a kind of a black "vest", which is the thing glued to the phone (not the battery itself).
This vest can be "unbuttoned" from the top and bottom sides (position 1, visible on some of the previous pictures).
After that the battery would pop out with much less effort (there is some adhesive in the "vest", but it's much less robust).
What is being depicted here is quite dangerous and unnecessary, as it makes the battery bend heavily.
-
-
-
Entferne die acht rot markierten Kreuzschlitzschrauben #000, welche die Hauptplatine befestigen.
-
Wenn alle Schrauben weg sind kannst du den Metalldeckel mit einem Spudger hochhebeln.
-
-
-
Die Metallabdeckungen sind weg, der Akku gelöst, es kann weitergehen.
-
Finde die Rückkamera und clipse sie mit einem Spudger aus. Lege sie zur Seite.
-
Finde den rot markierten Verbinder und löse ihn mit einem Spudger. Schiebe ihn zur Seite.
-
-
-
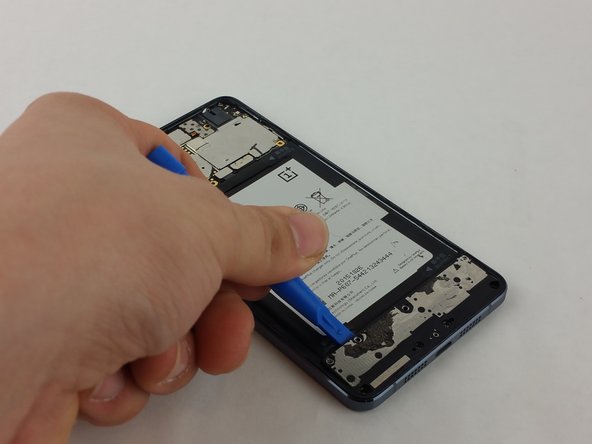
Heble die obere Hauptplatine vorsichtig mit einem Öffnungswerkzeug hoch, bis du sie ganz herausheben kannst.
-
Unten links am Smartphone findest du eine kleine Kreuzschlitzschraube #000. Drehe sie heraus.
Switch back to the plastic spudger and start to pry at the upper logic board. Carefully pry it up until you can safely remove completely.
This should not been done from the top but from the bottom, just as the metal cover from step one.
And before starting, make sure the three state button is in the top position.
-
-
-
Nachdem die Kreuzschlitzschraube weg ist musst du ein schwarzes Kabel entfernen. Löse es mit dem Spudger ab. .
-
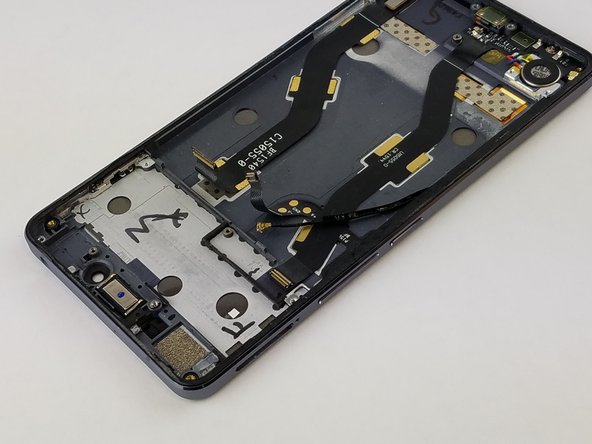
Ziehe das Flachbandkabel so wie im Bild gezeigt zurück. Es ist am Vibrationsmotor und an der Ladebuchse angeschlossen. Der Vibrationsmotor ähnelt einer Knopfzelle.
-
-
-
Wenn der Vibrationsmotor weg ist, dann ziehe vorsichtig am Kabel. Die Ladebuchse ist verklebt.
-
Nachdem du vorsichtig an der Buchse und dem Vibrationsmotor gezogen hast sollte alles frei sein; du kannst es dann austauschen.
-


Um dein Gerät wieder zusammenzusetzen, folge den Schritten in umgekehrter Reihenfolge.
Um dein Gerät wieder zusammenzusetzen, folge den Schritten in umgekehrter Reihenfolge.
Rückgängig: Ich habe diese Anleitung nicht absolviert.
15 weitere Nutzer:innen haben diese Anleitung absolviert.
Besonderer Dank geht an diese Übersetzer:innen:
100%
VauWeh hilft uns, die Welt in Ordnung zu bringen! Wie kann ich mithelfen?
Hier starten ›
Team

USF Tampa, Team 3-6, Wollert Spring 2016 Mitglied von USF Tampa, Team 3-6, Wollert Spring 2016
USFT-WOLLERT-S16S3G6
2 Mitglieder
10 Anleitungen geschrieben
7 Kommentare
I had to reuse the vibration motor de- and solder it back on, because it is not included in the spare part.
Watch for the silence switch when you reasamble the phone. I had to unscrew the upper bord again because i didn't payed atention to it and it was locked. Also the mic is covered on the replacement part. Don't forget to remove the yellow "flag" there.
I replaced USB flex port, now working, but now phone dont recognize SIM card..what i must check? Thanks for any help
What is the price of charging port with vibrator module
Good Instructions
In the upper right Corner is one more Screw
where the Logic-board is screwed directly.
That was not mentioned!
Also, you should pay attention that you do not pry where the PCP goes around the Camera.
I break off the Corner, fortunately it's only connected to the Status-LED.
Otherwise everything works.
Thank for the instructions, this came in very handy!
I agree with all the above remarks:
- The screw in the upper right corner
- Battery comes out difficult, but you can listen the sealant come loose, so don’t force it!
- As well, don’t pry to much on the logic board, it’s being hold down by little ‘clips’ on the phone edge. Gently ply the edge toward the outside and it will click loose.
After reinstalling everything, all works perfectly! (saving me a lot of money !)
Thank you!
i did not try this out, since everything is ok with my phone (I was looking for polarity of the contacts of the battery connector actually), but this instructions seem very weird to me (as they are now): if you want to change the micro USB port, WHY on earth would you have to remove the logic board??? they are on opposing sides of the device and connected with a flex-cable, I don’t see the necessity.