Zum Hauptinhalt wechseln
Gemeinsam reparieren - Jetzt registrieren

Osmo Mobile Trigger Button Replacement

Was du brauchst

  1. Osmo Mobile Trigger Button Replacement, Osmo Mobile Handle Disassembly: Schritt 1, Bild 1 von 2 Osmo Mobile Trigger Button Replacement, Osmo Mobile Handle Disassembly: Schritt 1, Bild 2 von 2
    • Remove gimbal from base handle by loosening round plate found at the top of the handle.

    Frag FixBot

    Kommentar hinzufügen

  2. Osmo Mobile Trigger Button Replacement: Schritt 2, Bild 1 von 2 Osmo Mobile Trigger Button Replacement: Schritt 2, Bild 2 von 2
    • Use Phillips #00 screwdriver to remove the three screws found on the gimbal stabilizer to detach handle from gimbal.

    • Carefully detach handle from gimbal and disconnect the cable that connects the two.

    Frag FixBot

    Kommentar hinzufügen

  3. Osmo Mobile Trigger Button Replacement: Schritt 3, Bild 1 von 1
    • Locate the hex screws found at the top base of the handle, and unscrew using the 1.5mm hex screwdriver.

    Frag FixBot

    Kommentar hinzufügen

  4. Osmo Mobile Trigger Button Replacement: Schritt 4, Bild 1 von 2 Osmo Mobile Trigger Button Replacement: Schritt 4, Bild 2 von 2
    • Remove joystick by gently pulling away from handle

    Frag FixBot

    Kommentar hinzufügen

  5. Osmo Mobile Trigger Button Replacement: Schritt 5, Bild 1 von 3 Osmo Mobile Trigger Button Replacement: Schritt 5, Bild 2 von 3 Osmo Mobile Trigger Button Replacement: Schritt 5, Bild 3 von 3
    In diesem Schritt verwendetes Werkzeug:
    Tweezers
    $4.99
    • Remove the quick release PCBA by locating the connecting wires and release the ribbon cable with tweezers.

    • Use the spudger to pry open and remove the face plate, starting at the back of the handle.

    Frag FixBot

    Kommentar hinzufügen

  6. Osmo Mobile Trigger Button Replacement: Schritt 6, Bild 1 von 3 Osmo Mobile Trigger Button Replacement: Schritt 6, Bild 2 von 3 Osmo Mobile Trigger Button Replacement: Schritt 6, Bild 3 von 3
    • Locate four screws directly on top of handle.

    • Unscrew the silver, bottom two screws, that are closest to the face plate using the 00 screwdriver.

    • Unscrew the black, top two screws, located furthest from the face plate, using the 0 screwdriver.

    • Remove the remaining two screws found on the front of the faceplate.

    • Remove the rest of the face plate shell.

    Frag FixBot

    Kommentar hinzufügen

  7. Osmo Mobile Trigger Button Replacement, Charging Port: Schritt 7, Bild 1 von 1
    • Remove the top left screw on the joystick panel with Phillips #00 screwdriver.

    • Lift faceplate holding joystick module.

    Frag FixBot

    Kommentar hinzufügen

  8. Osmo Mobile Trigger Button Replacement: Schritt 8, Bild 1 von 1
    • Remove the bottom right screw on the joystick panel with the #00 Phillips screwdriver.

    Frag FixBot

    Kommentar hinzufügen

  9. Osmo Mobile Trigger Button Replacement: Schritt 9, Bild 1 von 1
    • Hold down the larger of the two ribbon cables, and pull on circuit board with a constant and careful down and out motion.

    Frag FixBot

    Kommentar hinzufügen

  10. Osmo Mobile Trigger Button Replacement: Schritt 10, Bild 1 von 1
    • Remove the two screws from the green charging module and the two screws on the grey plate and remove from handle.

    • Replace charging module.

    Frag FixBot

    Kommentar hinzufügen

  11. Osmo Mobile Trigger Button Replacement, Trigger Button: Schritt 11, Bild 1 von 2 Osmo Mobile Trigger Button Replacement, Trigger Button: Schritt 11, Bild 2 von 2
    In diesem Schritt verwendetes Werkzeug:
    Tweezers
    $4.99
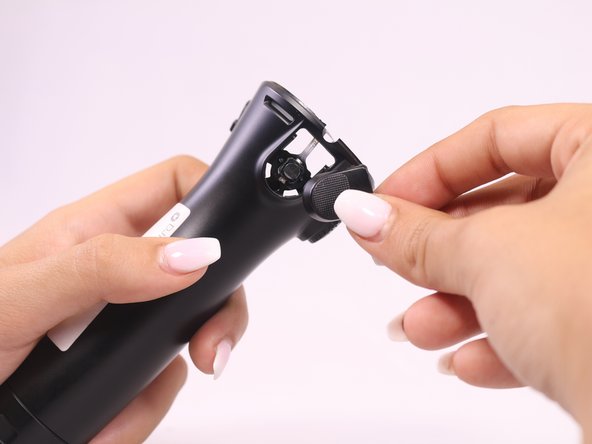
    • Use the tweezers to push outward on the backside of the trigger button hinges.

    • Pop out trigger button.

    Frag FixBot

    Kommentar hinzufügen

  12. Osmo Mobile Trigger Button Replacement: Schritt 12, Bild 1 von 1
    • Use the tweezers to remove the underlying button that contacts with the trigger button, and replace.

    Frag FixBot

    Kommentar hinzufügen

Abschluss

To reassemble your device, follow these instructions in reverse order.

Rückgängig: Ich habe diese Anleitung nicht absolviert.

Team

USF Tampa, Team S2-G1, Nance Fall 2017 Mitglied von USF Tampa, Team S2-G1, Nance Fall 2017

USFT-NANCE-F17S2G1

4 Mitglieder

18 Anleitungen geschrieben

1 Kommentar zur Anleitung

How I can fix the USB port, it went inside the handle?

Juan Carlos Beltran - Antwort Teilen

Kommentar hinzufügen

Seitenaufrufe:

Letzte 24 Stunden: 1

Letzte 7 Tage: 12

Letzte 30 Tage: 53

Insgesamt: 3,318