Zum Hauptinhalt wechseln

P775DM3 Keyboard replacement

Was du brauchst

  1. P775DM3 Keyboard replacement, Battery: Schritt 1, Bild 1 von 2 P775DM3 Keyboard replacement, Battery: Schritt 1, Bild 2 von 2
    • Unlock the lock circled in red.

  2. P775DM3 Keyboard replacement: Schritt 2, Bild 1 von 3 P775DM3 Keyboard replacement: Schritt 2, Bild 2 von 3 P775DM3 Keyboard replacement: Schritt 2, Bild 3 von 3
    • Lift the battery while unlocking the lock circled in red.

  3. P775DM3 Keyboard replacement, Access to major components: Schritt 3, Bild 1 von 2 P775DM3 Keyboard replacement, Access to major components: Schritt 3, Bild 2 von 2
    • Unscrew the five screws circled in red.

  4. P775DM3 Keyboard replacement: Schritt 4, Bild 1 von 2 P775DM3 Keyboard replacement: Schritt 4, Bild 2 von 2
    • Slide the plate in the direction of the red arrow.

  5. P775DM3 Keyboard replacement: Schritt 5, Bild 1 von 2 P775DM3 Keyboard replacement: Schritt 5, Bild 2 von 2
    • Lift the plate.

  6. P775DM3 Keyboard replacement, Keyboard: Schritt 6, Bild 1 von 2 P775DM3 Keyboard replacement, Keyboard: Schritt 6, Bild 2 von 2
    • Unscrew the two screws circled in red

  7. P775DM3 Keyboard replacement: Schritt 7, Bild 1 von 3 P775DM3 Keyboard replacement: Schritt 7, Bild 2 von 3 P775DM3 Keyboard replacement: Schritt 7, Bild 3 von 3
    • Press a paper clip in the three places marked in red

    • Lift the keyboard and feel free to put some strength

  8. P775DM3 Keyboard replacement: Schritt 8, Bild 1 von 2 P775DM3 Keyboard replacement: Schritt 8, Bild 2 von 2
    • Disconnect the three framed connectors in red

  9. P775DM3 Keyboard replacement: Schritt 9, Bild 1 von 2 P775DM3 Keyboard replacement: Schritt 9, Bild 2 von 2
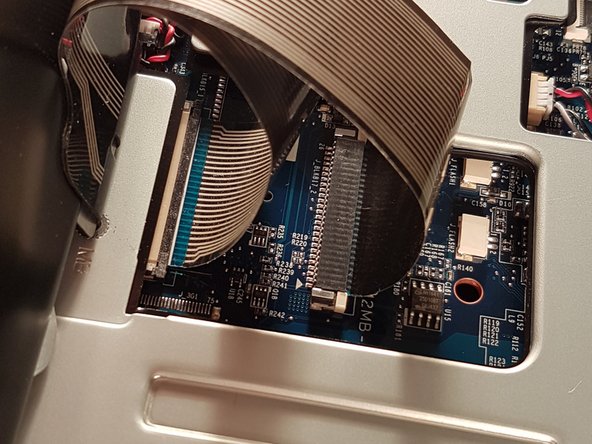
    • Pull the white drawer in the direction of the arrow to unlock the connector

    • Disconnect the red circled connector

  10. P775DM3 Keyboard replacement: Schritt 10, Bild 1 von 2 P775DM3 Keyboard replacement: Schritt 10, Bild 2 von 2
    • Pull the black drawer in the direction of the arrow to unlock the connector

    • Disconnect the red circled connector

  11. P775DM3 Keyboard replacement: Schritt 11, Bild 1 von 3 P775DM3 Keyboard replacement: Schritt 11, Bild 2 von 3 P775DM3 Keyboard replacement: Schritt 11, Bild 3 von 3
    • Lift the flap that holds the connector circled in red

    • Disconnect the red circled connector

    • Remove the keyboard

Abschluss

To reassemble your device, follow the instructions in reverse order.

6 weitere Nutzer:innen haben diese Anleitung absolviert.

Besonderer Dank geht an diese Übersetzer:innen:

fr en

100%

Diese Übersetzer:innen helfen uns, die Welt zu reparieren! Wie kann ich mithelfen?
Hier starten ›

Felice Suglia

Mitglied seit: 06/15/13

30.884 Reputation

264 Anleitungen geschrieben

3 Kommentare

I wish to know whether it’s possible to pry off the key to clean off the contacts. (I spilled coffee on the keyboard).

Fortunately for me, the key was on the edge of the board (the down arrow key). It was stuck on.

I lifted the key up as much as I could and I cleaned it with Deoxit. That did the trick. My keyboard is now working.

Thanks for the steps!

Clem Wang - Antwort

Oops. Spoke too soon. There’s something wrong with the keyboard: the INSERT key (ESC -[2~ ) is stuck. Also, there’s a red light under the keyboard. I’m not sure what that all means…

Clem Wang - Antwort

Great instructions, but for my laptop, step 7 only indicated three of seven places (the other four are the top centre of the keyboard, and the three points symmetrical to the 3 you’ve indacted, on the right hand side of the keyboard).

Josh Greifer - Antwort

Kommentar hinzufügen

Seitenaufrufe:

Letzte 24 Stunden: 2

Letzte 7 Tage: 7

Letzte 30 Tage: 30

Insgesamt: 3,863