Zum Hauptinhalt wechseln

PS Vita Slim Motherboard Replacement

Was du brauchst

  1. PS Vita Slim Motherboard Replacement, Back Panel: Schritt 1, Bild 1 von 1
    • Please make sure the system is completely powered off and all SD storage cards are removed before starting the removal process

    • All 6.35mm screws were removed using a J00 bit from the iFixit pro toolkit.

    • There are four screws on the back of the device, remove them as shown.

    I actually broke a 32GB storage card because I didn’t remove it first before I open the chasis. Beware of this!!! REMOVE YOUR CARD FIRST!!!

    Daniel Wang - Antwort

  2. PS Vita Slim Motherboard Replacement: Schritt 2, Bild 1 von 2 PS Vita Slim Motherboard Replacement: Schritt 2, Bild 2 von 2
    • There are two screws on the bottom, near the charging port, remove them using the J00 screwdriver on the 6.35mm screws from the iFixit pro toolkit.

    • Finally, remove the top screw under the dust cover using the J00 screwdriver on the 6.35mm screws from the iFixit pro toolkit.

  3. PS Vita Slim Motherboard Replacement: Schritt 3, Bild 1 von 3 PS Vita Slim Motherboard Replacement: Schritt 3, Bild 2 von 3 PS Vita Slim Motherboard Replacement: Schritt 3, Bild 3 von 3
    • The next step will require the opening tool.

    • Please carefully separate the back from the front completely. You will need to disconnect the small ribbon cable on the inside before completely removing the back. Otherwise you may end up hurting the ribbons on the inside.

    • While separating the back, carefully pry all the way around the back. You will hear popping noises while going around and this is a good sign.

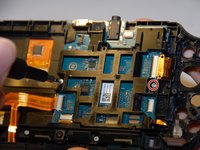
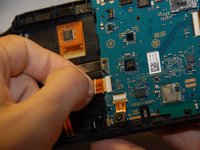
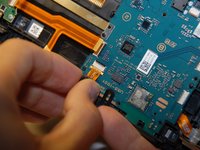
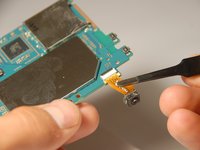
    • Upon removing the back panel you will need to slowly and carefully remove the ribbons connecting the hardware to access the needed parts to be repaired.

  4. PS Vita Slim Motherboard Replacement: Schritt 4, Bild 1 von 1
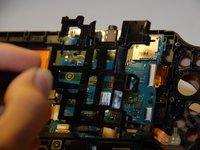
    • Once the ribbons have been removed, then the back is fully removed and you can access the hardware within.

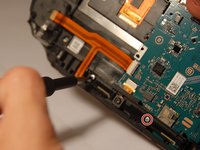
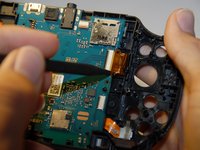
    Don’t forget to remove the battery at this point. The little corners of the connector that poke out a bit are there for you to pry the connector up. Be careful pulling the battery connector out by the wire, you could damage the wire where it is attached to the connector.

    Landon Burnette - Antwort

  5. PS Vita Slim Motherboard Replacement, Motherboard: Schritt 5, Bild 1 von 2 PS Vita Slim Motherboard Replacement, Motherboard: Schritt 5, Bild 2 von 2
    • First you will want to remove the black casing holding the motherboard in.

    • Remove the two screws that are holding the casing down. These will be 6.35 mm screws that are to be removed using the J00 bit from the iFixit pro toolkit.

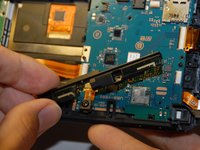
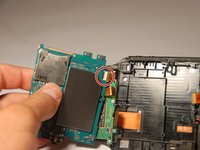
    • Once the screws are removed, carefully lift the case out of the system.

    There may be three screws holding the casing in. One between the two shown but up a bit higher. You can see the hole it should be in in the picture.

    Kiev - Antwort

    Hi Kiev,

    While that may look like a screw hole, I don't believe it is.

    Also, I believe the plastic motherboard cover sits underneath a clear ribbon cable on the bottom right, so be careful when removing it.

    Jbyer 4 - Antwort

  6. PS Vita Slim Motherboard Replacement: Schritt 6, Bild 1 von 2 PS Vita Slim Motherboard Replacement: Schritt 6, Bild 2 von 2
    • Next remove the two bottom 6.35 mm screws using the J00 bit from the iFixit pro toolkit.

    • Now you will be able to gently remove the bottom casing.

    There are tabs on this piece too. On the far right and far left. I believe there is one in the middle but I was able to pull it out with enough force that that one did not seem to matter.

    Kiev - Antwort

  7. PS Vita Slim Motherboard Replacement: Schritt 7, Bild 1 von 3 PS Vita Slim Motherboard Replacement: Schritt 7, Bild 2 von 3 PS Vita Slim Motherboard Replacement: Schritt 7, Bild 3 von 3
    • Next you must remove the two ribbon cables connecting the motherboard to other hardware parts. Please be careful. The third ribbon on the bottom is a camera that also needs to be carefully removed.

  8. PS Vita Slim Motherboard Replacement: Schritt 8, Bild 1 von 3 PS Vita Slim Motherboard Replacement: Schritt 8, Bild 2 von 3 PS Vita Slim Motherboard Replacement: Schritt 8, Bild 3 von 3
    • Now gently lift the motherboard up, as there will be a ribbon that still needs to be removed.

    • Carefully remove the last ribbon, from the hardware and not the motherboard.

    • The motherboard can be successfully removed.

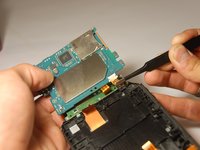
    • Any repairs or replaces will be doable now.

    There will be clamps connecting this piece to the shell. Remember to pull them back instead of brute forcing it if it is not coming out.

    Kiev - Antwort

Abschluss

To reassemble your device, follow these instructions in reverse order.

9 weitere Personen haben diese Anleitung absolviert.

Daniel Woodard

Mitglied seit: 08/22/17

3.025 Reputation

7 Anleitungen geschrieben

Team

4 Kommentare

bonjour ma ps vita slim

batterie changé et la console a du mal a demarré quand elle s'allume comme si c'est comme elle a pas de batterie se remet a zero et apres on lance un jeu elle s'éteint et quand elle redémarre remettre heure c'est quoi le probleme

merci

Raymond Depardieu - Antwort

pls tell me when it is in stock

Samadith Egodagamage - Antwort

i need new screen and new motherboard to done build it

Matthew T - Antwort

el conector del flex que se muestra al principio, que conecta con la carcaza, esta roto, le falta la traba. pero el flex esta bien, como hago para repararlo o cambiarlo?

Anti P - Antwort

Kommentar hinzufügen

Seitenaufrufe:

Letzte 24 Stunden: 6

Letzte 7 Tage: 37

Letzte 30 Tage: 149

Insgesamt: 10,856