Zum Hauptinhalt wechseln

Packard Bell ms-Hera c Disassembly

Was du brauchst

  1. Packard Bell ms-Hera c Disassembly, Unscrew the lid: Schritt 1, Bild 1 von 3 Packard Bell ms-Hera c Disassembly, Unscrew the lid: Schritt 1, Bild 2 von 3 Packard Bell ms-Hera c Disassembly, Unscrew the lid: Schritt 1, Bild 3 von 3
    • Remove the battery.

    • Unscrew the red marked screws with a Phillips screwdriver.

    • Remove the DVD reader.

  2. Packard Bell ms-Hera c Disassembly, Disconnect the keyboard: Schritt 2, Bild 1 von 3 Packard Bell ms-Hera c Disassembly, Disconnect the keyboard: Schritt 2, Bild 2 von 3 Packard Bell ms-Hera c Disassembly, Disconnect the keyboard: Schritt 2, Bild 3 von 3
    • Pry in the red marked spots to release the keyboard

    • Unplug the keyboard connector.

  3. Packard Bell ms-Hera c Disassembly, Unplug the cables: Schritt 3, Bild 1 von 3 Packard Bell ms-Hera c Disassembly, Unplug the cables: Schritt 3, Bild 2 von 3 Packard Bell ms-Hera c Disassembly, Unplug the cables: Schritt 3, Bild 3 von 3
    • Unplug the 3 connectors on the motherboard

    • Remove the 2 screws holding the display in place

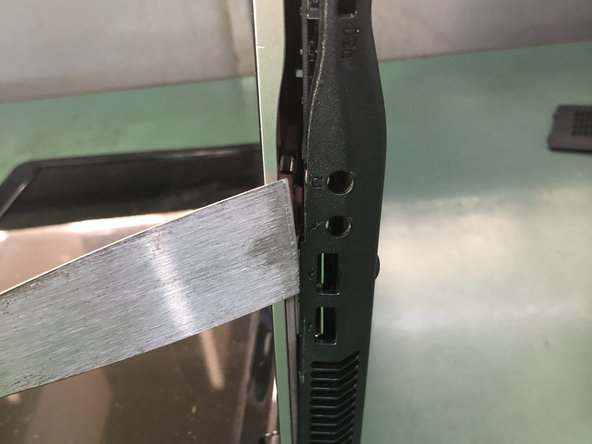
    • Use a thin tool to pry up the back cover of the laptop on the side

  4. Packard Bell ms-Hera c Disassembly, Unscrew the motherboard: Schritt 4, Bild 1 von 3 Packard Bell ms-Hera c Disassembly, Unscrew the motherboard: Schritt 4, Bild 2 von 3 Packard Bell ms-Hera c Disassembly, Unscrew the motherboard: Schritt 4, Bild 3 von 3
    • Remove the back cover.

    • Remove the HDD.

    • Remove the screws that hold the motherboard.

  5. Packard Bell ms-Hera c Disassembly, Remove the display: Schritt 5, Bild 1 von 3 Packard Bell ms-Hera c Disassembly, Remove the display: Schritt 5, Bild 2 von 3 Packard Bell ms-Hera c Disassembly, Remove the display: Schritt 5, Bild 3 von 3
    • Remove the marked screws and connectors.

    • Disconnect the display connector.

    • Remove the display.

  6. Packard Bell ms-Hera c Disassembly, Remove the heatsink: Schritt 6, Bild 1 von 3 Packard Bell ms-Hera c Disassembly, Remove the heatsink: Schritt 6, Bild 2 von 3 Packard Bell ms-Hera c Disassembly, Remove the heatsink: Schritt 6, Bild 3 von 3
    • Remove the cooling fan.

    • Remove the heatsink.

    • Remove the screws on the connector.

  7. Packard Bell ms-Hera c Disassembly, Remove the motherboard: Schritt 7, Bild 1 von 2 Packard Bell ms-Hera c Disassembly, Remove the motherboard: Schritt 7, Bild 2 von 2
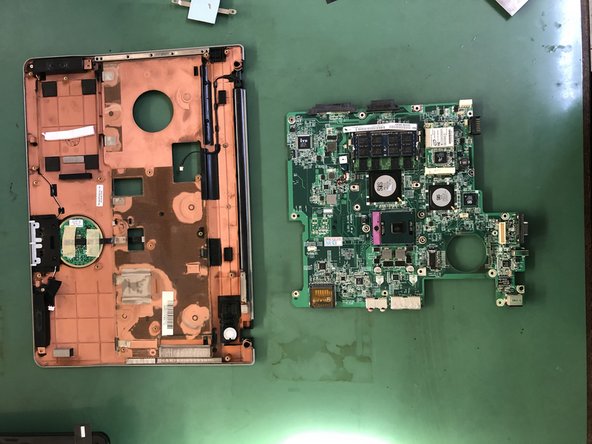
    • Remove the screws to remove the motherboard.

Abschluss

To reassemble your device, follow these instructions in reverse order.

Ein:e weitere:r Nutzer:in hat diese Anleitung absolviert.

Besonderer Dank geht an diese Übersetzer:innen:

it en

100%

Diese Übersetzer:innen helfen uns, die Welt zu reparieren! Wie kann ich mithelfen?
Hier starten ›

Smilzo

Mitglied seit: 11/09/13

11.294 Reputation

39 Anleitungen geschrieben

0 Kommentare

Kommentar hinzufügen

Seitenaufrufe:

Letzte 24 Stunden: 1

Letzte 7 Tage: 5

Letzte 30 Tage: 42

Insgesamt: 1,097