Zum Hauptinhalt wechseln

Panasonic Lumix DMC-FX07 LCD Display Replacement

Was du brauchst

  1. Panasonic Lumix DMC-FX07 LCD Display Replacement, Battery: Schritt 1, Bild 1 von 1
    • Move the switch on the battery door to the Open position.

    • The door will automatically swing open after you let it go.

  2. Panasonic Lumix DMC-FX07 LCD Display Replacement: Schritt 2, Bild 1 von 2 Panasonic Lumix DMC-FX07 LCD Display Replacement: Schritt 2, Bild 2 von 2
    • Push the small gray tab on the top right corner to the left. The battery will pop out slightly.

    • Keep your finger clear of the battery when it pops out.

  3. Panasonic Lumix DMC-FX07 LCD Display Replacement, Memory Card: Schritt 3, Bild 1 von 1
    • Push the memory card in and let go.

    • The memory card will pop out slightly.

    • Pull out the memory card.

  4. Panasonic Lumix DMC-FX07 LCD Display Replacement, Back Cover: Schritt 4, Bild 1 von 2 Panasonic Lumix DMC-FX07 LCD Display Replacement, Back Cover: Schritt 4, Bild 2 von 2
    • Unscrew the small screws on the sides of the camera.

    • The screws on the left side(#00P, 4.7mm) are longer than the screw on the right side(#00P, 3.3mm).

  5. Panasonic Lumix DMC-FX07 LCD Display Replacement: Schritt 5, Bild 1 von 2 Panasonic Lumix DMC-FX07 LCD Display Replacement: Schritt 5, Bild 2 von 2
    • Unscrew the three small screws on the bottom(#00P, 3.3mm).

    • The bottom will fall off.

  6. Panasonic Lumix DMC-FX07 LCD Display Replacement: Schritt 6, Bild 1 von 3 Panasonic Lumix DMC-FX07 LCD Display Replacement: Schritt 6, Bild 2 von 3 Panasonic Lumix DMC-FX07 LCD Display Replacement: Schritt 6, Bild 3 von 3
    • Lift up the bottom back cover by prying the bottom edge with the spudger.

    • Gently lift up the back cover with your hand from the bottom to the top.

  7. Panasonic Lumix DMC-FX07 LCD Display Replacement: Schritt 7, Bild 1 von 3 Panasonic Lumix DMC-FX07 LCD Display Replacement: Schritt 7, Bild 2 von 3 Panasonic Lumix DMC-FX07 LCD Display Replacement: Schritt 7, Bild 3 von 3
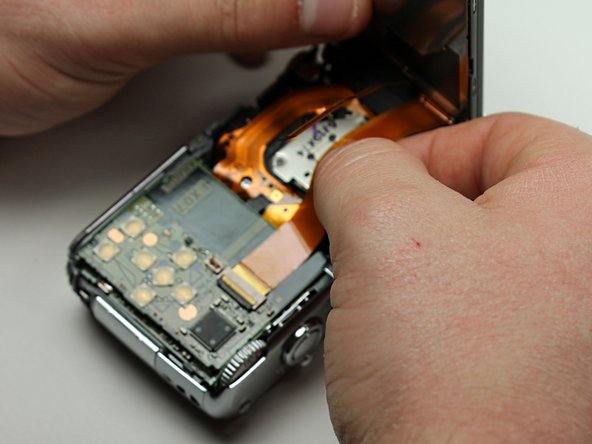
    • Lift the tabs on the ZIF connectors.

    • The ribbon cables should easily come out of the ZIF connectors.

  8. Panasonic Lumix DMC-FX07 LCD Display Replacement, LCD Display: Schritt 8, Bild 1 von 3 Panasonic Lumix DMC-FX07 LCD Display Replacement, LCD Display: Schritt 8, Bild 2 von 3 Panasonic Lumix DMC-FX07 LCD Display Replacement, LCD Display: Schritt 8, Bild 3 von 3
    • Use the pointed end of the spudger to pry off the LCD screen from the back cover. Place the tip of the spudger in the small hole in the bracket on the LCD screen and lift it out.

Abschluss

To reassemble your device, follow these instructions in reverse order.

Team

Cal Poly, Team 6-23, Amido Spring 2012 Mitglied von Cal Poly, Team 6-23, Amido Spring 2012

CPSU-AMIDO-S12S6G23

4 Mitglieder

10 Anleitungen geschrieben

0 Kommentare

Kommentar hinzufügen

Seitenaufrufe:

Letzte 24 Stunden: 0

Letzte 7 Tage: 2

Letzte 30 Tage: 7

Insgesamt: 1,806