Zum Hauptinhalt wechseln

Panasonic Lumix DMC-G5 Lens Connection Assembly Replacement

Was du brauchst

  1. Panasonic Lumix DMC-G5 Lens Connection Assembly Replacement, Lens Connection Assembly: Schritt 1, Bild 1 von 1
    • Remove the four 5.4 mm J000 screws from the front lens mount.

  2. Panasonic Lumix DMC-G5 Lens Connection Assembly Replacement: Schritt 2, Bild 1 von 2 Panasonic Lumix DMC-G5 Lens Connection Assembly Replacement: Schritt 2, Bild 2 von 2
    • Use your hands or the thin plastic opening tool to remove the external housing ring as well as the smaller internal ring underneath.

    • Keep in mind that the red dot should be on the left side of the face. A small hole on the right side keeps the external ring centered on the lens release button. A similar hole on the left side keeps the internal ring centered underneath.

    • The three short depressed sections of the internal ring should be facing into the camera during reassembly.

  3. Panasonic Lumix DMC-G5 Lens Connection Assembly Replacement: Schritt 3, Bild 1 von 2 Panasonic Lumix DMC-G5 Lens Connection Assembly Replacement: Schritt 3, Bild 2 von 2
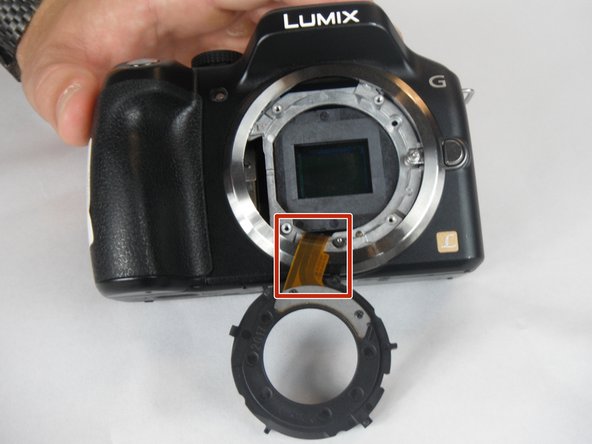
    • Use the Thin Plastic Opening Tool to release the black connection ring.

    • Insert the tool underneath the right side of the black ring to improve leverage.

    • Let the ring fall forward to reveal its underside.

    • Take care not to disconnect the filament connections from the camera as they can be very difficult to reconnect.

  4. Panasonic Lumix DMC-G5 Lens Connection Assembly Replacement: Schritt 4, Bild 1 von 2 Panasonic Lumix DMC-G5 Lens Connection Assembly Replacement: Schritt 4, Bild 2 von 2
    • Remove the two 2.7mm J000 phillips screws from the mount ring which connect to the ribbon of filament connections.

    • There are many small golden-colored springs and rivets within the black ring connector. They will fall out if held upside down. When reassembling, they should be in contact with the gold plating of the filament connection.

Abschluss

To reassemble your device, follow these instructions in reverse order.

2 weitere Nutzer:innen haben diese Anleitung absolviert.

Team

USF Tampa, Team 1-3, Kass Spring 2017 Mitglied von USF Tampa, Team 1-3, Kass Spring 2017

USFT-KASS-S17S1G3

4 Mitglieder

6 Anleitungen geschrieben

0 Kommentare

Kommentar hinzufügen

Seitenaufrufe:

Letzte 24 Stunden: 1

Letzte 7 Tage: 5

Letzte 30 Tage: 8

Insgesamt: 1,142