Zum Hauptinhalt wechseln

Panasonic Lumix DMC-ZS1 Door Replacement

Was du brauchst

  1. Panasonic Lumix DMC-ZS1 Door Replacement, Exterior Screw removal: Schritt 1, Bild 1 von 3 Panasonic Lumix DMC-ZS1 Door Replacement, Exterior Screw removal: Schritt 1, Bild 2 von 3 Panasonic Lumix DMC-ZS1 Door Replacement, Exterior Screw removal: Schritt 1, Bild 3 von 3
    • Remove the battery and memory card from the unit

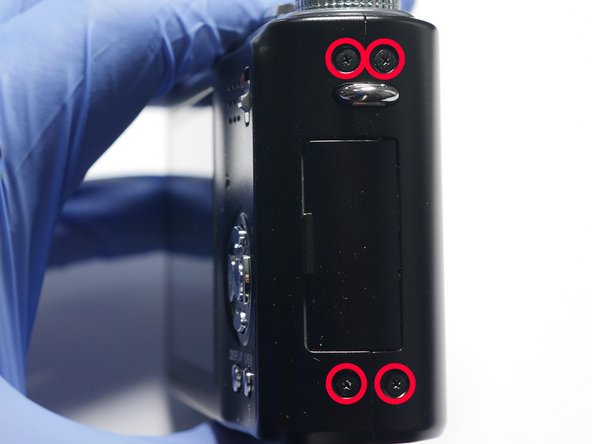
    • Remove 6 (0.3mm) screws from the sides of the unit

    • Remove 5 (0.3mm) screws from the bottom of the unit

  2. Panasonic Lumix DMC-ZS1 Door Replacement: Schritt 2, Bild 1 von 2 Panasonic Lumix DMC-ZS1 Door Replacement: Schritt 2, Bild 2 von 2
    • Lift up slightly the rear cover.

    • Do not remove rear cover yet. It is still attached to the Main PCB.

    • Flip up the cable clamps using a spudger or other device. Careful not to break the clamps. Release flex cables and remove back cover.

  3. Panasonic Lumix DMC-ZS1 Door Replacement: Schritt 3, Bild 1 von 3 Panasonic Lumix DMC-ZS1 Door Replacement: Schritt 3, Bild 2 von 3 Panasonic Lumix DMC-ZS1 Door Replacement: Schritt 3, Bild 3 von 3
    • Release the 3 metal clips from the rear cover and remove the LCD

  4. Panasonic Lumix DMC-ZS1 Door Replacement, Door: Schritt 4, Bild 1 von 3 Panasonic Lumix DMC-ZS1 Door Replacement, Door: Schritt 4, Bild 2 von 3 Panasonic Lumix DMC-ZS1 Door Replacement, Door: Schritt 4, Bild 3 von 3
    In diesem Schritt verwendetes Werkzeug:
    Tweezers
    $4.99
    Kaufen
    • Complete the following review guide: LCD removal

    • Remove the front cover

    • Use tweezers or a thin object to push door pin thru enough to grab from the other side.

    • Keep door closed during this procedure so you will not loose the spring.

  5. Panasonic Lumix DMC-ZS1 Door Replacement: Schritt 5, Bild 1 von 3 Panasonic Lumix DMC-ZS1 Door Replacement: Schritt 5, Bild 2 von 3 Panasonic Lumix DMC-ZS1 Door Replacement: Schritt 5, Bild 3 von 3
    • Try to keep the door closed during this procedure.

    • Pull out door pin using needle nose pliers or other tool.

    • Notice spring positioning. This will help you re-install your replacement door

    • If you are having trouble installing, try to keep the spring in place by using a small piece of tape.

    • Replacement Door

Abschluss

To reassemble your device, follow these instructions in reverse order.

Ein:e weitere:r Nutzer:in hat diese Anleitung absolviert.

0 Kommentare

Kommentar hinzufügen

Seitenaufrufe:

Letzte 24 Stunden: 0

Letzte 7 Tage: 4

Letzte 30 Tage: 10

Insgesamt: 150