Zum Hauptinhalt wechseln

Patagonia Black Hole® Wheeled Duffel Wheel Replacement

Was du brauchst

  1. Patagonia Black Hole® Wheeled Duffel Wheel Replacement, Open Liner Compartment: Schritt 1, Bild 1 von 3 Patagonia Black Hole® Wheeled Duffel Wheel Replacement, Open Liner Compartment: Schritt 1, Bild 2 von 3 Patagonia Black Hole® Wheeled Duffel Wheel Replacement, Open Liner Compartment: Schritt 1, Bild 3 von 3
    • A headlamp is recommended for working inside the bag.

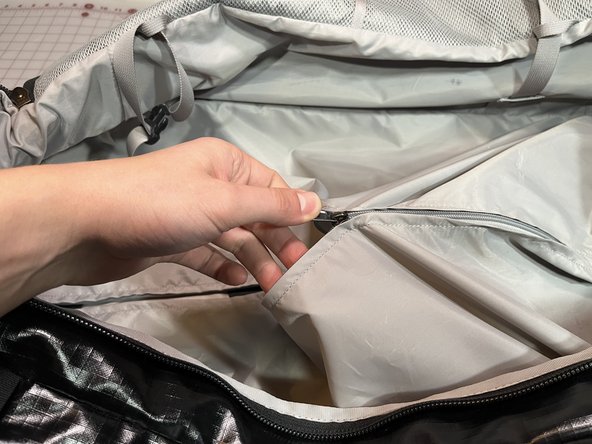
    • Inside the main compartment of the duffel at the bottom, locate the zipper to the liner compartment and open. This will expose the inside of the plastic wheel housing.

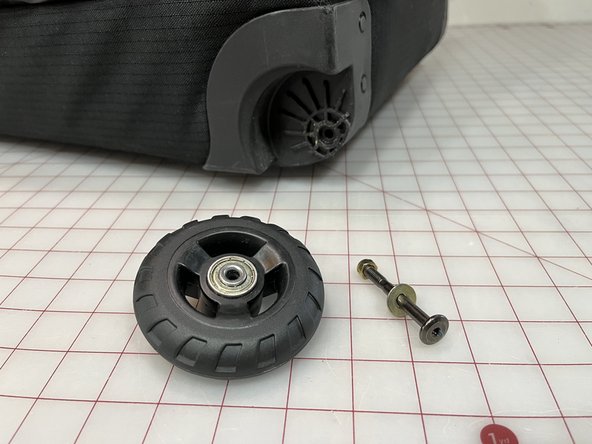
    • If the wheel and axle are missing, try and locate the washer and nut inside the liner compartment to reuse.

  2. Patagonia Black Hole® Wheeled Duffel Wheel Replacement, Remove Broken Wheel & Axle: Schritt 2, Bild 1 von 3 Patagonia Black Hole® Wheeled Duffel Wheel Replacement, Remove Broken Wheel & Axle: Schritt 2, Bild 2 von 3 Patagonia Black Hole® Wheeled Duffel Wheel Replacement, Remove Broken Wheel & Axle: Schritt 2, Bild 3 von 3
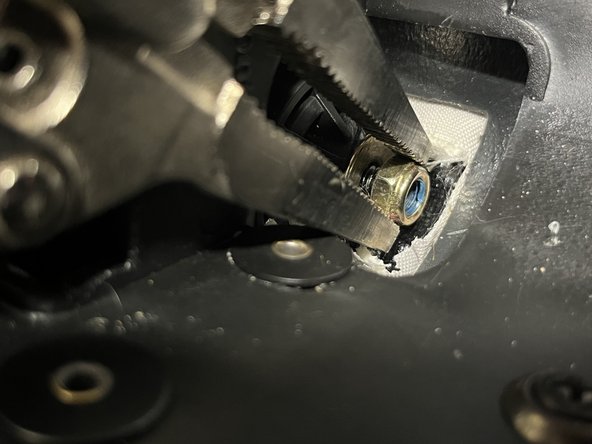
    • If the broken wheel and axle are still attached, locate the axle nut inside the liner compartment and hold it in place with the adjustable wrench.

    • If there is excess foam and lining fabric blocking access, skip to Step 5 and come back.

    • From the outside, turn the axle using the 4mm Allen wrench to free the wheel and axle from the plastic wheel housing. Save the washer and nut to reuse.

    • Lefty Loosy, Righty Tighty

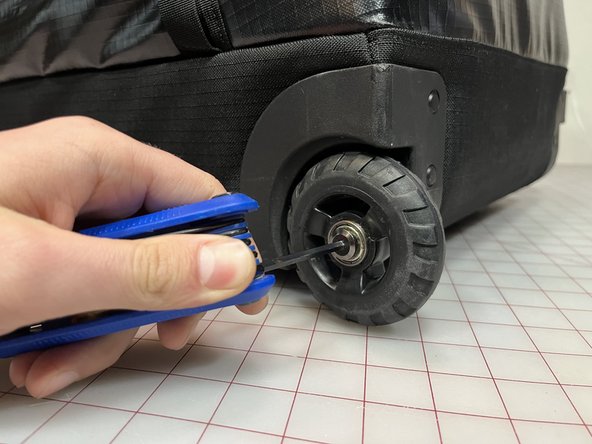
    • Test the other wheel for functionality and remove if it is broken.

  3. Patagonia Black Hole® Wheeled Duffel Wheel Replacement, Assess Status of Broken Parts and Order Parts: Schritt 3, Bild 1 von 3 Patagonia Black Hole® Wheeled Duffel Wheel Replacement, Assess Status of Broken Parts and Order Parts: Schritt 3, Bild 2 von 3 Patagonia Black Hole® Wheeled Duffel Wheel Replacement, Assess Status of Broken Parts and Order Parts: Schritt 3, Bild 3 von 3
    • If the wheel and axle are missing, you will need to source a new wheel and axle from Patagonia. Skip to Step 5.

    • If the original wheel has a worn rubber tread or a flat spot, you will need to source a new wheel and axle from Patagonia. Responsibly dispose of the broken parts and skip to Step 5.

    • If the original wheel is in working shape, but the axle is bent, continue to Step 4.

    • Please contact Patagonia Customer Service for replacement wheels, axles, nuts, and washers.

    • 40l and 70l Black Hole® Wheeled Duffels use 80mm wheels (85mm wheels cannot fit). 100l and 120l Black Hole® Wheeled Duffels use 85mm wheels (80mm wheels can fit if the 85mm are not available). The axles, nuts and washers fit both wheel sizes.

  4. Patagonia Black Hole® Wheeled Duffel Wheel Replacement, Salvage Working Wheel from Bent Axle: Schritt 4, Bild 1 von 3 Patagonia Black Hole® Wheeled Duffel Wheel Replacement, Salvage Working Wheel from Bent Axle: Schritt 4, Bild 2 von 3 Patagonia Black Hole® Wheeled Duffel Wheel Replacement, Salvage Working Wheel from Bent Axle: Schritt 4, Bild 3 von 3
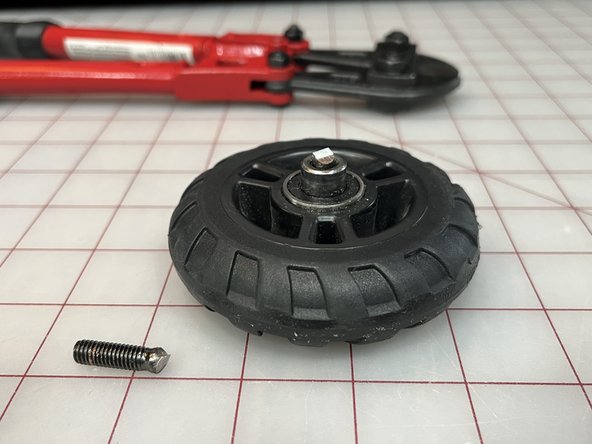
    • If the original wheel is in working shape, but the axle is bent, you can often free the wheel by cutting the axle off.

    • Using the bolt cutters, cut the axle as close to wheel as possible.

    • Use safety glasses.

    • If the cut axle remains stuck inside the wheel, elevate the wheel with a sturdy surface, and tap the cut end of the axle using a flat head screwdriver and a hammer until the axle is driven out.

    • What did I just say about safety glasses?

    • If it is not possible to free the broken axle, you can always request a new wheel from Patagonia.

  5. Patagonia Black Hole® Wheeled Duffel Wheel Replacement, Prepare the Inside of the Plastic Housing: Schritt 5, Bild 1 von 2 Patagonia Black Hole® Wheeled Duffel Wheel Replacement, Prepare the Inside of the Plastic Housing: Schritt 5, Bild 2 von 2
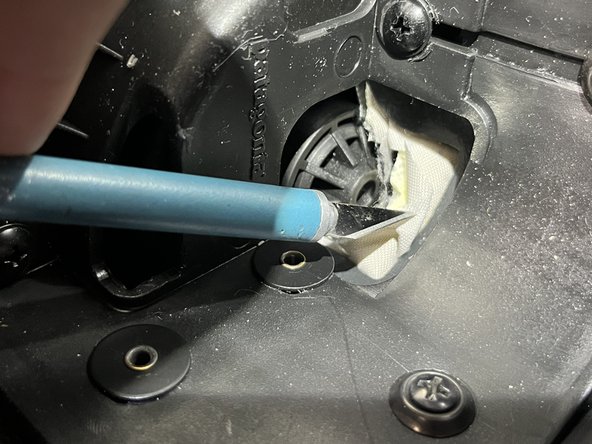
    • There is often excess foam and lining fabric blocking access to the back of the plastic housing.

    • It is okay to cut away this excess using an X-Acto blade.

    • Use extreme caution to avoid cutting yourself or other parts of the duffel.

  6. Patagonia Black Hole® Wheeled Duffel Wheel Replacement, Reassemble Wheel & Axle: Schritt 6, Bild 1 von 3 Patagonia Black Hole® Wheeled Duffel Wheel Replacement, Reassemble Wheel & Axle: Schritt 6, Bild 2 von 3 Patagonia Black Hole® Wheeled Duffel Wheel Replacement, Reassemble Wheel & Axle: Schritt 6, Bild 3 von 3
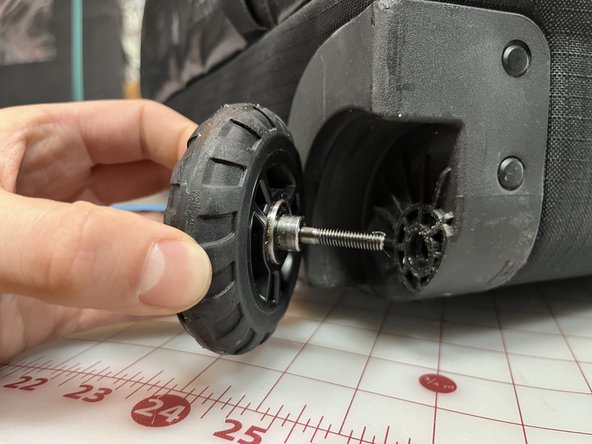
    • Place a new or salvaged wheel onto a new axle and insert the axle into the plastic wheel housing.

    • Inside the plastic wheel housing, place a washer and a nut onto the axle and finger-turn until attached. Use the adjustable wrench to keep the nut in-place.

    • Tighten the axle from the outside using the 4mm Allen wrench.

    • Make sure the locking nylon ring on the nut engages on the axle. This prevents the nut from loosening during use.

    • Do not overtighten the nut.

    • A perfectly-tightened Black Hole wheel spins freely for about 1-2 seconds.

  7. Patagonia Black Hole® Wheeled Duffel Wheel Replacement, Close Lining Compartment: Schritt 8, Bild 1 von 2 Patagonia Black Hole® Wheeled Duffel Wheel Replacement, Close Lining Compartment: Schritt 8, Bild 2 von 2
    • Check the liner compartment to make sure no tools have been left behind.

    • Close the zipper to the liner compartment.

Ziellinie

Zach Mueller

Mitglied seit: 02/23/23

701 Reputation

4 Anleitungen geschrieben

0 Kommentare

Kommentar hinzufügen

Seitenaufrufe:

Letzte 24 Stunden: 6

Letzte 7 Tage: 54

Letzte 30 Tage: 173

Insgesamt: 890