Zum Hauptinhalt wechseln

Pentax Optio WG-2 LCD Screen Replacement

Was du brauchst

  1. Achtung: Die Schritte 1-6 stammen von einer Anleitung, die derzeit bearbeitet wird.

    Pentax Optio WG-2 LCD Screen Replacement, Back Case: Schritt 1, Bild 1 von 2 Pentax Optio WG-2 LCD Screen Replacement, Back Case: Schritt 1, Bild 2 von 2
    • Remove all four 1 mm JIS #00 screws from the back of the camera.

  2. Pentax Optio WG-2 LCD Screen Replacement: Schritt 2, Bild 1 von 1
    • Use your finger to peel the grip off the top of the camera.

    • For best results, start from the right side of the camera, opposite the buttons.

    • Once the grip is removed, you will most likely lose the water-tight seal.

  3. Pentax Optio WG-2 LCD Screen Replacement: Schritt 3, Bild 1 von 1
    • Use the tweezers to remove the two buttons from the top of the camera.

    • The buttons may fall out while removing the grip.

  4. Pentax Optio WG-2 LCD Screen Replacement: Schritt 4, Bild 1 von 3 Pentax Optio WG-2 LCD Screen Replacement: Schritt 4, Bild 2 von 3 Pentax Optio WG-2 LCD Screen Replacement: Schritt 4, Bild 3 von 3
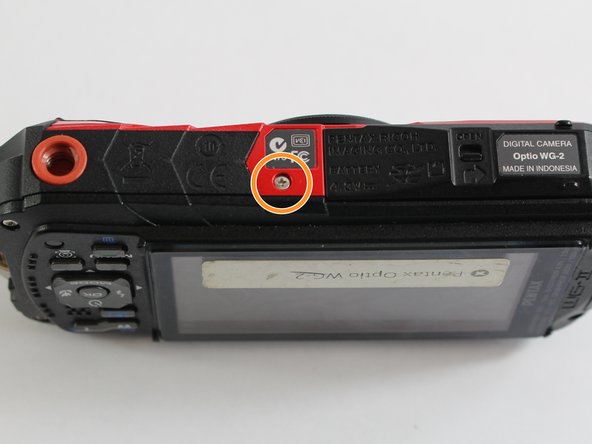
    • Remove the three 1 mm JIS #000 screws from the top.

    • Remove the 1 mm JIS #000 screw from the bottom.

  5. Pentax Optio WG-2 LCD Screen Replacement: Schritt 5, Bild 1 von 1
    • Carefully separate the back and the front of the camera.

    • There are three ribbon cables connecting the two boards. Be careful not to tear them.

  6. Pentax Optio WG-2 LCD Screen Replacement: Schritt 6, Bild 1 von 1
    • Use the tip of a spudger to flip up the small retaining flaps on the ribbon cable ZIF connectors.

    • Carefully pull the ribbon cables out of their sockets.

  7. Pentax Optio WG-2 LCD Screen Replacement, LCD Screen: Schritt 7, Bild 1 von 2 Pentax Optio WG-2 LCD Screen Replacement, LCD Screen: Schritt 7, Bild 2 von 2
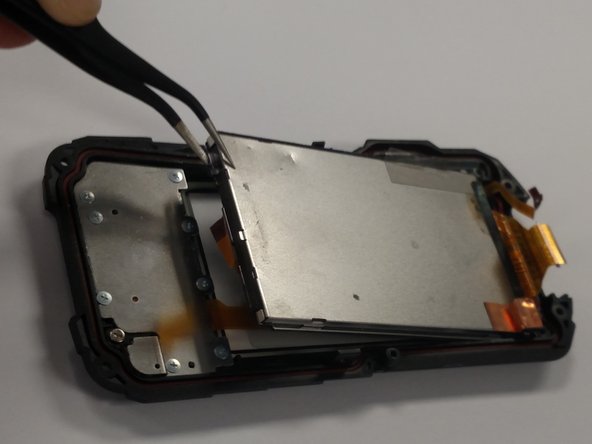
    • Carefully remove the clear tape covering the screws and the ribbon cable.

    • Be careful not to tear the ribbon cable when removing the tape.

    • We want to remove the larger silver panel (right). The best way to do this is to slightly bend the cover backwards and use the tweezers to grab a corner and slowly lift the screen up and out.

  8. Pentax Optio WG-2 LCD Screen Replacement: Schritt 8, Bild 1 von 2 Pentax Optio WG-2 LCD Screen Replacement: Schritt 8, Bild 2 von 2
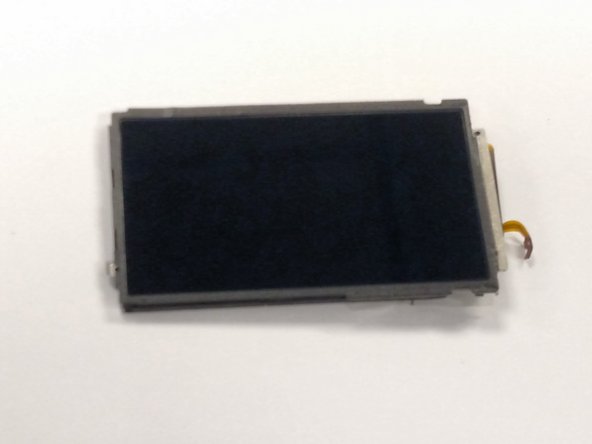
    • Once the screen is removed you should have two pieces as seen in the picture.

    • The screen is the silver rectangle in the top of the picture or the component seen in picture two.

Abschluss

To reassemble your device, follow these instructions in reverse order.

2 weitere Nutzer:innen haben diese Anleitung absolviert.

Team

UMass Dartmouth, Team 6-7, Bhusal Spring 2016 Mitglied von UMass Dartmouth, Team 6-7, Bhusal Spring 2016

UMASSD-BHUSAL-S16S6G7

3 Mitglieder

6 Anleitungen geschrieben

2 Kommentare

Dónde puedo comprar el Display?

Where I can buy the dispaly?

Sebastian Mesa - Antwort

opération réussie ça marche nickel la plus grosse difficultée est de remettre correctement les 3 connecteurs

impératif: utiliser les bons outils comme indiqué attention aux vis il y a un petit joint et les longueurs différentes ne pas mélanger !!!

merci pour ce super tuto ….

walchkorn - Antwort

Kommentar hinzufügen

Seitenaufrufe:

Letzte 24 Stunden: 1

Letzte 7 Tage: 3

Letzte 30 Tage: 9

Insgesamt: 762