Zum Hauptinhalt wechseln

Pentax Optio WP Motherboard and Flash Unit Replacement

Grundständige Anleitung
Dies ist eine grundständige Anleitung, die nur als Teil einer anderen Anleitung verwendet werden sollte.

Was du brauchst

  1. Pentax Optio WP Motherboard and Flash Unit Replacement, Motherboard and Flash Unit: Schritt 1, Bild 1 von 1
    • Remove the 4 mm black screw on the bottom right corner of the mother board.

    • The black screw may be hard to remove. Use the tweezers if necessary.

  2. Pentax Optio WP Motherboard and Flash Unit Replacement: Schritt 2, Bild 1 von 1
    • With the tweezers, carefully peel back the copper ribbon that was underneath the black screw.

  3. Pentax Optio WP Motherboard and Flash Unit Replacement: Schritt 3, Bild 1 von 1
    • Remove the 2.5 mm silver screw from the upper left corner of the motherboard.

  4. Pentax Optio WP Motherboard and Flash Unit Replacement: Schritt 4, Bild 1 von 2 Pentax Optio WP Motherboard and Flash Unit Replacement: Schritt 4, Bild 2 von 2
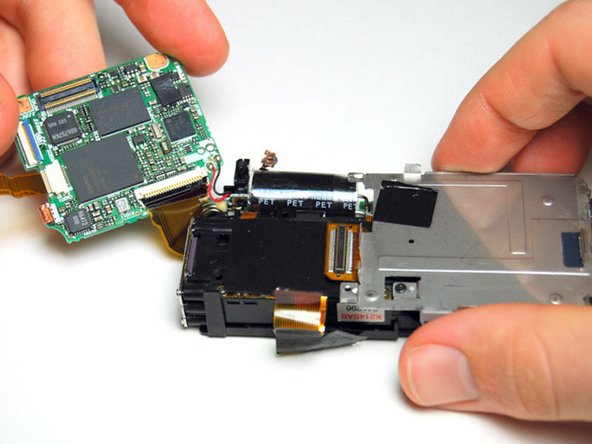
    • Press down on the metal plate and gently lift the motherboard up from left to right.

    • Be cautious when lifting the motherboard since there is a copper ribbon and two wires attaching the motherboard to the flash unit.

    • Reorient the camera so you are looking at the top edge with the metal plate on the right.

Abschluss

To reassemble your device, follow these instructions in reverse order.

Derek

Mitglied seit: 01/21/11

746 Reputation

5 Anleitungen geschrieben

Team

Cal Poly, Team 1-13, Amido Winter 2011 Mitglied von Cal Poly, Team 1-13, Amido Winter 2011

CPSU-AMIDO-W11S1G13

5 Mitglieder

18 Anleitungen geschrieben

0 Kommentare

Kommentar hinzufügen

Seitenaufrufe:

Letzte 24 Stunden: 0

Letzte 7 Tage: 0

Letzte 30 Tage: 0

Insgesamt: 236