Zum Hauptinhalt wechseln

Pentax ZX-5n Exposure Compensation Dial Replacement

Was du brauchst

  1. Pentax ZX-5n Exposure Compensation Dial Replacement, Remove back cover: Schritt 1, Bild 1 von 1
    • Push down on the screw to depress the spring loaded hinge and release the door.

  2. Pentax ZX-5n Exposure Compensation Dial Replacement, Remove bottom cover: Schritt 2, Bild 1 von 1
    • Remove six 5.3 mm #00 screws.

    • Remove one 3.4 mm #00 screw.

    • The short screw has a machine thread and screws into the plate underneath. The rest screw into the plastic body.

  3. Pentax ZX-5n Exposure Compensation Dial Replacement, Remove left front cover: Schritt 3, Bild 1 von 1
    • Remove three 5.3 mm #00 screws (the bottom-most screw is not always present).

    • Remove one 7.3 mm #00 screw.

    • Remove the remote trigger cover.

  4. Pentax ZX-5n Exposure Compensation Dial Replacement, Remove front cover: Schritt 4, Bild 1 von 2 Pentax ZX-5n Exposure Compensation Dial Replacement, Remove front cover: Schritt 4, Bild 2 von 2
    • Remove one 3.4 mm #00 screw.

    • Remove two 5.3 mm #00 screw.

    • Gently lift up on the flash housing to help remove the cover if necessary.

  5. Pentax ZX-5n Exposure Compensation Dial Replacement, Remove right front cover: Schritt 5, Bild 1 von 1
    • Remove two 3.9 mm #00 screws.

  6. Pentax ZX-5n Exposure Compensation Dial Replacement, Remove eye cup: Schritt 6, Bild 1 von 1
    • Slide the eye cup up and off to access the screws underneath.

  7. Pentax ZX-5n Exposure Compensation Dial Replacement, Unscrew top cover: Schritt 7, Bild 1 von 3 Pentax ZX-5n Exposure Compensation Dial Replacement, Unscrew top cover: Schritt 7, Bild 2 von 3 Pentax ZX-5n Exposure Compensation Dial Replacement, Unscrew top cover: Schritt 7, Bild 3 von 3
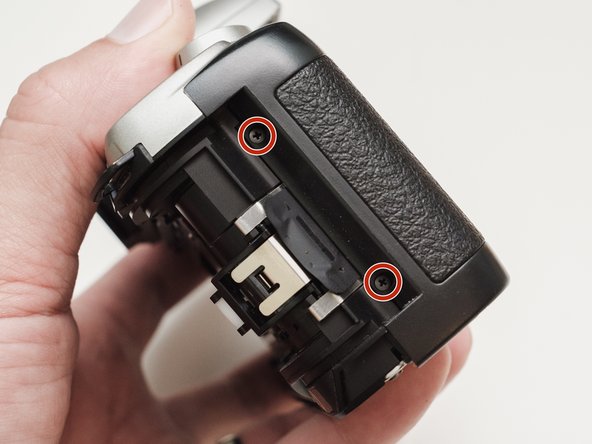
    • Remove two 5.3 mm #00 screws by the eyepiece.

    • Remove one 6.8 mm #00 screw in the battery compartment.

    • Remove one 7.0 mm #00 screw near the take up spool.

  8. Pentax ZX-5n Exposure Compensation Dial Replacement, Lift top cover: Schritt 8, Bild 1 von 1
    • Lift the cover so it is just free of the body. It is still attached by several wires.

  9. Pentax ZX-5n Exposure Compensation Dial Replacement, Release top cover: Schritt 9, Bild 1 von 2 Pentax ZX-5n Exposure Compensation Dial Replacement, Release top cover: Schritt 9, Bild 2 von 2
    • De-solder the green, blue, brown and black wires from the flash PCB.

    • De-solder the black wire.

    • Pull out slack in the black wire so you can comfortably work on the underside of the top cover.

  10. Pentax ZX-5n Exposure Compensation Dial Replacement, Set exposure compensation: Schritt 10, Bild 1 von 1
    • Set the exposure compensation dial to '0'.

  11. Pentax ZX-5n Exposure Compensation Dial Replacement, Remove screws: Schritt 11, Bild 1 von 1
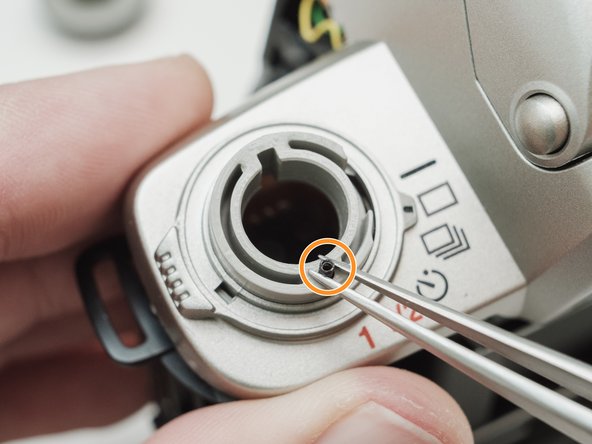
    • Remove two #00 screws

    • Be careful not to damage the feeler contacts from the drive mode switch throughout the repair. There are delicate and easily bent.

  12. Pentax ZX-5n Exposure Compensation Dial Replacement, Remove contact PCB: Schritt 12, Bild 1 von 2 Pentax ZX-5n Exposure Compensation Dial Replacement, Remove contact PCB: Schritt 12, Bild 2 von 2
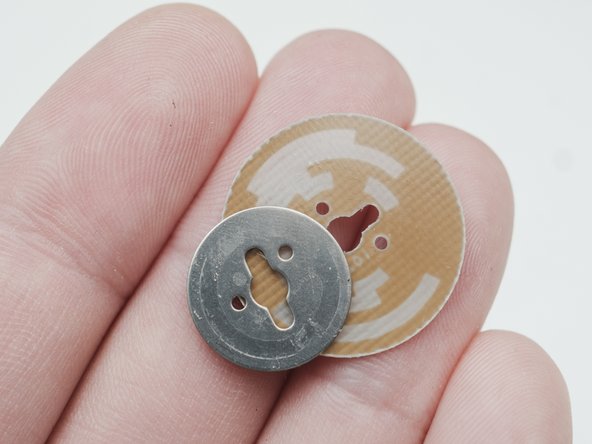
    • Remove the contact PCB.

    • There is a metal plate underneath that may stick to the PCB.

  13. Pentax ZX-5n Exposure Compensation Dial Replacement, Remove dial: Schritt 13, Bild 1 von 1
    • Slide the exposure compensation dial out of the top cover.

    • If the dial was not set to '0' in Step 10, the knob will not slide out. Turning the knob at this stage could damage the detent spring.

  14. Pentax ZX-5n Exposure Compensation Dial Replacement, Remove detent components: Schritt 14, Bild 1 von 2 Pentax ZX-5n Exposure Compensation Dial Replacement, Remove detent components: Schritt 14, Bild 2 von 2
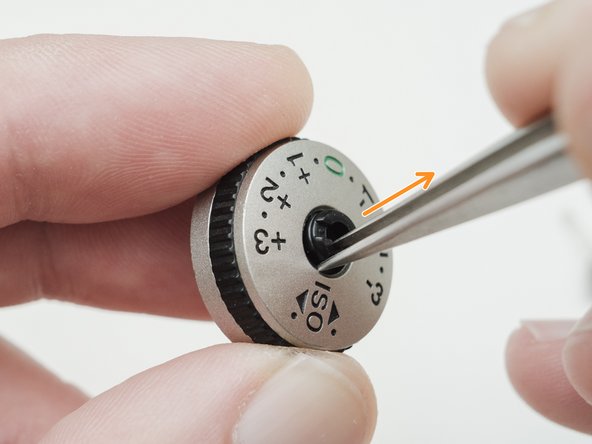
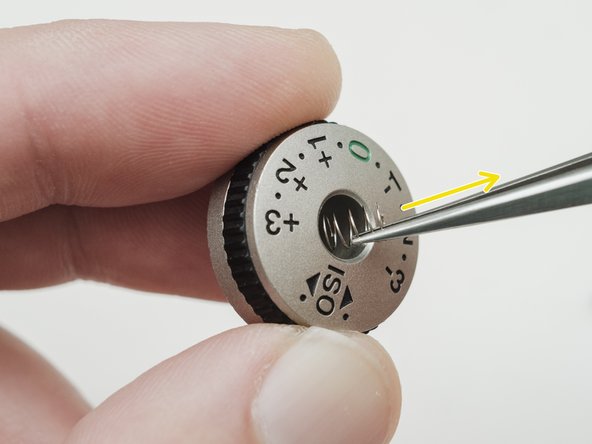
    • Remove the ball bearing from the inside of the dial.

    • Remove the detent spring from the top cover.

  15. Pentax ZX-5n Exposure Compensation Dial Replacement, Remove c-clip: Schritt 15, Bild 1 von 1
    • Remove the small plastic c-clip on the end of the shaft.

    • Place your finger over the c-clip whenever you are working with it to prevent it from unexpectedly flying away.

  16. Pentax ZX-5n Exposure Compensation Dial Replacement, Remove inner components: Schritt 16, Bild 1 von 3 Pentax ZX-5n Exposure Compensation Dial Replacement, Remove inner components: Schritt 16, Bild 2 von 3 Pentax ZX-5n Exposure Compensation Dial Replacement, Remove inner components: Schritt 16, Bild 3 von 3
    • Remove the lock button.

    • Remove the lock actuator.

    • Remove the lock spring.

  17. Pentax ZX-5n Exposure Compensation Dial Replacement, Reassembly notes: Schritt 17, Bild 1 von 2 Pentax ZX-5n Exposure Compensation Dial Replacement, Reassembly notes: Schritt 17, Bild 2 von 2
    • Use tape to hold components in place when reassembling the lock button and installing the dial.

Abschluss

To reassemble your device, follow these instructions in reverse order.

Eine weitere Person hat diese Anleitung absolviert.

Sam Gustafson

Mitglied seit: 09/01/22

3.350 Reputation

14 Anleitungen geschrieben

0 Kommentare

Kommentar hinzufügen

Seitenaufrufe:

Letzte 24 Stunden: 0

Letzte 7 Tage: 3

Letzte 30 Tage: 10

Insgesamt: 198