Zum Hauptinhalt wechseln

Philips Satinelle Metal Rolling Tracks Replacement

Was du brauchst

  1. Philips Satinelle Metal Rolling Tracks Replacement, Philips Satinelle Disassembly: Schritt 1, Bild 1 von 2 Philips Satinelle Metal Rolling Tracks Replacement, Philips Satinelle Disassembly: Schritt 1, Bild 2 von 2
    • Unplug the device and remove the purple guard.

    • Remove the head by pressing the right side of the head (with the device facing away from you).

    • You will hear a 'click' and the head will become dislodged from the body of the device.

  2. Philips Satinelle Metal Rolling Tracks Replacement: Schritt 2, Bild 1 von 3 Philips Satinelle Metal Rolling Tracks Replacement: Schritt 2, Bild 2 von 3 Philips Satinelle Metal Rolling Tracks Replacement: Schritt 2, Bild 3 von 3
    • While wearing safety glasses, use a plastic opening tool to pry from right to left to pry out the tensor clip.

    • Be careful not to lose the clip. It will likely fly off when it releases.

  3. Philips Satinelle Metal Rolling Tracks Replacement: Schritt 3, Bild 1 von 1
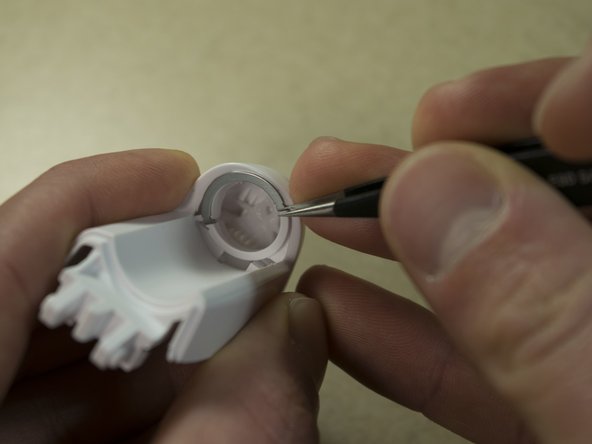
    • The left side will swing down.

    • Remove the Tweezers.

  4. Philips Satinelle Metal Rolling Tracks Replacement: Schritt 4, Bild 1 von 3 Philips Satinelle Metal Rolling Tracks Replacement: Schritt 4, Bild 2 von 3 Philips Satinelle Metal Rolling Tracks Replacement: Schritt 4, Bild 3 von 3
    • Remove the plastic component that swings down.

    • Use fingernails to lift clips from stubs.

  5. Philips Satinelle Metal Rolling Tracks Replacement: Schritt 5, Bild 1 von 3 Philips Satinelle Metal Rolling Tracks Replacement: Schritt 5, Bild 2 von 3 Philips Satinelle Metal Rolling Tracks Replacement: Schritt 5, Bild 3 von 3
    • Using Needle Nose pliers remove metal roller track on both sides of the Tweezers Head.

  6. Philips Satinelle Metal Rolling Tracks Replacement: Schritt 6, Bild 1 von 3 Philips Satinelle Metal Rolling Tracks Replacement: Schritt 6, Bild 2 von 3 Philips Satinelle Metal Rolling Tracks Replacement: Schritt 6, Bild 3 von 3
    • Use a spudger to pry the gear housing unit from the base.

  7. Philips Satinelle Metal Rolling Tracks Replacement: Schritt 7, Bild 1 von 3 Philips Satinelle Metal Rolling Tracks Replacement: Schritt 7, Bild 2 von 3 Philips Satinelle Metal Rolling Tracks Replacement: Schritt 7, Bild 3 von 3
    • Use your thumbnail and a pair of needle nose pliers to push out the gear housing retention pin.

  8. Philips Satinelle Metal Rolling Tracks Replacement, Metal Rolling Tracks Replacement: Schritt 8, Bild 1 von 1
    • Replace Metal Roller Tracks on both sides of the Tweezer Head.

Abschluss

To reassemble your device, follow these instructions in reverse order.

Team

IUPUI, Team S5-G5, Wilson Fall 2017 Mitglied von IUPUI, Team S5-G5, Wilson Fall 2017

IUPUI-WILSON-F17S5G5

3 Mitglieder

4 Anleitungen geschrieben

0 Kommentare

Kommentar hinzufügen

Seitenaufrufe:

Letzte 24 Stunden: 0

Letzte 7 Tage: 0

Letzte 30 Tage: 1

Insgesamt: 567