Zum Hauptinhalt wechseln

Pioneer MXT-X366BT Metal Case Replacement

Was du brauchst

  1. Pioneer MXT-X366BT Metal Case Replacement, Metal Casing: Schritt 1, Bild 1 von 2 Pioneer MXT-X366BT Metal Case Replacement, Metal Casing: Schritt 1, Bild 2 von 2
    • Apply small amount of pressure inward with a plastic opening tool to release bottom clip.

    • Pry the top clip with the plastic opening tool to release it.

    • The head unit is symmetrical and has the same amount of clips on the other side.

  2. Pioneer MXT-X366BT Metal Case Replacement: Schritt 2, Bild 1 von 1
    • Remove the face plate holder.

  3. Pioneer MXT-X366BT Metal Case Replacement: Schritt 3, Bild 1 von 1
    • Remove the six 5mm Phillips-head screws with Philips #2 screwdriver.

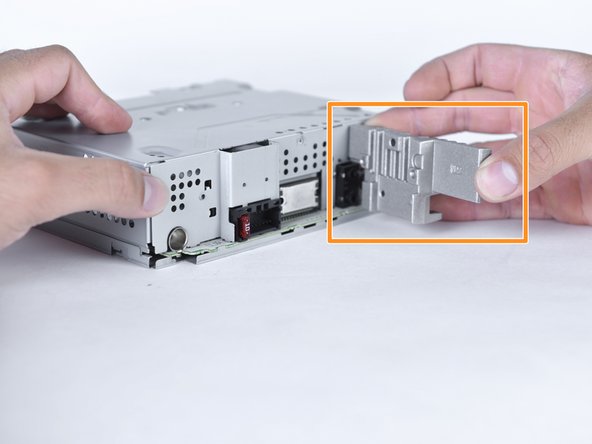
  4. Pioneer MXT-X366BT Metal Case Replacement: Schritt 4, Bild 1 von 2 Pioneer MXT-X366BT Metal Case Replacement: Schritt 4, Bild 2 von 2
    • Remove the inner three 5mm Phillips head screws, with a Phillips #2 screwdriver, attached to the metal backing.

    • Remove the metal backing that is now free.

  5. Pioneer MXT-X366BT Metal Case Replacement: Schritt 5, Bild 1 von 1
    • Carefully slide the metal casing forward.

    • Metal piece standing is the rear of the head unit.

    • Edges are sharp.

  6. Pioneer MXT-X366BT Metal Case Replacement: Schritt 6, Bild 1 von 1
    • Lift the metal casing from the rear and pull it away.

    • Edges are sharp.

  7. Pioneer MXT-X366BT Metal Case Replacement: Schritt 7, Bild 1 von 1
    • The metal casing is now fully removed.

Abschluss

To reassemble your device, follow these instructions in reverse order.

Ein:e weitere:r Nutzer:in hat diese Anleitung absolviert.

Team

Sam Houston State, Team S17-G7, Blackburne Spring 2018 Mitglied von Sam Houston State, Team S17-G7, Blackburne Spring 2018

SHSU-BLACKBURNE-S18S17G7

4 Mitglieder

5 Anleitungen geschrieben

0 Kommentare

Kommentar hinzufügen

Seitenaufrufe:

Letzte 24 Stunden: 1

Letzte 7 Tage: 3

Letzte 30 Tage: 6

Insgesamt: 277