Zum Hauptinhalt wechseln

PlayStation 2 Slimline Fan Replacement

Was du brauchst

  1. PlayStation 2 Slimline Fan Replacement, Outer Shell: Schritt 1, Bild 1 von 1
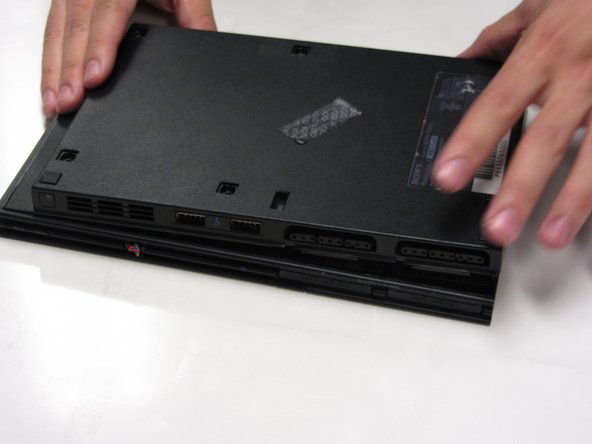
    • Disconnect all cables from the console and flip the unit over to reveal its base.

  2. PlayStation 2 Slimline Fan Replacement: Schritt 2, Bild 1 von 3 PlayStation 2 Slimline Fan Replacement: Schritt 2, Bild 2 von 3 PlayStation 2 Slimline Fan Replacement: Schritt 2, Bild 3 von 3
    • Locate the 6 feet on the base of the unit. Pry them off using a spudger to reveal the screws.

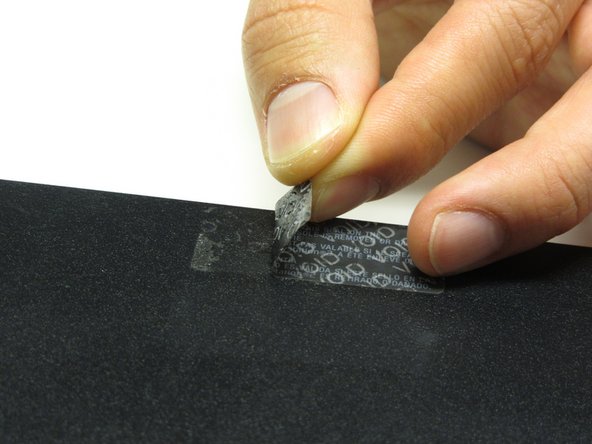
    • Note: One of the feet is located under the sticker shown in the photo. Removing this sticker will void any warranty with Sony.

  3. PlayStation 2 Slimline Fan Replacement: Schritt 3, Bild 1 von 3 PlayStation 2 Slimline Fan Replacement: Schritt 3, Bild 2 von 3 PlayStation 2 Slimline Fan Replacement: Schritt 3, Bild 3 von 3
    • Remove all six 4.0 mm screws from the base of the unit using a #1 Phillips screwdriver.

  4. PlayStation 2 Slimline Fan Replacement: Schritt 4, Bild 1 von 3 PlayStation 2 Slimline Fan Replacement: Schritt 4, Bild 2 von 3 PlayStation 2 Slimline Fan Replacement: Schritt 4, Bild 3 von 3
    • Starting at the corner at which the power and Ethernet ports are located, pry open the outer shell using a spudger and continue around the entire unit.

    • Note: You may use your hands for additional force to separate the two pieces of the outer shell.

  5. PlayStation 2 Slimline Fan Replacement, Fan: Schritt 5, Bild 1 von 2 PlayStation 2 Slimline Fan Replacement, Fan: Schritt 5, Bild 2 von 2
    • Locate the fan at the front, left section of the unit.

  6. PlayStation 2 Slimline Fan Replacement: Schritt 6, Bild 1 von 2 PlayStation 2 Slimline Fan Replacement: Schritt 6, Bild 2 von 2
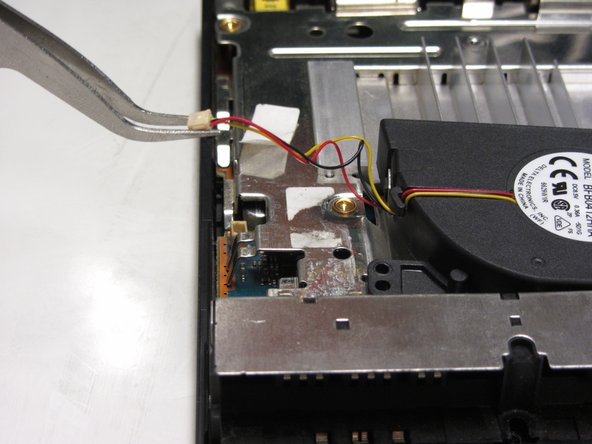
    • Peel off the sticker holding the power cords to the unit.

  7. PlayStation 2 Slimline Fan Replacement: Schritt 7, Bild 1 von 2 PlayStation 2 Slimline Fan Replacement: Schritt 7, Bild 2 von 2
    In diesem Schritt verwendetes Werkzeug:
    Tweezers
    $4.99
    Kaufen
    • Lift the connector from the motherboard with a pair of tweezers using a firm, upward force.

  8. PlayStation 2 Slimline Fan Replacement: Schritt 8, Bild 1 von 3 PlayStation 2 Slimline Fan Replacement: Schritt 8, Bild 2 von 3 PlayStation 2 Slimline Fan Replacement: Schritt 8, Bild 3 von 3
    • Remove all three 1.6 mm screws fastening the fan to the unit using a #1 Phillips screwdriver.

    • Gently lift and remove the fan from its compartment.

Abschluss

To reassemble your device, follow these instructions in reverse order.

10 weitere Personen haben diese Anleitung absolviert.

Thomas Sullivan

Mitglied seit: 10/23/13

4.062 Reputation

6 Anleitungen geschrieben

Ein Kommentar

Una disculpa ayuda es que lo arranque por accidente podría darme una ayuda

A

Diegoraul Martinez Martinez - Antwort

Kommentar hinzufügen

Seitenaufrufe:

Letzte 24 Stunden: 2

Letzte 7 Tage: 25

Letzte 30 Tage: 137

Insgesamt: 8,623