Zum Hauptinhalt wechseln

PlayStation 2 Slimline Hauptplatine tauschen

Was du brauchst

  1. PlayStation 2 Slimline Hauptplatine tauschen, Außengehäuse: Schritt 1, Bild 1 von 1
    • Löse alle Kabel von der Konsole ab und drehe das Gerät herum, um an die Bodenplatte zu gelangen.

  2. PlayStation 2 Slimline Hauptplatine tauschen: Schritt 2, Bild 1 von 3 PlayStation 2 Slimline Hauptplatine tauschen: Schritt 2, Bild 2 von 3 PlayStation 2 Slimline Hauptplatine tauschen: Schritt 2, Bild 3 von 3
    • Finde die sechs Füße an der Bodenplatte. Heble sie mit einem Spudger ab, so dass die Schrauben zum Vorschein kommen.

    • Beachte: eine der Schrauben befindet sich unter dem Aufkleber, wie im Foto zu sehen. Wenn du den Aufkleber entfernst, kann die Garantie von Sony erlöschen.

  3. PlayStation 2 Slimline Hauptplatine tauschen: Schritt 3, Bild 1 von 3 PlayStation 2 Slimline Hauptplatine tauschen: Schritt 3, Bild 2 von 3 PlayStation 2 Slimline Hauptplatine tauschen: Schritt 3, Bild 3 von 3
    • Entferne die sechs 4,0 mm Kreuzschlitzschrauben von der Bodenplatte.

  4. PlayStation 2 Slimline Hauptplatine tauschen: Schritt 4, Bild 1 von 3 PlayStation 2 Slimline Hauptplatine tauschen: Schritt 4, Bild 2 von 3 PlayStation 2 Slimline Hauptplatine tauschen: Schritt 4, Bild 3 von 3
    • Beginne mit dem Aufhebeln des Außengehäuses in der Ecke mit dem Strom- und Ethernetanschluss. Benutze einen Spudger und arbeite dich um das ganze Gerät herum.

    • Hinweis: du musst wahrscheinlich mit den Händen die beiden Gehäuseteile auseinander ziehen.

  5. PlayStation 2 Slimline Hauptplatine tauschen, Lüfter: Schritt 5, Bild 1 von 2 PlayStation 2 Slimline Hauptplatine tauschen, Lüfter: Schritt 5, Bild 2 von 2
    • Finde den Lüfter vorne links im Gerät.

  6. PlayStation 2 Slimline Hauptplatine tauschen: Schritt 6, Bild 1 von 2 PlayStation 2 Slimline Hauptplatine tauschen: Schritt 6, Bild 2 von 2
    • Ziehe das Klebeband ab, mit dem die Zuleitungen zum Lüfter befestigt sind.

  7. PlayStation 2 Slimline Hauptplatine tauschen: Schritt 7, Bild 1 von 2 PlayStation 2 Slimline Hauptplatine tauschen: Schritt 7, Bild 2 von 2
    • Ziehe mit einer Pinzette gleichmäßig und fest den Stecker von der Hauptplatine nach oben ab.

  8. PlayStation 2 Slimline Hauptplatine tauschen: Schritt 8, Bild 1 von 3 PlayStation 2 Slimline Hauptplatine tauschen: Schritt 8, Bild 2 von 3 PlayStation 2 Slimline Hauptplatine tauschen: Schritt 8, Bild 3 von 3
    • Entferne die drei 1,6 mm Kreuzschlitzschrauben #1, mit denen der Lüfter im Gerät befestigt ist.

    • Hebe den Lüfter behutsam aus seinem Sitz heraus und entferne ihn.

  9. PlayStation 2 Slimline Hauptplatine tauschen, Uhrenbatterie (CMOS-Batterie): Schritt 9, Bild 1 von 1
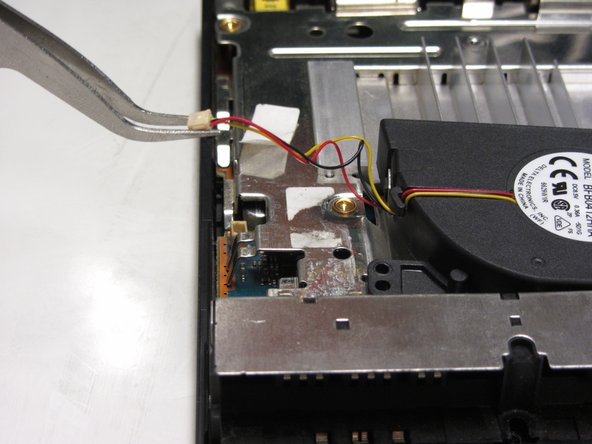
    • Die Uhrenbatterie (CMOS-Batterie) befindet sich vorne rechts im Gerät. Die Batterie hat die Form einer Münze und ist mit einem roten (+) und einem schwarzen (-) Kabel an der Hauptplatine angeschlossen.

  10. PlayStation 2 Slimline Hauptplatine tauschen: Schritt 10, Bild 1 von 2 PlayStation 2 Slimline Hauptplatine tauschen: Schritt 10, Bild 2 von 2
    • Ziehe den Stecker mit einer Pinzette fest und gleichmäßig von der Hauptplatine ab.

  11. PlayStation 2 Slimline Hauptplatine tauschen: Schritt 11, Bild 1 von 2 PlayStation 2 Slimline Hauptplatine tauschen: Schritt 11, Bild 2 von 2
    • Hebe die Batterie mit einem Spudger aus ihrer Vertiefung heraus und entferne sie.

  12. PlayStation 2 Slimline Hauptplatine tauschen, Infrarotsensor: Schritt 12, Bild 1 von 1
    • Der Infrarotsensor befindet sich in der vorderen rechten Ecke des Gerätes.

  13. PlayStation 2 Slimline Hauptplatine tauschen: Schritt 13, Bild 1 von 1
    • Löse behutsam das Flachbandkabel, welches den Infrarotsensor mit der Hauptplatine verbindet.

    • Vorsicht: Fasse Flachbandkabel immer nur an den vorgesehenen Stellen an den Kabelenden an. Wenn du das Kabel anderswo anfasst, kann das Kabel beschädigt werden.

  14. PlayStation 2 Slimline Hauptplatine tauschen: Schritt 14, Bild 1 von 1
    • Hebe den Infrarotsensor vorsichtig aus seiner Fassung heraus und entferne ihn.

  15. PlayStation 2 Slimline Hauptplatine tauschen, Optisches Laufwerk: Schritt 15, Bild 1 von 2 PlayStation 2 Slimline Hauptplatine tauschen, Optisches Laufwerk: Schritt 15, Bild 2 von 2
    • Das optische Laufwerk nimmt viel Platz in der rechten Seite des Gerätes ein. Du kannst es gut an den vier Schrauben mit den breiten Köpfen erkennen, mit denen es an der Hauptplatine befestigt ist.

  16. PlayStation 2 Slimline Hauptplatine tauschen: Schritt 16, Bild 1 von 2 PlayStation 2 Slimline Hauptplatine tauschen: Schritt 16, Bild 2 von 2
    • Entferne die vier 4,0 mm Kreuzschlitzschrauben #1.

  17. PlayStation 2 Slimline Hauptplatine tauschen: Schritt 17, Bild 1 von 1
    • Drei Flachbandkabel verbinden das optische Laufwerk mit der Hauptplatine.

  18. PlayStation 2 Slimline Hauptplatine tauschen: Schritt 18, Bild 1 von 3 PlayStation 2 Slimline Hauptplatine tauschen: Schritt 18, Bild 2 von 3 PlayStation 2 Slimline Hauptplatine tauschen: Schritt 18, Bild 3 von 3
    • Löse die drei Flachbandkabel vorsichtig mit einer Pinzette von der Hauptplatine ab.

    • Hinweis: Um das mittlere Flachbandkabel abzulösen, musst du erst den schwarzen Sicherungsbügel hochheben. Denke beim Zusammenbau daran, diesen wieder einzudrücken.

    • Vorsicht: Fasse die Flachbandkabel nur an den dafür vorgesehenen Stellen an den Kabelenden an. Wenn du sie anderswo anfasst, kannst du die Kabel dauerhaft beschädigen.

  19. PlayStation 2 Slimline Hauptplatine tauschen: Schritt 19, Bild 1 von 3 PlayStation 2 Slimline Hauptplatine tauschen: Schritt 19, Bild 2 von 3 PlayStation 2 Slimline Hauptplatine tauschen: Schritt 19, Bild 3 von 3
    • Wenn die Kabel mit Klebeband an der Hauptplatine befestigt sind, dann löse diese ab. Hebe das optische Laufwerk vorsichtig hoch und entferne es.

    Be really careful when dealing with the orange ribbon cable attached to the optical lens, as it is glued on the metal surface underneath it. From normal usage months or years, and the optical lens natural movement, this ribbon might lose some glue and start lifting upwards, sometimes even touching the CD surface. This could start scratching your games to an unplayable extent. Reapply glue if needed.

    Americo Santos Oliveira - Antwort

    You don't necessarily need to remove the ribbon cable from the shield. After you detached the cable from the motherboard, flip the optical drive and detach the other end of the cable.

    Vincenzo Quinci - Antwort

  20. PlayStation 2 Slimline Hauptplatine tauschen, Hauptplatine: Schritt 20, Bild 1 von 1
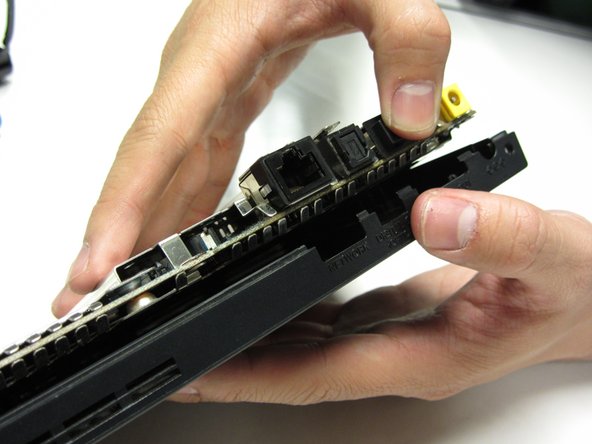
    • Entferne die 2,4 mm Kreuzschlitzschraube #1 zwischen den beiden Anschlüssen für die Kontroller.

  21. PlayStation 2 Slimline Hauptplatine tauschen: Schritt 21, Bild 1 von 3 PlayStation 2 Slimline Hauptplatine tauschen: Schritt 21, Bild 2 von 3 PlayStation 2 Slimline Hauptplatine tauschen: Schritt 21, Bild 3 von 3
    • Hebe den Rahmen und die Hauptplatine vorsichtig vom äußeren Gehäuse ab.

  22. PlayStation 2 Slimline Hauptplatine tauschen: Schritt 22, Bild 1 von 3 PlayStation 2 Slimline Hauptplatine tauschen: Schritt 22, Bild 2 von 3 PlayStation 2 Slimline Hauptplatine tauschen: Schritt 22, Bild 3 von 3
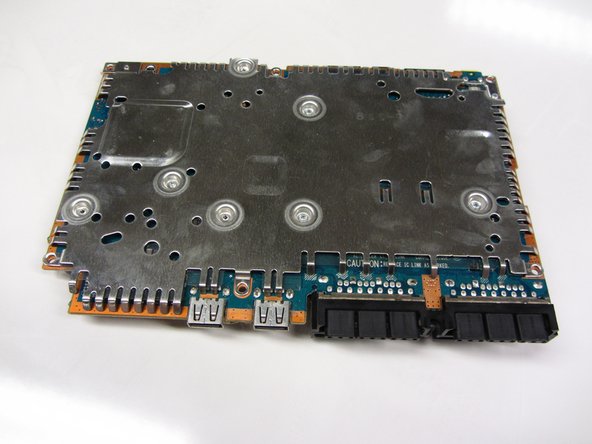
    • Der Metallrahmen ist mit fünf 1,6 mm Kreuzschlitzschrauben #1 an der Hauptplatine befestigt.

    • Drehe die Schraube auf der Oberseite und die vier Schrauben auf der Unterseite heraus.

  23. PlayStation 2 Slimline Hauptplatine tauschen: Schritt 23, Bild 1 von 3 PlayStation 2 Slimline Hauptplatine tauschen: Schritt 23, Bild 2 von 3 PlayStation 2 Slimline Hauptplatine tauschen: Schritt 23, Bild 3 von 3
    • Löse die beiden Metallplatten behutsam von der Hauptplatine ab.

Abschluss

Um dein Gerät wieder zusammenzubauen, folge den Schritten in umgekehrter Reihenfolge.

33 weitere Nutzer:innen haben diese Anleitung absolviert.

Besonderer Dank geht an diese Übersetzer:innen:

en de

100%

VauWeh hilft uns, die Welt in Ordnung zu bringen! Wie kann ich mithelfen?
Hier starten ›

Thomas Sullivan

Mitglied seit: 10/23/13

3.927 Reputation

6 Anleitungen geschrieben

2 Kommentare

نرجو اضافة اللغة العربية

Muammar lmgaroush - Antwort

Mi placa no tiene corriente, seguro tiene un corto quien me ayuda a solucionar, es la 77001, ya tiene botón y flex nuevo y no me da luz Led

gasper6913 - Antwort

Kommentar hinzufügen

Seitenaufrufe:

Letzte 24 Stunden: 8

Letzte 7 Tage: 46

Letzte 30 Tage: 202

Insgesamt: 24,976