Diese Version enthält möglicherweise inkorrekte Änderungen. Wechsle zur letzten geprüften Version.
Was du brauchst
-
-
Löse alle Kabel von der Konsole ab und drehe das Gerät herum, um an die Bodenplatte zu gelangen.
-
-
-
Finde die sechs Füße an der Bodenplatte. Heble sie mit einem Spudger ab, so dass die Schrauben zum Vorschein kommen.
-
-
-
Beginne mit dem Aufhebeln des Außengehäuses in der Ecke mit dem Strom- und Ethernetanschluss. Benutze einen Spudger und arbeite dich um das ganze Gerät herum.
-
-
-
Dieser Schritt ist noch nicht übersetzt. Hilf mit, ihn zu übersetzen!
-
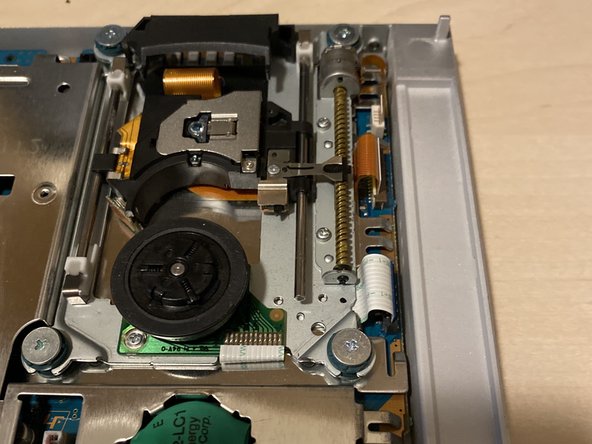
Remove the 2 philips screws, marked in red.
-
Remove the white plastic slider holder.
-
Picture 3 shows how it should be done.
-
-
Dieser Schritt ist noch nicht übersetzt. Hilf mit, ihn zu übersetzen!
-
Remove the slider as shown in the picture. You could do this with your fingers, otherwise take tweezers to remove it.
-
-
Dieser Schritt ist noch nicht übersetzt. Hilf mit, ihn zu übersetzen!
-
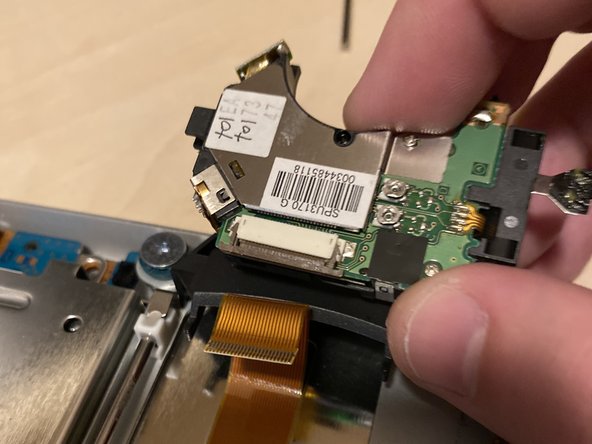
Take the laser out of the rail and rotate it.
-
Open up the connector by both sides with your fingernail or spudger. Be EXTREME carefull here, as it can break easily! (if the laser is broken, it won't matter, you can even practice on the broken laser).
-
Take the ribbon cable out, it should come out with ease.
-
-
Dieser Schritt ist noch nicht übersetzt. Hilf mit, ihn zu übersetzen!
-
Remove the philips screw from the laser and take off the slider.
-
Transfer the slider to the new laser and screw it down.
-
-
Dieser Schritt ist noch nicht übersetzt. Hilf mit, ihn zu übersetzen!
-
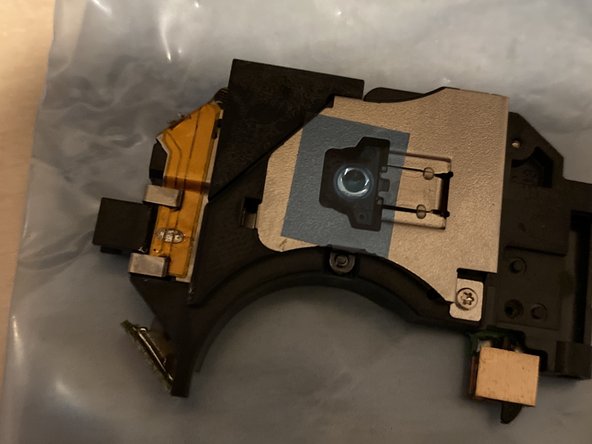
Most of the lasers have some solder on it for the anti-static security. You NEED to remove the solder, otherwise it won't work. Remove the solder with desolder wick.
-
2nd picture shows how it should be done. If you have the same result, your good to go. If you are not sure, just use your soldering iron again to remove some more (don't hold it too long on it, otherwise you could damage something).
-
-
Dieser Schritt ist noch nicht übersetzt. Hilf mit, ihn zu übersetzen!
-
Remove the blue sticker from the laser (if it has one). Put the laser back in and all other removed components (follow guide in reverse order). When you've put everything back, it should look like the provided picture.
-


Rückgängig: Ich habe diese Anleitung nicht absolviert.
4 weitere Nutzer:innen haben diese Anleitung absolviert.

Team

Protectors Of The Game Systems Mitglied von Protectors Of The Game Systems
Community
4 Mitglieder
25 Anleitungen geschrieben
3 Kommentare
Hi there,
Do you need to worry about the laser cd/dvd parameters when installing the new one?
Thanks
Simon
Hi Simon! No, for the PS2 slim, this is not the case. Regarding the "PS2 Phat", sometimes it is required to adjust the parameters, same for the PS1.