Zum Hauptinhalt wechseln

PlayStation 4 Slim Bottom Cover Replacement

Was du brauchst

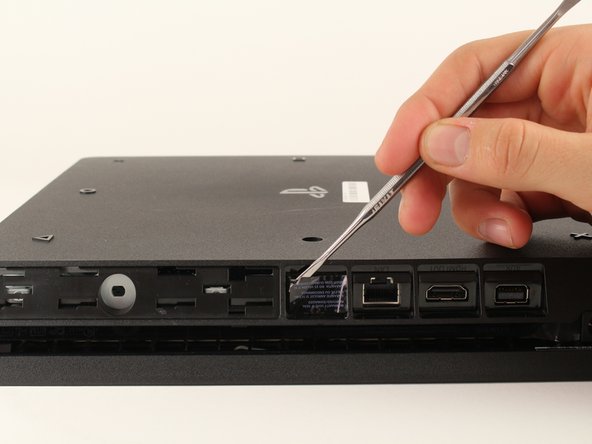
  1. PlayStation 4 Slim Bottom Cover Replacement, Bottom Cover: Schritt 1, Bild 1 von 3 PlayStation 4 Slim Bottom Cover Replacement, Bottom Cover: Schritt 1, Bild 2 von 3 PlayStation 4 Slim Bottom Cover Replacement, Bottom Cover: Schritt 1, Bild 3 von 3
    • Locate the plastic warranty sticker next to the three ports on the side of the console.

    • Remove the warranty sticker by peeling it off with any kind of spudger.

    • Removing the warranty sticker will NOT cause your warranty to be null and void.

  2. PlayStation 4 Slim Bottom Cover Replacement: Schritt 2, Bild 1 von 2 PlayStation 4 Slim Bottom Cover Replacement: Schritt 2, Bild 2 von 2
    • Unscrew and remove the now exposed 5.0mm screw using a T8 security Torx screwdriver with a counter-clockwise motion.

  3. PlayStation 4 Slim Bottom Cover Replacement: Schritt 3, Bild 1 von 3 PlayStation 4 Slim Bottom Cover Replacement: Schritt 3, Bild 2 von 3 PlayStation 4 Slim Bottom Cover Replacement: Schritt 3, Bild 3 von 3
    • Place the Playstation 4 Slim upside down with the side of the screw you just removed facing you.

    • Pry up on the two corners that are facing you with your fingers.

    • This may take a bit of force to open up and you will hear a fairly loud click when the bottom cover detaches.

    • Remove the bottom cover by sliding it towards the back corners and lifting up.

Abschluss

To reassemble your device, follow these instructions in reverse order.

36 weitere Nutzer:innen haben diese Anleitung absolviert.

Team

Cal Poly, Team S19-G4, Livingston Winter 2018 Mitglied von Cal Poly, Team S19-G4, Livingston Winter 2018

CPSU-LIVINGSTON-W18S19G4

4 Mitglieder

35 Anleitungen geschrieben

2 Kommentare

Wo kann man die Bodenplatte kaufen?

Emre Kaman - Antwort

Kommentar hinzufügen

Seitenaufrufe:

Letzte 24 Stunden: 14

Letzte 7 Tage: 130

Letzte 30 Tage: 776

Insgesamt: 47,501