Zum Hauptinhalt wechseln

PlayStation 4 Slim Hauptplatine austauschen

Was du brauchst

  1. PlayStation 4 Slim Hauptplatine austauschen, Bodenplatte: Schritt 1, Bild 1 von 3 PlayStation 4 Slim Hauptplatine austauschen, Bodenplatte: Schritt 1, Bild 2 von 3 PlayStation 4 Slim Hauptplatine austauschen, Bodenplatte: Schritt 1, Bild 3 von 3
    • Finde den Garantieaufkleber aus Plastik in der Nähe der drei Anschlüsse auf der Seite der Konsole.

    • Löse den Aufkleber mit einem geeigneten Werkzeug ab.

    • Die Garantie wird durch das Entfernen des Aufklebers NICHT beeinträchtigt.

  2. PlayStation 4 Slim Hauptplatine austauschen: Schritt 2, Bild 1 von 2 PlayStation 4 Slim Hauptplatine austauschen: Schritt 2, Bild 2 von 2
    • Unter dem Aufkleber ist eine 5,0 mm Torx T8 Sicherheits-Schraube verborgen. Drehe sie gegen den Uhrzeigersinn heraus.

  3. PlayStation 4 Slim Hauptplatine austauschen: Schritt 3, Bild 1 von 3 PlayStation 4 Slim Hauptplatine austauschen: Schritt 3, Bild 2 von 3 PlayStation 4 Slim Hauptplatine austauschen: Schritt 3, Bild 3 von 3
    • Lege die Playstation 4 Slim mit der Unterseite nach oben, so dass die Seite mit der eben entfernten Schraube zu dir zeigt.

    • Ziehe an den beiden Ecken, die zu dir zeigen, mit den Fingern hoch.

    • Das erfordert schon einiges an Kraft und du wirst ein lautes Knacken hören, wenn sich die Bodenplatte löst.

    • Schiebe die Bodenplatte in Richtung der Rückseite, hebe sie hoch und entferne sie.

  4. PlayStation 4 Slim Hauptplatine austauschen, Netzteil: Schritt 4, Bild 1 von 3 PlayStation 4 Slim Hauptplatine austauschen, Netzteil: Schritt 4, Bild 2 von 3 PlayStation 4 Slim Hauptplatine austauschen, Netzteil: Schritt 4, Bild 3 von 3
    • Lege die Playstation 4 Slim mit der rechten Seite nach oben, so dass das PS Logic oben ist und der Schriftzug "SONY" und "PS4" zu dir zeigen.

    • Ziehe die beiden Ecken, die zu dir zeigen, mit den Fingern hoch.

    • Das erfordert schon einiges an Kraft und du wirst ein lautes Knacken hören, wenn sich die obere Abdeckung löst.

    • Schiebe die Abdeckung nach hinten und hebe sie ab.

  5. PlayStation 4 Slim Hauptplatine austauschen: Schritt 5, Bild 1 von 3 PlayStation 4 Slim Hauptplatine austauschen: Schritt 5, Bild 2 von 3 PlayStation 4 Slim Hauptplatine austauschen: Schritt 5, Bild 3 von 3
    • Drehe die beiden Torx T8 Schrauben heraus. Die linke ist 31,0 mm lang, die rechte 24,0 mm.

    • Entferne die 3,0 mm Kreuzschlitzschraube #1.

  6. PlayStation 4 Slim Hauptplatine austauschen: Schritt 6, Bild 1 von 1
    • Entferne die vier 16 mm Kreuzschlitzschrauben, die das Netzteil am Gehäuse befestigen.

  7. PlayStation 4 Slim Hauptplatine austauschen: Schritt 7, Bild 1 von 2 PlayStation 4 Slim Hauptplatine austauschen: Schritt 7, Bild 2 von 2
    • Hebe das Metallblech über dem Netzteil mit der Hand hoch und entferne es.

  8. PlayStation 4 Slim Hauptplatine austauschen: Schritt 8, Bild 1 von 2 PlayStation 4 Slim Hauptplatine austauschen: Schritt 8, Bild 2 von 2
    • Führe das Antennenkabel oben auf dem Netzteil mit den Fingern durch die Rillen unter der Metallplatte und entferne die Antenne.

  9. PlayStation 4 Slim Hauptplatine austauschen: Schritt 9, Bild 1 von 2 PlayStation 4 Slim Hauptplatine austauschen: Schritt 9, Bild 2 von 2
    • Lege die Playstation 4 Slim auf die Rückseite.

    • Entferne die 4,0 mm Kreuzschlitzschraube #1.

  10. PlayStation 4 Slim Hauptplatine austauschen: Schritt 10, Bild 1 von 3 PlayStation 4 Slim Hauptplatine austauschen: Schritt 10, Bild 2 von 3 PlayStation 4 Slim Hauptplatine austauschen: Schritt 10, Bild 3 von 3
    • Zwänge ein Plastik Opening Tool zwischen Netzteil und Konsole, wackle etwas hin und her und vergrößere den Spalt dazwischen.

    • Hebe das Netzteil mit der Hand hoch auf seine Rückseite auf das Metallblech.

  11. PlayStation 4 Slim Hauptplatine austauschen: Schritt 11, Bild 1 von 3 PlayStation 4 Slim Hauptplatine austauschen: Schritt 11, Bild 2 von 3 PlayStation 4 Slim Hauptplatine austauschen: Schritt 11, Bild 3 von 3
    • Fasse den Netzteil mit den Fingern oder einer Pinzette fest an, ziehe ihn heraus und löse ihn ab.

    • Hebe das Netzteil mit der Hand heraus und entferne es.

  12. PlayStation 4 Slim Hauptplatine austauschen, Hauptplatine: Schritt 12, Bild 1 von 2 PlayStation 4 Slim Hauptplatine austauschen, Hauptplatine: Schritt 12, Bild 2 von 2
    • Entferne die 31,0 mm Torx T8 Sicherheitschraube.

  13. PlayStation 4 Slim Hauptplatine austauschen: Schritt 13, Bild 1 von 2 PlayStation 4 Slim Hauptplatine austauschen: Schritt 13, Bild 2 von 2
    • Finde die beiden Anschlusskabel unten an der Hauptplatine.

    • Ziehe die Anschlüsse mit den Fingern oder einer Pinzette fest nach oben, bis sie sich lösen.

  14. PlayStation 4 Slim Hauptplatine austauschen: Schritt 14, Bild 1 von 3 PlayStation 4 Slim Hauptplatine austauschen: Schritt 14, Bild 2 von 3 PlayStation 4 Slim Hauptplatine austauschen: Schritt 14, Bild 3 von 3
    • Drehe das Gerät auf die Rückseite.

    • Löse und entferne 14 schwarze 4,0 mm Kreuzschlitzschrauben #1. (Bei CUH-21xx Modellen sind es 19 Schrauben).

    • Löse und entferne 8 silberne 6,0 mm Kreuzschlitzschrauben #1. (Bei CUH-21xx Modellen sind es 7 Schrauben).

    • Löse und entferne 4 silberfarbene 3,0 mm Kreuzschlitzschrauben #1.

  15. PlayStation 4 Slim Hauptplatine austauschen: Schritt 15, Bild 1 von 2 PlayStation 4 Slim Hauptplatine austauschen: Schritt 15, Bild 2 von 2
    • Entferne die beiden 5,0 mm Kreuzschlitzschrauben #1.

    • Bei CUH-21xx-Modellen wurden diese Schrauben schon im letzten Schritt entfernt.

  16. PlayStation 4 Slim Hauptplatine austauschen: Schritt 16, Bild 1 von 3 PlayStation 4 Slim Hauptplatine austauschen: Schritt 16, Bild 2 von 3 PlayStation 4 Slim Hauptplatine austauschen: Schritt 16, Bild 3 von 3
    • Finde das weiße Kabel oben in der Ecke der Hauptplatine.

    • Fasse das Kabel mit den Fingern oder einer Pinzette fest an und ziehe es nach oben, bis es sich löst.

    • Löse das Klebeband, mit dem es befestigt ist und schiebe es zur Seite.

  17. PlayStation 4 Slim Hauptplatine austauschen: Schritt 17, Bild 1 von 3 PlayStation 4 Slim Hauptplatine austauschen: Schritt 17, Bild 2 von 3 PlayStation 4 Slim Hauptplatine austauschen: Schritt 17, Bild 3 von 3
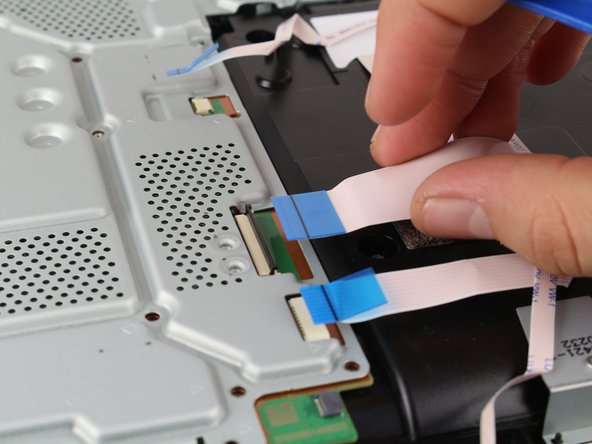
    • Ziehe mit den Fingern an den blauen Laschen und trenne die Verbindungen.

    • An der größten Lasche musst du erst den schwarzen Clip hochklappen, bevor du die Verbindung trenne kannst.

    • Fasse den Stecker fest mit den Fingern und ziehe ihn ab.

  18. PlayStation 4 Slim Hauptplatine austauschen: Schritt 18, Bild 1 von 2 PlayStation 4 Slim Hauptplatine austauschen: Schritt 18, Bild 2 von 2
    • Fasse die Metallplatte an den Rändern an, hebe sie hoch und von dir weg.

    • Du musst vielleicht ein wenig an der Platte wackeln, bevor sie sich löst.

    • Achte bei diesem Schritt darauf, dass du keines der schwarzen Pads verlierst, die an der Hauptplatine angebracht sind.

  19. PlayStation 4 Slim Hauptplatine austauschen: Schritt 19, Bild 1 von 3 PlayStation 4 Slim Hauptplatine austauschen: Schritt 19, Bild 2 von 3 PlayStation 4 Slim Hauptplatine austauschen: Schritt 19, Bild 3 von 3
    • Entferne die beiden 10,0 mm Kreuzschlitzschrauben #1, eine ist Schwarz, die andere silberfarben.

    • Fasse die kleine Metallplatte mit den Fingern und hebe sie hoch, entferne sie dann.

  20. PlayStation 4 Slim Hauptplatine austauschen: Schritt 20, Bild 1 von 3 PlayStation 4 Slim Hauptplatine austauschen: Schritt 20, Bild 2 von 3 PlayStation 4 Slim Hauptplatine austauschen: Schritt 20, Bild 3 von 3
    • Fasse den Stecker fest mit einer Pinzette und ziehe ihn ab.

    • Du musst dafür vielleicht fest ziehen, aber beschädige keines der Kabel.

  21. PlayStation 4 Slim Hauptplatine austauschen: Schritt 21, Bild 1 von 2 PlayStation 4 Slim Hauptplatine austauschen: Schritt 21, Bild 2 von 2
    • Fasse die Hauptplatine am Rand mit einer oder zwei Händen an, hebe sie hoch und entferne sie.

    • Du musst vielleicht die Platine ein bisschen hin und her wackeln, bevor sie sich löst.

Abschluss

Um dein Gerät wieder zusammenzusetzen, folge den Schritten in umgekehrter Reihenfolge.

61 weitere Nutzer:innen haben diese Anleitung absolviert.

Besonderer Dank geht an diese Übersetzer:innen:

en de

100%

Diese Übersetzer:innen helfen uns, die Welt zu reparieren! Wie kann ich mithelfen?
Hier starten ›

Harry Koos

Mitglied seit: 01/24/18

4.886 Reputation

2 Anleitungen geschrieben

Team

Cal Poly, Team S19-G4, Livingston Winter 2018 Mitglied von Cal Poly, Team S19-G4, Livingston Winter 2018

CPSU-LIVINGSTON-W18S19G4

4 Mitglieder

35 Anleitungen geschrieben

10 Kommentare

Hi Harry

I think this guide is fantastic. My PS4 slim is not coming on. It’s not the HDMI display port or anything of the sort. It powers on, you hear the beep and the blue power light stays on. That’s all. Nothing after this… no signal to the TV, cannot reinitialise, nothing. I’ve checked online to see if I can diagnose it. Based on the few signs I’ve seen I think the board is gone. So am looking to replace that hence I came across your guide. Is there a way you know to be certain my board is faulty. Thanks

Jx Corp - Antwort

I have a PS4 slim issue…. when connected to power it doesn't show it’s on and no light displays….. I would say the board is faulty and how do I work on such problem.

michael quartey - Antwort

do you need to change the optical drive as well?

Hafiz Adam - Antwort

my ps4 slim power supply ok no power motherboard

Naeem Tyagi - Antwort

Very good repair guide, but it’s incomplete. The first step is remove the HDD (hard disk drive).

Yeong - Antwort

Kommentar hinzufügen

Seitenaufrufe:

Letzte 24 Stunden: 49

Letzte 7 Tage: 329

Letzte 30 Tage: 1,437

Insgesamt: 101,948