Zum Hauptinhalt wechseln

Portege Z830-S8302 Speaker Replacement

Was du brauchst

  1. Portege Z830-S8302 Speaker Replacement, Battery: Schritt 1, Bild 1 von 3 Portege Z830-S8302 Speaker Replacement, Battery: Schritt 1, Bild 2 von 3 Portege Z830-S8302 Speaker Replacement, Battery: Schritt 1, Bild 3 von 3
    • Flip the laptop over with the screen facing down to reveal the bottom panel.

    • Unscrew each of the highlighted screws with a Phillips #0 screwdriver.

  2. Portege Z830-S8302 Speaker Replacement: Schritt 2, Bild 1 von 3 Portege Z830-S8302 Speaker Replacement: Schritt 2, Bild 2 von 3 Portege Z830-S8302 Speaker Replacement: Schritt 2, Bild 3 von 3
    • Use a metal spudger to remove fitting and reveal the screw.

    • Use a screwdriver with a Torx T7 bit to remove the screw.

  3. Portege Z830-S8302 Speaker Replacement: Schritt 3, Bild 1 von 3 Portege Z830-S8302 Speaker Replacement: Schritt 3, Bild 2 von 3 Portege Z830-S8302 Speaker Replacement: Schritt 3, Bild 3 von 3
    • The SD Card slot is on the top right corner of the device near the headphone jacks.

    • Depress the fake SD Card and release.

    • Pull the fake SD Card out and remove it completely from the slot, as this will help in the removal of the backplate.

  4. Portege Z830-S8302 Speaker Replacement: Schritt 4, Bild 1 von 2 Portege Z830-S8302 Speaker Replacement: Schritt 4, Bild 2 von 2
    • Lift the back plate starting at the opposing edge to the SD card. Lift from left to right and continue lifting this plate at this angle until it's free from the laptop.

    • Once the backplate is completely off, this will reveal the inside components of the device.

    • Upon reassembly of the back cover, make sure to line up the two headphone jacks on the upper right corner with the holes in the back cover or else it will not seat fully.

  5. Portege Z830-S8302 Speaker Replacement: Schritt 5, Bild 1 von 3 Portege Z830-S8302 Speaker Replacement: Schritt 5, Bild 2 von 3 Portege Z830-S8302 Speaker Replacement: Schritt 5, Bild 3 von 3
    • The battery is the black rectangular piece in the bottom half of the device.

    • Remove six 5mm screws holding down the battery using a Phillips PH0 screwdriver.

    • Lift the battery and separate from its place holder.

    • Do not fully remove the battery as it is still connected by the connector in the top right corner.

  6. Portege Z830-S8302 Speaker Replacement: Schritt 6, Bild 1 von 3 Portege Z830-S8302 Speaker Replacement: Schritt 6, Bild 2 von 3 Portege Z830-S8302 Speaker Replacement: Schritt 6, Bild 3 von 3
    • Using the nylon spudger, disconnect the white plugin.

    • Once the wire has been disconnected you may remove the battery.

  7. Portege Z830-S8302 Speaker Replacement, Speaker: Schritt 7, Bild 1 von 3 Portege Z830-S8302 Speaker Replacement, Speaker: Schritt 7, Bild 2 von 3 Portege Z830-S8302 Speaker Replacement, Speaker: Schritt 7, Bild 3 von 3
    • There are two black speakers on either side of the bottom corner of the device.

    • Remove tape securing speaker wires to frame.

  8. Portege Z830-S8302 Speaker Replacement: Schritt 8, Bild 1 von 3 Portege Z830-S8302 Speaker Replacement: Schritt 8, Bild 2 von 3 Portege Z830-S8302 Speaker Replacement: Schritt 8, Bild 3 von 3
    • Using a blue plastic opening tool, disconnect the white cable running from the trackpad to the motherboard, at themotherboard port.

    • Disconnect the cable gently and do not yank on cable, this step is to get the cable out out of the way of speaker wires.

  9. Portege Z830-S8302 Speaker Replacement: Schritt 9, Bild 1 von 3 Portege Z830-S8302 Speaker Replacement: Schritt 9, Bild 2 von 3 Portege Z830-S8302 Speaker Replacement: Schritt 9, Bild 3 von 3
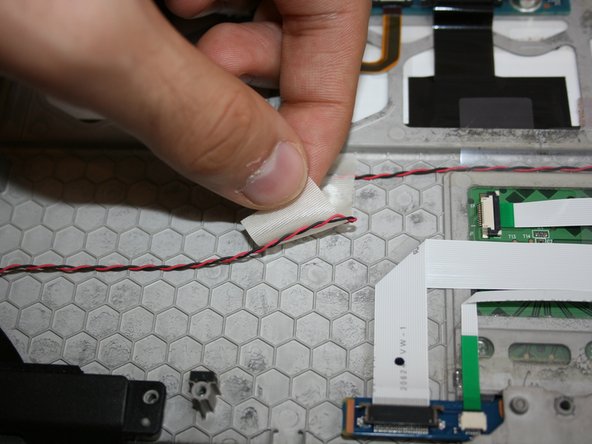
    • The speakers are connected by a plug with wires (Red/Black) (Black/White) to the motherboard.

    • Simply remove the plug with your fingers, disconnecting the speakers from the motherboard.

  10. Portege Z830-S8302 Speaker Replacement: Schritt 10, Bild 1 von 2 Portege Z830-S8302 Speaker Replacement: Schritt 10, Bild 2 von 2
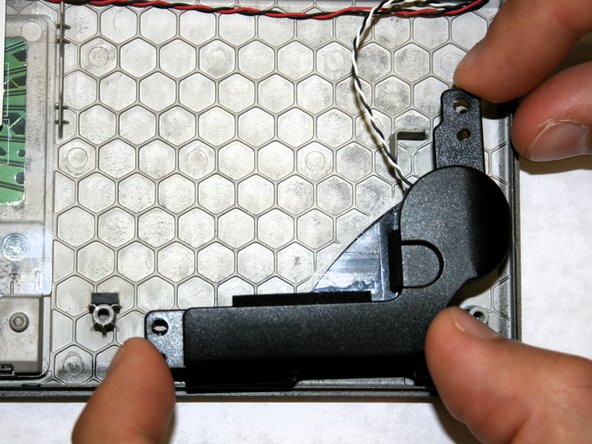
    • With the plug disconnected, now you can remove the speakers.

    • Lift the speakers up vertically removing them from pegs that hold them in place.

    • This does not require a tool as they are not fastened down, just lift and remove.

Abschluss

To reassemble your device, follow these instructions in reverse order.

Team

Washington State, Team S2-G7, Hope Fall 2018 Mitglied von Washington State, Team S2-G7, Hope Fall 2018

WSU-HOPE-F18S2G7

3 Mitglieder

15 Anleitungen geschrieben

0 Kommentare

Kommentar hinzufügen

Seitenaufrufe:

Letzte 24 Stunden: 0

Letzte 7 Tage: 0

Letzte 30 Tage: 2

Insgesamt: 229