Zum Hauptinhalt wechseln

PowerBook G4 Aluminum 12" 1-1.5 GHz Rear Display Bezel Replacement

Was du brauchst

  1. PowerBook G4 Aluminum 12" 1-1.5 GHz Rear Display Bezel Replacement, Battery: Schritt 1, Bild 1 von 1
    • Use a coin to turn the battery locking screw 90 degrees to the right.

    • Lift the battery out of the computer.

  2. PowerBook G4 Aluminum 12" 1-1.5 GHz Rear Display Bezel Replacement, Rear Display Bezel: Schritt 2, Bild 1 von 1
    • Open the computer and rotate the display as far as possible.

    • Remove the T6 Torx screw from the bottom left corner of the display assembly. The computer casing will not allow the screwdriver to be inserted directly into the screw, so be careful not to strip the screw.

  3. PowerBook G4 Aluminum 12" 1-1.5 GHz Rear Display Bezel Replacement: Schritt 3, Bild 1 von 1
    • Remove the T6 Torx screw from the bottom right corner of the display assembly.

    • To avoid cross-threading these screws during reinstallation, use a pair of tweezers to start each screw in its hole before using your Torx screwdriver to tighten them.

  4. PowerBook G4 Aluminum 12" 1-1.5 GHz Rear Display Bezel Replacement: Schritt 4, Bild 1 von 3 PowerBook G4 Aluminum 12" 1-1.5 GHz Rear Display Bezel Replacement: Schritt 4, Bild 2 von 3 PowerBook G4 Aluminum 12" 1-1.5 GHz Rear Display Bezel Replacement: Schritt 4, Bild 3 von 3
    • The next steps involve the use of plastic opening tools and spudgers which will probably be ruined in the process. Have a few spares of each tool handy.

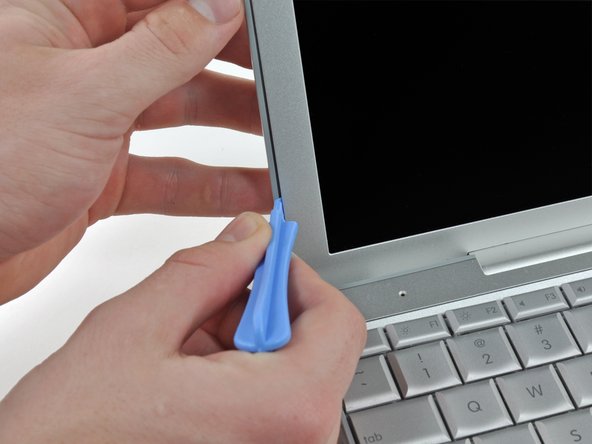
    • Insert a plastic opening tool between the left edge of the front display bezel and the plastic strip attached to the rear bezel, with the edge of the tool angled toward the LCD.

    • Rotate the tool away from the LCD to pop the rear bezel off the tabs on the front display bezel.

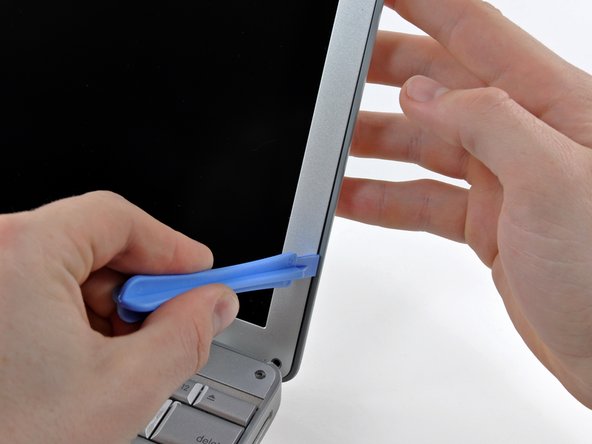
    • Work along the left edge of the display until the rear bezel is evenly separated from the front bezel.

    • Freeing these tabs may require some force. Be sure to support the display assembly with your other hand to avoid putting too much strain on the hinges.

  5. PowerBook G4 Aluminum 12" 1-1.5 GHz Rear Display Bezel Replacement: Schritt 5, Bild 1 von 3 PowerBook G4 Aluminum 12" 1-1.5 GHz Rear Display Bezel Replacement: Schritt 5, Bild 2 von 3 PowerBook G4 Aluminum 12" 1-1.5 GHz Rear Display Bezel Replacement: Schritt 5, Bild 3 von 3
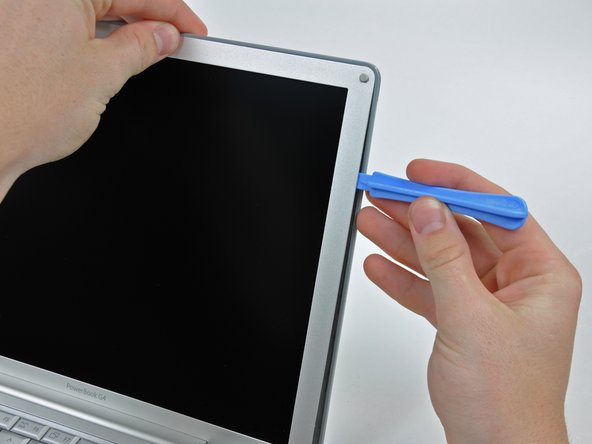
    • Insert a plastic opening tool between the right edge of the front display bezel and the plastic strip attached to the rear bezel, with the edge of the tool angled toward the LCD.

    • Rotate the tool away from the LCD to pop the rear bezel off the tabs on the front display bezel.

    • Work along the right edge of the display until the rear bezel is evenly separated from the front bezel.

  6. PowerBook G4 Aluminum 12" 1-1.5 GHz Rear Display Bezel Replacement: Schritt 6, Bild 1 von 3 PowerBook G4 Aluminum 12" 1-1.5 GHz Rear Display Bezel Replacement: Schritt 6, Bild 2 von 3 PowerBook G4 Aluminum 12" 1-1.5 GHz Rear Display Bezel Replacement: Schritt 6, Bild 3 von 3
    • Close the display.

    • The rear display bezel is still attached to the display via the antenna cables.

    • Lift the bottom edge of the rear display bezel up about an inch.

    • Slide the rear display bezel forward to release the clips along the top edge of the display.

    • Rotate the rear display bezel away from the display and lay it next to the computer.

  7. PowerBook G4 Aluminum 12" 1-1.5 GHz Rear Display Bezel Replacement: Schritt 7, Bild 1 von 1
    • Remove any tape covering the right antenna cable.

    • De-route the antenna cable from the right side of the rear display bezel.

  8. PowerBook G4 Aluminum 12" 1-1.5 GHz Rear Display Bezel Replacement: Schritt 8, Bild 1 von 2 PowerBook G4 Aluminum 12" 1-1.5 GHz Rear Display Bezel Replacement: Schritt 8, Bild 2 von 2
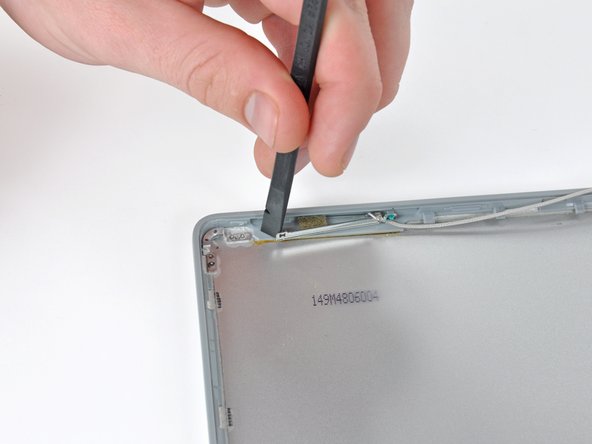
    • The antenna is attached to the rear display bezel via adhesive. To remove it, place the flat end of a spudger behind the top edge of the antenna, and carefully twist the spudger to pop the antenna off.

  9. PowerBook G4 Aluminum 12" 1-1.5 GHz Rear Display Bezel Replacement: Schritt 9, Bild 1 von 1
    • Place the pointed end of the spudger behind the lower part of the antenna and carefully rotate the spudger to free the antenna from the rear display bezel.

  10. PowerBook G4 Aluminum 12" 1-1.5 GHz Rear Display Bezel Replacement: Schritt 10, Bild 1 von 1
    • Remove any tape covering the left antenna cable.

    • De-route the antenna cable from the left side of the rear display bezel.

  11. PowerBook G4 Aluminum 12" 1-1.5 GHz Rear Display Bezel Replacement: Schritt 11, Bild 1 von 1
    • Remove the left antenna in the same way the right antenna is removed (shown above).

Abschluss

To reassemble your device, follow these instructions in reverse order.

Ein:e weitere:r Nutzer:in hat diese Anleitung absolviert.

Angehängte Dokumente

Matthew Newsom

Mitglied seit: 01/05/10

39.402 Reputation

67 Anleitungen geschrieben

0 Kommentare

Kommentar hinzufügen

Seitenaufrufe:

Letzte 24 Stunden: 0

Letzte 7 Tage: 1

Letzte 30 Tage: 5

Insgesamt: 3,291