Zum Hauptinhalt wechseln

RCA Pro10 Edition Battery Replacement

Was du brauchst

  1. RCA Pro10 Edition Battery Replacement, Speaker: Schritt 1, Bild 1 von 2 RCA Pro10 Edition Battery Replacement, Speaker: Schritt 1, Bild 2 von 2
    • Using a separating tool, look for a seam in the plastic casing that looks most accessible.

    • Use the prying tool to separate the front and back casing, working your way around the perimeter.

    • Utilize a card tool or a pick to assist in keeping the case separated.

    • To reassemble the device simply align the two casing halves and pinch to snap together or press down on the edges while the device in on a table.

  2. RCA Pro10 Edition Battery Replacement: Schritt 2, Bild 1 von 1
    • Flip over the back of the device while keeping it close to the front, the speaker is attached to it.

    • Remove the yellow tape securing the speaker to the back casing.

  3. RCA Pro10 Edition Battery Replacement: Schritt 3, Bild 1 von 2 RCA Pro10 Edition Battery Replacement: Schritt 3, Bild 2 von 2
    • Use the separating tool to pry the speaker from its surface.

    • Use caution when removing the speaker, you may damage the screen.

    • Cut or desolder the wires to replace or repair the speaker.

  4. RCA Pro10 Edition Battery Replacement, Battery: Schritt 4, Bild 1 von 2 RCA Pro10 Edition Battery Replacement, Battery: Schritt 4, Bild 2 von 2
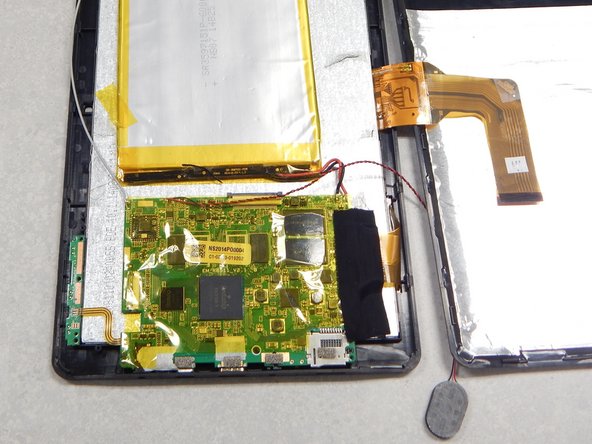
    • Peel off the black tape on the battery and main-board.

    • Peel off the black tape securing the screen ribbon cable to the back of the screen.

    • Use caution to avoid damaging either ribbon cable.

  5. RCA Pro10 Edition Battery Replacement: Schritt 5, Bild 1 von 2 RCA Pro10 Edition Battery Replacement: Schritt 5, Bild 2 von 2
    • Slide out the ribbon cable lock that is securing the screen ribbon cable.

    • Move the ribbon cable out of the way using tape if necessary.

  6. RCA Pro10 Edition Battery Replacement: Schritt 6, Bild 1 von 2 RCA Pro10 Edition Battery Replacement: Schritt 6, Bild 2 von 2
    In diesem Schritt verwendetes Werkzeug:
    Plastic Cards
    $2.99
    Kaufen
    • Remove the yellow tape securing the battery to the screen.

    • Use a plastic card or pick to separate the battery from the screen.

    • Do not bend or puncture battery, battery is difficult to separate from screen.

    • Cut or desolder the wires on the battery to remove or replace it.

Abschluss

To reassemble your device, follow these instructions in reverse order.

10 weitere Nutzer:innen haben diese Anleitung absolviert.

Dayne Russell

Mitglied seit: 01/27/15

401 Reputation

4 Anleitungen geschrieben

Team

Pasco Hernando, Team 1-1, Prince Winter 2015 Mitglied von Pasco Hernando, Team 1-1, Prince Winter 2015

PHSC-PRINCE-W15S1G1

6 Mitglieder

10 Anleitungen geschrieben

0 Kommentare

Kommentar hinzufügen

Seitenaufrufe:

Letzte 24 Stunden: 0

Letzte 7 Tage: 5

Letzte 30 Tage: 10

Insgesamt: 15,928