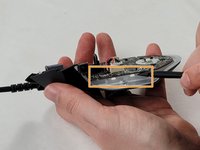
Zum Hauptinhalt wechseln

Razer Basilisk V3 Side and Middle Scroll Wheel Buttons Replacement

Was du brauchst

  1. Razer Basilisk V3 Side and Middle Scroll Wheel Buttons Replacement, Skates: Schritt 1, Bild 1 von 1
    • Locate the highlighted white skates on the bottom of the mouse.

  2. Razer Basilisk V3 Side and Middle Scroll Wheel Buttons Replacement: Schritt 2, Bild 1 von 3 Razer Basilisk V3 Side and Middle Scroll Wheel Buttons Replacement: Schritt 2, Bild 2 von 3 Razer Basilisk V3 Side and Middle Scroll Wheel Buttons Replacement: Schritt 2, Bild 3 von 3
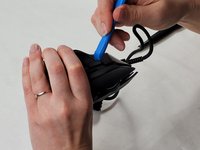
    • Heat the skate using a heat gun or hair dryer.

    • Using the pointy end of the spudger pry away a corner of the skate.

    • If the adhesive does not pull away easily, heat the skate more.

    • Once the corner of the skate comes free use the flat end of the spudger to peel off the rest of the skate.

    • Repeat these steps for each of the skates.

  3. Razer Basilisk V3 Side and Middle Scroll Wheel Buttons Replacement, Backplate: Schritt 3, Bild 1 von 1
    • Remove two 4.8 mm screws that were hidden under the front skates using a JIS #1 screwdriver.

    • Remove the single 4 mm screw beneath the thumb grip using a JIS #1 screwdriver.

  4. Razer Basilisk V3 Side and Middle Scroll Wheel Buttons Replacement: Schritt 4, Bild 1 von 3 Razer Basilisk V3 Side and Middle Scroll Wheel Buttons Replacement: Schritt 4, Bild 2 von 3 Razer Basilisk V3 Side and Middle Scroll Wheel Buttons Replacement: Schritt 4, Bild 3 von 3
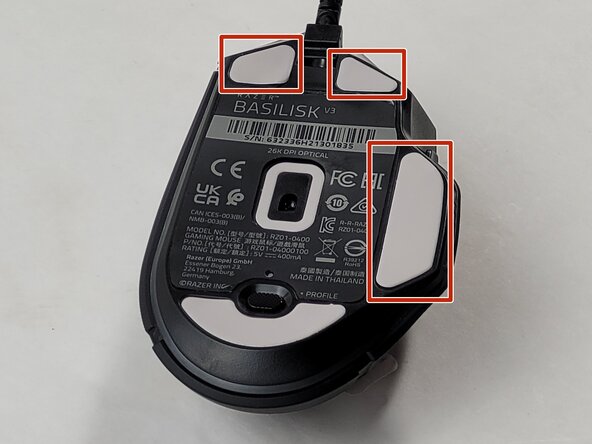
    • Heat the label gently with a heat gun or hair dryer.

    • Once the adhesive is loosened, use a spudger to peel off the label carefully, revealing two additional screws.

    • Remove the two 4.8 mm screws using a JIS #1 screwdriver.

  5. Razer Basilisk V3 Side and Middle Scroll Wheel Buttons Replacement: Schritt 5, Bild 1 von 3 Razer Basilisk V3 Side and Middle Scroll Wheel Buttons Replacement: Schritt 5, Bild 2 von 3 Razer Basilisk V3 Side and Middle Scroll Wheel Buttons Replacement: Schritt 5, Bild 3 von 3
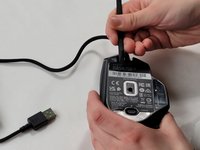
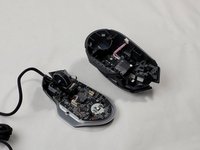
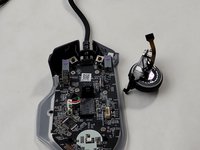
    • Carefully pry apart the mouse's top and bottom halves. Using the iFixit opening tool, start at one corner and work around the edge.

    • Be cautious of the clips that may break during this process.

    • Using a plastic opening tool, gently pry the connector apart by moving side to side to avoid bending the pins.

    • When reassembling, be mindful that the connector only fits one way, as shown in the pictures.

  6. Razer Basilisk V3 Side and Middle Scroll Wheel Buttons Replacement, Scroll Wheel Assembly: Schritt 6, Bild 1 von 3 Razer Basilisk V3 Side and Middle Scroll Wheel Buttons Replacement, Scroll Wheel Assembly: Schritt 6, Bild 2 von 3 Razer Basilisk V3 Side and Middle Scroll Wheel Buttons Replacement, Scroll Wheel Assembly: Schritt 6, Bild 3 von 3
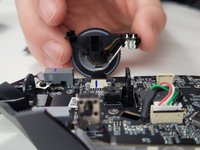
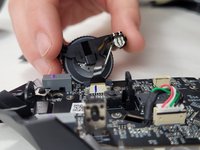
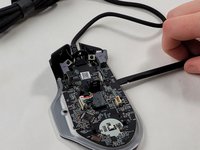
    • Use the flat end of the spudger to pop-out the scroll wheel assembly.

    • Make sure you are careful when removing the scroll wheel since it is still connected to the device with a ribbon cable. If you pull too hard the cable could break.

  7. Razer Basilisk V3 Side and Middle Scroll Wheel Buttons Replacement: Schritt 7, Bild 1 von 3 Razer Basilisk V3 Side and Middle Scroll Wheel Buttons Replacement: Schritt 7, Bild 2 von 3 Razer Basilisk V3 Side and Middle Scroll Wheel Buttons Replacement: Schritt 7, Bild 3 von 3
    • Pull up on the top half of the cable connector and pull the cable from the connector.

    • The connection pins on the wire face towards the scroll wheel assembly housing. When reassembling, make sure the connectors on the cable are facing the correct direction.

  8. Razer Basilisk V3 Side and Middle Scroll Wheel Buttons Replacement, Motherboard: Schritt 8, Bild 1 von 3 Razer Basilisk V3 Side and Middle Scroll Wheel Buttons Replacement, Motherboard: Schritt 8, Bild 2 von 3 Razer Basilisk V3 Side and Middle Scroll Wheel Buttons Replacement, Motherboard: Schritt 8, Bild 3 von 3
    • Remove the six 4 mm screws using a JIS #0 screwdriver.

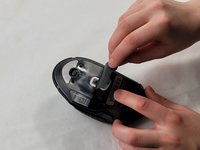
    • Insert the flat end of a spudger in the gap between the motherboard and the rest of the mouse.

    • Slowly pry up the edge of the board, moving around the mouse slowly in a counterclockwise direction.

  9. Razer Basilisk V3 Side and Middle Scroll Wheel Buttons Replacement: Schritt 9, Bild 1 von 3 Razer Basilisk V3 Side and Middle Scroll Wheel Buttons Replacement: Schritt 9, Bild 2 von 3 Razer Basilisk V3 Side and Middle Scroll Wheel Buttons Replacement: Schritt 9, Bild 3 von 3
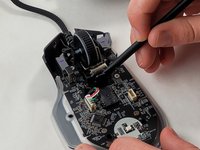
    • Unplug the white cable connection.

    • Feed the cable through the hole in the motherboard next to the connector.

  10. Razer Basilisk V3 Side and Middle Scroll Wheel Buttons Replacement, Side and Middle Scroll Wheel Buttons: Schritt 10, Bild 1 von 3 Razer Basilisk V3 Side and Middle Scroll Wheel Buttons Replacement, Side and Middle Scroll Wheel Buttons: Schritt 10, Bild 2 von 3 Razer Basilisk V3 Side and Middle Scroll Wheel Buttons Replacement, Side and Middle Scroll Wheel Buttons: Schritt 10, Bild 3 von 3
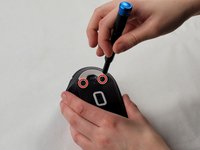
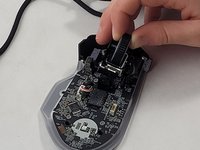
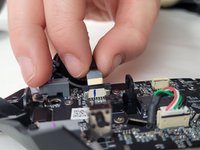
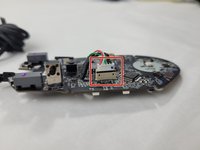
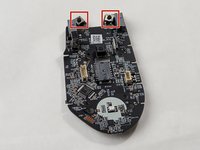
    • Identify SW2, SW3, and SW4 which are marked on the motherboard.

    • These switches are located in the front portion of the mouse

    • Always work in a well-ventilated area when soldering.

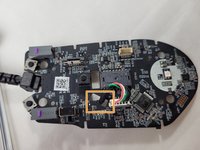
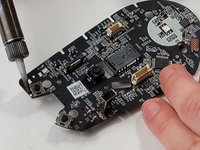
    • Use a soldering iron and desoldering pump or solder wick to remove the old solder from SW2, SW3, and SW4.

    • Take care to heat only the solder joints and avoid damaging the motherboard or surrounding components.

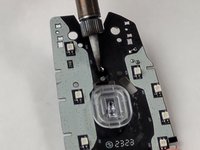
    • Once the solder is removed, use tweezers to carefully lift and remove the old button modules from the motherboard.

Abschluss

To reassemble your device, follow these instructions in reverse order.

Eine weitere Person hat diese Anleitung absolviert.

Brendin Costa

Mitglied seit: 03/18/24

402 Reputation

4 Anleitungen geschrieben

Team

UMass Dartmouth, Team 1-2, Santin Spring 2024 Mitglied von UMass Dartmouth, Team 1-2, Santin Spring 2024

UMASSD-SANTIN-S24S1G2

3 Mitglieder

15 Anleitungen geschrieben

2 Kommentare zur Anleitung

Hi. You know which kind of switch is the black one in the middle?

Brother_Natez - Antwort

I would also like to kniw which kind of switch the black one in the middle is, its labeled SW3 i believe standing for switch 3.

D. E. - Antwort

Kommentar hinzufügen

Seitenaufrufe:

Letzte 24 Stunden: 3

Letzte 7 Tage: 30

Letzte 30 Tage: 167

Insgesamt: 2,469