Zum Hauptinhalt wechseln

Razer Blade Stealth 2017 Audio and USB-A Port Replacement

Was du brauchst

  1. Razer Blade Stealth 2017 Audio and USB-A Port Replacement, Battery: Schritt 1, Bild 1 von 2 Razer Blade Stealth 2017 Audio and USB-A Port Replacement, Battery: Schritt 1, Bild 2 von 2
    • Before you begin, be sure to turn off your laptop and discharge the battery down to 25%.

    • Use a Torx T5 screwdriver to remove the eight, 3mm screws on the bottom cover of the laptop.

    • Whenever you remove screws from the device, remember to save and label them.

  2. Razer Blade Stealth 2017 Audio and USB-A Port Replacement: Schritt 2, Bild 1 von 1
    • Remove the bottom cover of the laptop by sliding it away from the hinge.

    • Do not force the cover up!

  3. Razer Blade Stealth 2017 Audio and USB-A Port Replacement: Schritt 3, Bild 1 von 2 Razer Blade Stealth 2017 Audio and USB-A Port Replacement: Schritt 3, Bild 2 von 2
    • Use your fingernail to pry up and disconnect the battery from the motherboard.

  4. Razer Blade Stealth 2017 Audio and USB-A Port Replacement: Schritt 4, Bild 1 von 1
    • Use a Phillips #00 screwdriver to remove the six, 5mm screws securing the battery.

  5. Razer Blade Stealth 2017 Audio and USB-A Port Replacement: Schritt 5, Bild 1 von 2 Razer Blade Stealth 2017 Audio and USB-A Port Replacement: Schritt 5, Bild 2 von 2
    • Remove any tape attached to the battery.

    • Use the plastic spudger to pry out the battery.

  6. Razer Blade Stealth 2017 Audio and USB-A Port Replacement, Audio and USB-A Port: Schritt 6, Bild 1 von 2 Razer Blade Stealth 2017 Audio and USB-A Port Replacement, Audio and USB-A Port: Schritt 6, Bild 2 von 2
    • Use a plastic spudger to lift up the module connector.

  7. Razer Blade Stealth 2017 Audio and USB-A Port Replacement: Schritt 7, Bild 1 von 2 Razer Blade Stealth 2017 Audio and USB-A Port Replacement: Schritt 7, Bild 2 von 2
    • Use a Phillips #00 screwdriver to remove the two, 3mm screws from the USB-A and audio port module.

  8. Razer Blade Stealth 2017 Audio and USB-A Port Replacement: Schritt 8, Bild 1 von 1
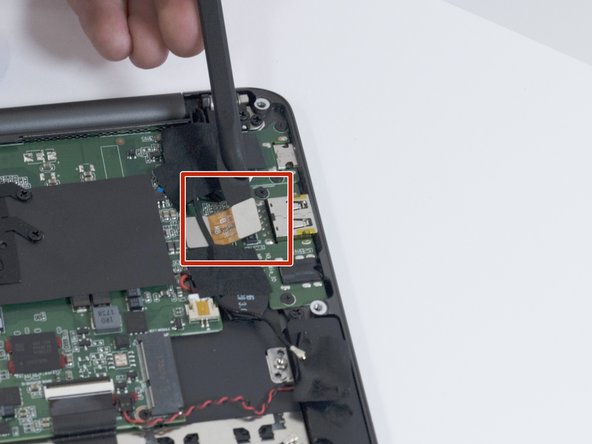
    • Use a plastic spudger to remove the USB-A and audio port module from the chassis.

Abschluss

To reassemble your device, follow these instructions in reverse order.

Ein:e weitere:r Nutzer:in hat diese Anleitung absolviert.

Team

Cal Poly, Team S11-G3, Regan Fall 2019 Mitglied von Cal Poly, Team S11-G3, Regan Fall 2019

CPSU-REGAN-F19S11G3

4 Mitglieder

7 Anleitungen geschrieben

0 Kommentare

Kommentar hinzufügen

Seitenaufrufe:

Letzte 24 Stunden: 0

Letzte 7 Tage: 1

Letzte 30 Tage: 16

Insgesamt: 1,701