Zum Hauptinhalt wechseln

Razer Blade Stealth 2017 Fan Replacement

Was du brauchst

  1. Razer Blade Stealth 2017 Fan Replacement, Battery: Schritt 1, Bild 1 von 2 Razer Blade Stealth 2017 Fan Replacement, Battery: Schritt 1, Bild 2 von 2
    • Before you begin, be sure to turn off your laptop and discharge the battery down to 25%.

    • Use a Torx T5 screwdriver to remove the eight, 3mm screws on the bottom cover of the laptop.

    • Whenever you remove screws from the device, remember to save and label them.

  2. Razer Blade Stealth 2017 Fan Replacement: Schritt 2, Bild 1 von 1
    • Remove the bottom cover of the laptop by sliding it away from the hinge.

    • Do not force the cover up!

  3. Razer Blade Stealth 2017 Fan Replacement: Schritt 3, Bild 1 von 2 Razer Blade Stealth 2017 Fan Replacement: Schritt 3, Bild 2 von 2
    • Use your fingernail to pry up and disconnect the battery from the motherboard.

  4. Razer Blade Stealth 2017 Fan Replacement: Schritt 4, Bild 1 von 1
    • Use a Phillips #00 screwdriver to remove the six, 5mm screws securing the battery.

  5. Razer Blade Stealth 2017 Fan Replacement: Schritt 5, Bild 1 von 2 Razer Blade Stealth 2017 Fan Replacement: Schritt 5, Bild 2 von 2
    • Remove any tape attached to the battery.

    • Use the plastic spudger to pry out the battery.

  6. Razer Blade Stealth 2017 Fan Replacement, Fan: Schritt 6, Bild 1 von 2 Razer Blade Stealth 2017 Fan Replacement, Fan: Schritt 6, Bild 2 von 2
    • Use a plastic spudger to lift the white clasp on the fan connector.

  7. Razer Blade Stealth 2017 Fan Replacement: Schritt 7, Bild 1 von 1
    In diesem Schritt verwendetes Werkzeug:
    Tweezers
    $4.99
    Kaufen
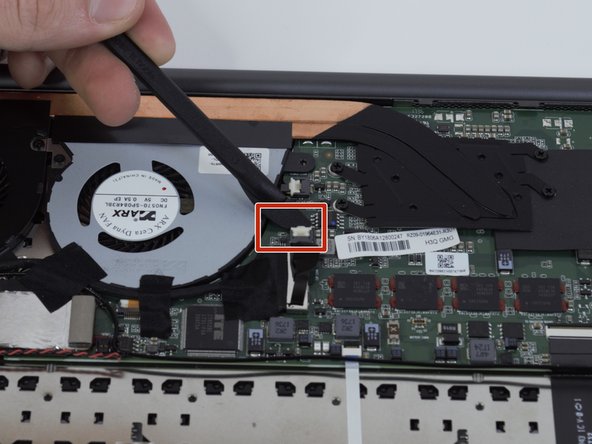
    • Use tweezers to pull the fan cable out of the opened connector terminal.

  8. Razer Blade Stealth 2017 Fan Replacement: Schritt 8, Bild 1 von 3 Razer Blade Stealth 2017 Fan Replacement: Schritt 8, Bild 2 von 3 Razer Blade Stealth 2017 Fan Replacement: Schritt 8, Bild 3 von 3
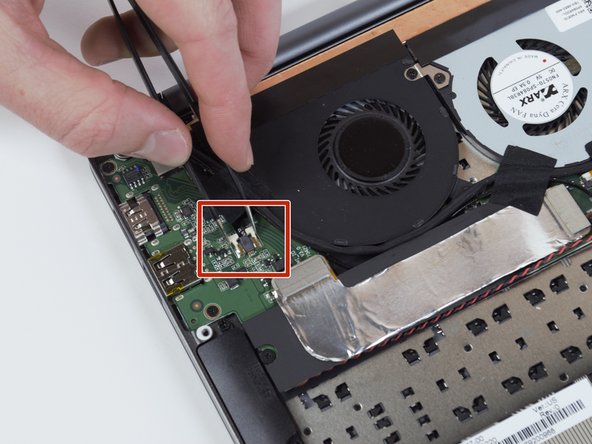
    • Use tweezers to squeeze the fan's white header.

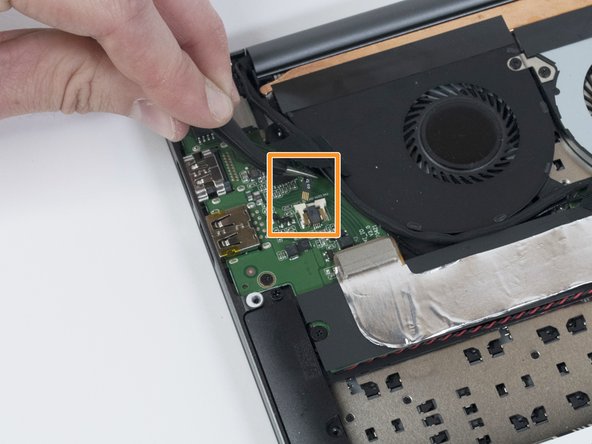
    • Disconnect the fan connector by sliding it out toward the rear of the chassis.

  9. Razer Blade Stealth 2017 Fan Replacement: Schritt 9, Bild 1 von 3 Razer Blade Stealth 2017 Fan Replacement: Schritt 9, Bild 2 von 3 Razer Blade Stealth 2017 Fan Replacement: Schritt 9, Bild 3 von 3
    • Remove any tape attached to the fans.

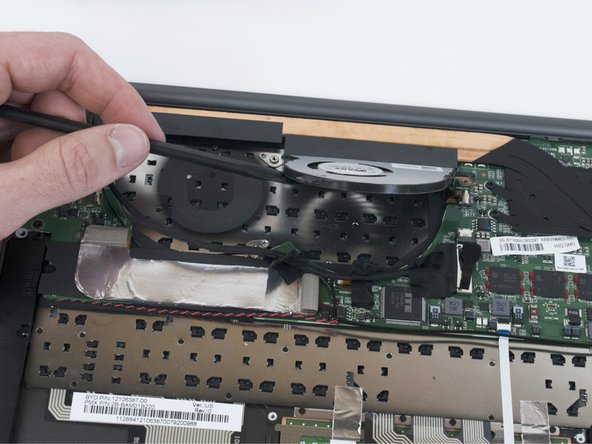
    • Use a Phillips #00 screwdriver to remove the six, 3mm screws and the metal bracket around both fans.

  10. Razer Blade Stealth 2017 Fan Replacement: Schritt 10, Bild 1 von 2 Razer Blade Stealth 2017 Fan Replacement: Schritt 10, Bild 2 von 2
    • Use a plastic spudger to slide the fans out of the case.

Abschluss

To reassemble your device, follow these instructions in reverse order.

2 weitere Nutzer:innen haben diese Anleitung absolviert.

Team

Cal Poly, Team S11-G3, Regan Fall 2019 Mitglied von Cal Poly, Team S11-G3, Regan Fall 2019

CPSU-REGAN-F19S11G3

4 Mitglieder

7 Anleitungen geschrieben

Ein Kommentar

What is the part number for the black fan? I'm trying to buy a replacement but I can't find any :(

Sang Jae Kouwenberg - Antwort

Kommentar hinzufügen

Seitenaufrufe:

Letzte 24 Stunden: 2

Letzte 7 Tage: 14

Letzte 30 Tage: 46

Insgesamt: 2,174