Zum Hauptinhalt wechseln

Replacing Creative Zen X-Fi Motherboard

Was du brauchst

  1. Replacing Creative Zen X-Fi Motherboard, Detaching Front Case: Schritt 1, Bild 1 von 3 Replacing Creative Zen X-Fi Motherboard, Detaching Front Case: Schritt 1, Bild 2 von 3 Replacing Creative Zen X-Fi Motherboard, Detaching Front Case: Schritt 1, Bild 3 von 3
    • Using a spudger, wedge the tip between the front and back case to pry them apart.

    • Be careful to not apply excessive force since there are six fasteners on the screen's side that holds the cases firmly together.

  2. Replacing Creative Zen X-Fi Motherboard, Rubber Button Cover: Schritt 2, Bild 1 von 1
    • The black rubber button pad can be removed by simply picking it up.

  3. Replacing Creative Zen X-Fi Motherboard, Button Input Chip Part 1: Schritt 3, Bild 1 von 1
    • Flip the LCD screen off the midsection plate to gain access to the space around the input button chip.

  4. Replacing Creative Zen X-Fi Motherboard, Button Input Chip: Schritt 4, Bild 1 von 1
    • Using a spudger, pry off the button input chip from the mid-section of the device. To gain best leverage, start at the bottom right corner and level your way up the side of the chip.

    • Be aware that the button input chip is glued to the mid-section, so some extra force may be required.

  5. Replacing Creative Zen X-Fi Motherboard, Access Midsection Plate: Schritt 5, Bild 1 von 1
    • Lift open the LCD screen and button input chip to access the entire midsection plate.

  6. Replacing Creative Zen X-Fi Motherboard, Unscrew below Button Chip: Schritt 6, Bild 1 von 1
    • Use a Phillips Head screwdriver to unscrew the three 3/16 inch screws that were underneath the button input chip.

  7. Replacing Creative Zen X-Fi Motherboard, Unscrew below LCD Screen: Schritt 7, Bild 1 von 1
    • Use a Phillips Head screwdriver to unscrew the three 3/16 inch screws that were underneath the LCD screen.

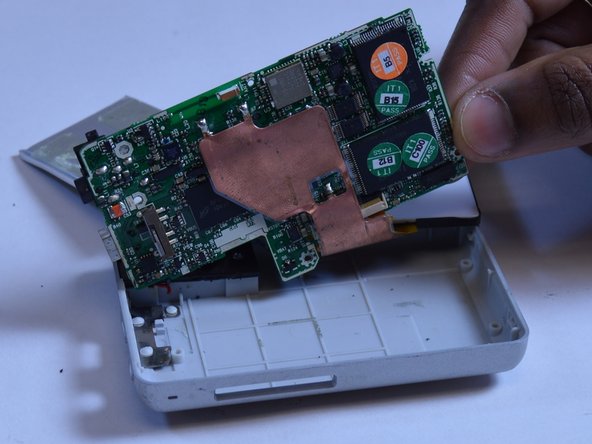
  8. Replacing Creative Zen X-Fi Motherboard, Pull the Motherboard Out: Schritt 8, Bild 1 von 2 Replacing Creative Zen X-Fi Motherboard, Pull the Motherboard Out: Schritt 8, Bild 2 von 2
    • Lift the right edge of the motherboard off the back case.

    • Using two fingers to grip the edge of the board, slide the motherboard out of the case to the right.

Abschluss

To reassemble your device, follow these instructions in reverse order.

Ein:e weitere:r Nutzer:in hat diese Anleitung absolviert.

Westley Courchene

Mitglied seit: 01/13/15

3.362 Reputation

14 Anleitungen geschrieben

Team

USF Tampa, Team 1-1, Remmell Fall 2015 Mitglied von USF Tampa, Team 1-1, Remmell Fall 2015

USFT-REMMELL-F15S1G1

5 Mitglieder

14 Anleitungen geschrieben

0 Kommentare

Kommentar hinzufügen

Seitenaufrufe:

Letzte 24 Stunden: 0

Letzte 7 Tage: 0

Letzte 30 Tage: 6

Insgesamt: 490