Einleitung
Diese Anleitung zeigt dir, wie du die komplette Retina Displayeinheit am Retina MacBook 2016 austauschen kannst, inklusive Außenschale und Apple Logo.
Was du brauchst
-
-
Entferne folgende acht Schrauben, mit denen das untere Gehäuse befestigt ist:
-
Zwei 1,8 mm Pentalobe P5 Schrauben
-
Vier 2,9 mm Pentalobe P5 Schrauben
-
Zwei 6,1 mm Pentalobe P5 Schrauben
-
-
-
Zwänge deine Finger in den Spalt zwischen dem oberen und dem unteren Gehäuse. Beginne an der Rückseite des MacBooks zwischen den Scharnieren.
-
Fasse das untere Gehäuse fest an und hebe es gleichmäßig hoch, bis es sich vom oberen Gehäuse löst.
-
-
-
Halte das untere Gehäuse gut fest und drehe das MacBook vorsichtig um, sodass das Apple Logo nach oben zeigt.
-
-
-
Hebe das obere Gehäuse und das Display zusammen von der Vorderkante her nach oben an, bis es mit einem Winkel von etwa 45° steht.
This displays two black pics to prop up the MacBook, but the kit only includes one black pic.
-
-
-
Drücke mit dem flachen Ende des Spudgers die goldfarbene "battery disconnect" Taste und halte sie fest.
-
Wenn die Einschalt-LED aufleuchtet, dann halte die Taste weiterhin gedrückt, bis die LED erlöscht. Das kann bis zu 10 Sekunden lang dauern.
-
Wenn die LED nicht aufleuchtet, dann lasse die Taste nach 5-10 Sekunden los. Drücke und halte sie für weitere 5-10 Sekunden und lasse los. Drücke und halte sie zum Abschluss erneut für 5-10 Sekunden und lasse los.
cannot turn on the led after replacing the new screen, even after following the turn on instructions upper…
on reassembly, I had to plug my laptop in to reactivate the LED light
After reassembly I could not restart my MacBook using the power button or after SMC reset (shift-ctrl-option-pwr). I had to connect my MacBook to its charging cable to get the battery LED to re-illuminate. After that it was all normal.
mine doesnt turn on w anything, i forgot to click the buton to disconnect :_/
Same issue as above peeps. Followed ifixit directions verbatim and wasn't getting anything after screwing everything back in. Plugged in original 45W power block and waited, after few minutes battery LED came on and a min. or two after that, was able to get screen to turn on. Hope this helps somebody else.
May I ask how to get screen to turn on. I cannot get it work..
For those whose Mac won't turn on.
See step 16
To reconnect this cable, first line up the metal bracket over the screw holes, then "PRESS DOWN" on the middle of the bracket.
There is a connector under the bracket, which you can't see if you don't see under.
Not having it in mind, you will not PRESS DOWN the middle of the bracket and there is no connect.
hls2005 -
Thank you @Xiubo Zhang - This solved my problem! Please everyone check this connector if you have trouble turning your Macbook on after replacing the battery.
Miksu -
There needs to be mention of procedure for getting the repaired MacBook to power up again after the repair is completed.
I also am running into the issue described by others. MB will not come on again, even after being plugged into power and performing an SMC reset.
Kinda stuck….
Hi, I tried everything and my MacBook will not start up after replacing the bottom case with a battery installed. I decided to put back on the old case with the battery that needs servicing and it still will not power on. I am fairly experienced taking apart laptops I was an Apple service tech for 15 years. this has me baffalled. Any hints BTY the logic board does not show any power coming from the AC charger the power LED is not lit up
I had trouble with this as well. What worked for me is to plug in power using the stock 29W USB C power brick that originally came with this Macbook. Trying other, lower powered, power adapters did not work. Use this advice with caution as there are multiple (i.e substantiated) comments that indicate that first power up should only be with a 5W adapter! So perhaps try this strict sequence: try with a 5W adapter, then and only then try with the 29W adapter. Or even slightly better, if everything else has completely failed, only then try full power 29W adapter.
How long did you wait to get it power back on? I replaced my logic board and tried to connect the power charger but it doesnt still turn on.
Herb -
The easiest error to make when working on this motherboard if applying full voltage after re-assembly. According to the big A, the motherboard on these Macbooks need to be “woken up” with a 5 watt (phone size) charger. Applying the normal 29 watts may render your system unusable.
Hello Noah,
It seems your remark is only valid for the 2015 and not the 2016 edition.
While it’s true that the internal documentation specifies this for a 2015, after frying 2 motherboards with a normal charger, I spoke with the engineers and they told me that this also applies to 2016 and 2017 macbook main logic boards. I say- It can’t hurt to try to wake them up with a 5 watt charger first! Please take 5 minutes to save your motherboard.
I plugged in my charger and the LED came on. The computer gets warm but the screen is not turning on. The keyboards doesn’t seem to respond to recovery options. Any suggestions?
After reassembly I could not restart my MacBook using the power button or after SMC reset (shift-ctrl-option-pwr). I had to connect my MacBook to its charging cable to get the battery LED to re-illuminate. After that it was all normal.
I had basically this when doing a screen replacement (and the ZIF connector ribbon which basically crumbled to dust as I touched it). Including no sound, no light, no boot, no logos, I had a USB connected sound once when plugging it into my windows PC which i guess confirmed it wasnt totally fried, but I had left it plugged in to a few different chargers (not the 20w or whatever one since I read it could damage it if it was not powering normally. could be total BS) and had it sit from 15-30 minutes on each. all nearly no sign of life, though one re-disassembly showed the previously unlit power LED was on again. I went to let it sit on the officical charger overnight thinking it was dead, but it just randomly booted and is working fine now. TLDR be patient with apples BS.
-
-
-
Hebe die Vorderkante hoch, bis das untere Gehäuse mit einem Winkel von etwa 45° geöffnet ist.
-
-
-
Löse mit einer Pinzette das Klebeband ab, mit dem der ZIF Verbinder des Trackpadkabels bedeckt ist.
Where can I find a replacement cable?
Just worked on one that was missing the tape from the factory, so yours may not have it either.
that cable got damaged, and now my macbook won't turn on anymore. Does this cable prevent the macbook from working?
I have the same issue. Th trackpad cable snapped while I was replacing the LCD screen. I have ordered a new cable from Amazon but I am not sure if that would cause the laptop to not power up (it's not power related)
-
-
-
Klappe vorsichtig den Sicherungsbügel am ZIF Verbinder des Trackpadkabels mit einem Spudger hoch.
I flipped up the small retainer -- but when I tried to flip it down, it flew off. The tabs that mount the retainer are very small, and I couldn't get it back on. Left it out, taped down the cable.... and so far the computer, battery, and trackpad are working.
-
-
-
Ziehe das Flachbandkabel des Trackpads vorsichtig durch den Schlitz im Rahmen vom Trackpad ab.
-
-
-
Schließe das MacBook sorgfältig und drehe es wieder um, so dass das Apple Logo nach oben zeigt.
-
Klappe das obere Gehäuse/Display Einheit etwa rechtwinklig auf und stütze es an einem stabilen Gegenstand, so dass du es nicht festhalten brauchst.
-
Klebe das obere Gehäuse mit einem Klebeband in der Nähe des Trackpads fest, so dass es sich nicht versehentlich bewegen kann.
-
-
-
-
Entferne die einzelne 2,9 mm Torx T5 Schraube, mit der der Akkuanschluss am Logic Board befestigt ist.
From my experience it’s important to carefully press and hold the small button above left of the Battery Discharge label. Use a plastic spudger or finger tip. The illuminated yellow LED to the right will go off. I believe this discharges remaining electricity from logic board protecting it during repair.
* I cannot find any documentation to support this, but I have damaged boards by not including this step.
I don't know what guide your on, but step 6 of the guide to replacing the USB-C cable has you press this button (3 times even).
What is with the all plastic end of this cable that appears to just be glued right on top of its connector?
Does the new one just stick back right on top?
(In this photo it is the bottom side of the cable below the white water indicator sticker)
-
-
-
Als zusätzliche Sicherheitsmaßnahme kannst du den Akku physisch trennen, indem du ein Akkuisolierstück zwischen Logic Board und Akkuanschluss einsetzt.
What happen if you don’t disconnect the battery? I didn’t and I saw smoke coming out when I connected the pad flex cable and the computer still started up
If you don’t disconnect the battery you might accidentally short something on the logic board since power is still running through everything while you’re working on it. You can complete the repair without disconnecting the battery, but you risk accidentally breaking your logic board. It’s much safer to keep the battery disconnected while you’re working.
-
-
-
Entferne die beiden Schrauben, mit denen die Halterung des USB-C Anschlusses befestigt ist:
-
Eine 1,1 mm Kreuzschlitzschraube #00
-
Eine 3,5 mm Torx T5 Schraube
I’m at this point and the 1.1 mm Phillips #00 screw won’t budge and now I fear it could be stripped? Now what???
You could try to cover the tip of your screwdriver with a thin rubber glove to improve the grip on the screw while applying a little more downward force for the initial jolt. That might loosen the screw.
With my iFixit screwdriver kit, these were Philips #000, not #00.
I was at the 1.1 mm and couldn't get it open with the 00. I ordered the 000 but it still won't budge. I tried the glove idea and as much pressure as I'm comfortable giving. I'm pretty sure the screw is stripped. Any ideas or advice or am I in trouble?
Got stuck here too. Bought a Chinese laptop/phone servicing kit and guess what? No 1.1mm philips. The 1.2mm it does include doesn’t sit tightly enough. Had to order separately….
-
-
-
Heble die Halterung des USB-C Anschlusses mit dem flachen Ende des Spudgers gerade hoch und löse sie vom Logic Board ab.
At re-assembling, when you reconnect this cable, pressing centre of metal plat is extremely important. You should feel tiny click when it connected properly. I encountered unrecognised external HDD and external monitor through USB-C even though charging in/out was OK, i.e failure of data transmission. I needed to re-open the back cover and pressed the metal plate again, then USB-C connection worked properly.
After this step, I flipped the Macbook over once more and opened it up 90 degrees, supported on the back. Proceeded directly to step 25. Seems safer, those fragile connectors and flimsy cables give me heebie jeebies.
I endorse maccentric's comment above. I think it's better to remove the battery (carefully) with the logic board in place. I did that and the computer works fine after reassembly.
In fact, I removed a couple more cables than this step, but got creeped out by the many delicate cables being moved, and user comments about failed disconnect and reconnect, so I skipped to step 25 lower down. -
-
-
Klappe den Sicherungsbügel am ZIF Verbinder des Kabels zur Audioplatine mit dem Spudger hoch.
-
-
-
Ziehe das Flachbandkabel zur Audioplatine gerade aus seinem ZIF Anschluss heraus und löse es ab.
Make sure at reassembly that you insert the ribbon cable in to the jack board fully. It seems to take an extra push. The white line should disappear when it is seated properly. I didn’t get it in all the way by a fraction of a mm and had no sound (internal speakers weren’t even recognized). Went back and seated the cable fully and sound was back.
I had that same problem, too.
Had the same problem, (no audio after reassembly) it did have the startup chime though.
after re-seating the ribbon cable, it worked for a few days, but then nothing after waking up.
not even the startup chime.
Any body got pointers on how to check if i broke the cable or the board? (looks fine...) -
-
-
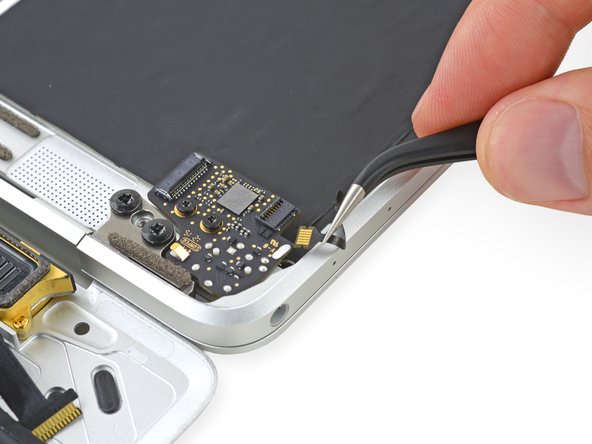
Ziehe das Klebeband vom Displaykabelstecker mit einer Pinzette zurück.
I won’t have my daughter’s MacBook with its banana encrusted USB-C port until she returns home during spring break — just doing some homework before then. But if the case can lie flat after the audio board ZIF cable is detached, why do you need to detach the display cable connector (Steps 19-24)? It seems that you could jump straight to Step 25 to replace the USB-C port and avoid those steps.
Hi John, disconnecting the display cable is not necessary, but is recommended to avoid accidental damage to the cable during the rest of the procedure. If you feel confident in the safety of the cable then you can skip ahead. Good luck with the repair!
-
-
-
Wenn das so ist, dann musst du den Sicherungsbügel mit dem flachen Ende des Spudgers nach unten halten, während du mit der Pinzette das Klebeband ablöst.
-
-
-
Klappe den Sicherungsbügel auf dem Displaykabelstecker mit dem flachen Ende des Spudgers hoch.
-
Versuche ihn vom Klebeband fern zu halten, sonst kann er daran festkleben. Dann wird das Ablösen des Kabels schwieriger.
I found it helpful to stick one of the triangular picks in between the table and the retaining flap to keep them separated.
-
-
-
Schiebe vorsichtig das flache Ende des Spudgers unter das Displaykabel, um es von der Klebeverbindung zum unteren Gehäuse zu trennen.
-
-
-
Lasse den Sicherungsbügel geöffnet.
-
Ziehe das Displaykabel vorsichtig gerade aus seinem Anschluss heraus und löse es ab.
I’m pretty sure I understand the instructions here, but I had to think about it a little longer because “… must remain closed when the cable is reinserted during reassembly …” was not clear to me right away. The retaining flap I discovered, is super delicate, and hence my paranoia, so I wanted to point this out in case anyone else felt like me: ''''Is it correct to assume that your instructions could be interpreted as:
“After disconnecting the cable, close the retaining flap for now to avoid damaging it. When reinstalling the cable, flip up the retaining flap once again, realign and slide the cable with gold contacts facing down.”
I bent the USB-C corner of the lower case from a short drop onto laminate flooring, so in I went to shape it so the edge wouldn’t snag or scratch things. I am typing on my MacBook that received the body work.
Thank you for your guidance!
For @seriouslyjohn and anyone else who might be wondering: “the flap must remain closed when the cable is reinserted” means keep it closed. Do not reopen the flap to insert the cable; just insert it carefully while leaving the flap closed. I know it probably runs counter to the procedure you’re used to, but Apple’s documentation is very clear on this, and I have to think it’s for a reason. My advice is to follow the instructions as written and don’t try to reinterpret them ;) Congrats on a successful repair!
Oops! I most definitely did NOT reinsert the cable into a closed connector. We can only wonder why Apple instructed this step to be counter-intuitive. I’ll pay closer attention to any weirdness that may arise, but the MacBook has been traveling and performing as it should; I’m going to avoid reopening the case, as easy as it is, until I have a good reason to do so. Thank you for replying and updating the guide!
I would argue that you should NOT close the retaining flap. I followed the directions to the letter, and when I started up the MacBook, the display did not register since the I wasn’t able to reseed the cable fully without worrying about tearing the cable. I did hear the computer charging and saw that the keyboard lit up, so I knew the MacBook was working besides the display. I looked up another video on Youtube that left the retaining flap open when reinstalling, so I took apart the Macbook again and tried it that way, and IT WORKED! The cable wasn’t fully reseated with the retainer open and I’m not sure if that was my fault or not, but with the retainer flap open, it was easier to see that. My 2 cents. Good luck everyone!
I initially tried inserting the cable with the retaining flap closed (as described), however after completing reassembly the MacBook could be heard to start but without any display action (no backlight, no graphics - also tried resetting the SMC). Being suspicious of this step based on the comments above, I tried re-inserting the cable with the retaining flap open before subsequently closing the flap. It may have just been my perception but insertion with the retaining flap open certainly appeared to result in a more robust mating of cable and connector. After reassembly and reset of the SMC I at least saw backlight action although no graphics still. A subsequent boot into to diagnostics mode resulted in the graphics coming to life.
Maybe my re-insertion while the retaining flap was closed was not quite correct (although I was certainly trying to be careful), but my experience was that success was achieved making the cable insertion while the retaining flap was open.
It is kind of nice that I don't have to worry about that. The screen cable is literally plug & play. Super easy.
-
-
-
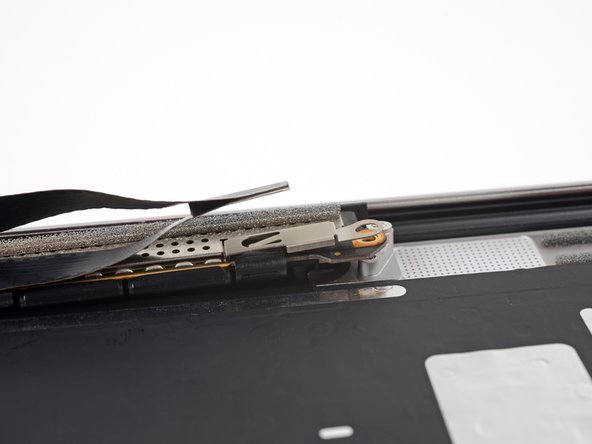
Klappe den Sicherungsbügel am ZIF Verbinder des Flachbandkabel zur Doppelmikrofoneinheit mit einem Spudger hoch.
-
-
-
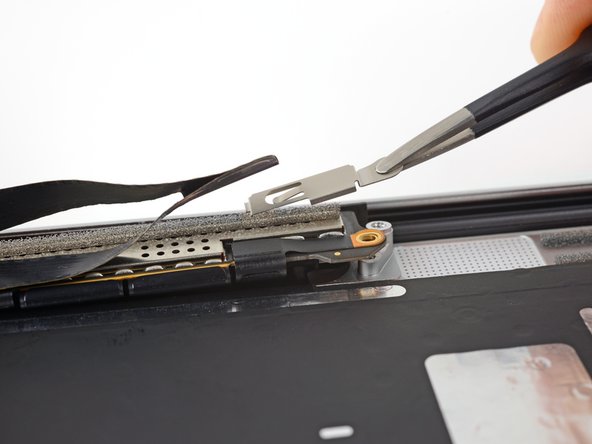
Ziehe das Flachbandkabel zur Mikrofoneinheit gerade aus seinem Anschluss heraus und löse es ab.
Does anyone know were I can buy the “microphone assembly ribbon cable“? It is the most delicate cable and cant seem to find spare part.
-
-
-
Entferne die beiden 3,2 mm Torx T5 Schrauben, mit denen die Platine der Kopfhörerbuchse am Gehäuse befestigt ist.
-
-
-
Entferne die Platine der Kopfhörerbuchse.
-
-
-
Entferne die beiden 2,5 mm Kreuzschlitzschrauben #00, die den USB-C Anschluss befestigen.
As with my comment above, for me, these were #000 not #00. Other than that, if you work slowly and deliberately, you will find the right angle. It does go in without any force, but you have to find the right way.
-
-
-
Hebe den USB-C Anschluss mit einer Pinzette genau über die Scharnierschrauben.
-
Schiebe den Anschluss heraus und hebe ihn über dem Scharnier hoch..
Successful completion of USBC in 20 minutes with following notes
1 the replacement part has to have the ribbon folded to match the original or will it foul the display case large screw. You know this when you can’t put the two big Pentalobe screws in on the final case install
2 my USBC part looks identical to the original, but the port has some motion even with the screws tight. I’m wondering about this a bit. I’m confident I did not cross thread the screws.
i measure the thickness of the original USB C port board at the two Phillips screws as 325 microns +_25 umicrons
I found the same problem with the new part moving a lot after installation even with the screws tight, and realised the problem is the new part does not come with the black rubber seal that goes around the connector (you can see it in pic 3 step 25). I moved that across from the old part to the new one and now it seems very tight.
Step 25 only has one pic
John M -
He means 3rd pic of step 26.
dmjenks -
If you are removing the screen (to replace the top case, for example), do this step afterwards. It is much easier this way.
No luck, the port seems to be wedged in behind the computer’s hinge. But you need to remove USBC port BEFORE you remove the display. Soooooooo any other tips?
The screws on the hinge aren’t in the way, it’s hitting right up near the edge of the computer itself.
remove the two screws under the rubber piece to disconnect the display. I didn’t have to completely remove it, just enough to slide the pieces in and out
totally worked! saved me about $550 doing it myself so you have my eternal gratitude
I found it impossible to remove the USB type C port during this step and instead continued with the next 2 steps and after separating the display found that the USB type C port was effortlessly removed……hope that helps someone
I think it’s a pretty $@$*!& tutorial. Sorry to be blunt.
It is essentially missing about 3 final steps that show the replacement piece so one can appreciate it.
I read the tutorial, thought it’s all clear and then bought the piece except it was an incomplete piece. Since the tutorial is missing the last three steps, I could not judge the piece and essentially got lured buying an incomplete piece.
I don’t understand why here in this picture it looks like the black ribbon is turning away from the port but for the piece I bought, die black ribbon goes in the same direction as the port: Retina MacBook 2016 Teardown .
-
-
-
Entferne die beiden 3,3 mm Torx T5 Schrauben, mit denen die Displaykabeleinheit befestigt ist.
-
-
-
Öffne das Display ganz.
-
Setze das MacBook auf seiner rechten Kante ab, so dass das Display, wie zu sehen, von dir weg zeigt.
I found putting the laptop keyboard down on the edge of a table (With screen open, and going down the side of the table) To be easier. It allowed me to put in the torque needed in unscrewing the screen.
-
-
-
Entferne die vier 4,8 mm Torx T8 Schrauben, mit denen die Displayscharniere befestigt sind.
-
-
-
Halte die Displayeinheit mit einer Hand fest und das obere Gehäuse mit der anderen. Drücke sie dann beide leicht gegeneinander, so dass sich die Scharniere aus ihren Vertiefungen im oberen Gehäuse herauslösen.
-
Drücke das obere Gehäuse nach vorne und ziehe gleichzeitig das Display vorsichtig zurück.
-
Wenn sich die Displayscharniere vom oberen Gehäuse gelöst haben, dann entferne das Display und lege es zur Seite.
I had to give the screen just a little force here, for it to pop out. Its an incredibly tight fit.
-


Um dein Gerät wieder zusammenzusetzen, folge den Schritten in umgekehrter Reihenfolge.
Um dein Gerät wieder zusammenzusetzen, folge den Schritten in umgekehrter Reihenfolge.
Rückgängig: Ich habe diese Anleitung nicht absolviert.
24 weitere Nutzer:innen haben diese Anleitung absolviert.
Besonderer Dank geht an diese Übersetzer:innen:
100%

Diese Übersetzer:innen helfen uns, die Welt zu reparieren! Wie kann ich mithelfen?
Hier starten ›

11 Kommentare
Hi, I did the tutorial and everything worked out except for one thing. My Macbook isn’t detecting when I close it and open it. I would like some help, does anyone know how to solve it?
will a 2015 screen work on a 2016 machine?
did you ever find the answer to this? I have a 2016 machine and looking for a new screen.
I followed the instructions, seemingly without problems, but the laptop won’t power up now. I have disassembled and reassemble twice, but haven’t found anything obviously missed or out of place. Any ideas on what might be preventing it from charging and restarting?
hi E.D. I had the same problem,but i got it to reboot with the help here https://www.macworld.co.uk/how-to/mac/ma... this
Thank you. Although I had plugged the computer in for 30 minutes and tried the SMC reboot several times unsuccessfully, I left it plugged in. After charging all day, it is actually working again. Phew! I assume that in my reassembly I tightened/connected something better and it needed the full charge to get it operational.
Terrific guide! I was able to replace a broken display with a used one from eBay for $200. I purchased the iFixit essential toolkit. The only step that gave me trouble was step #29. I had to remove the screws from the hinge, as recommended. However, there was still not enough room. I just wiggled it for a while until it magically got free. Putting it back in was the same problem.
Isn’t the rest of the disassemble missing? This just shows how to take the top part off, far from showing how replace the LED panel, glass or other elements of the display assembly.
This is to replace the entire ‘display assembly’ not elements of it.
I cracked the screen on my laptop by dropping it. Ordered a replacement off ebay and used these instructions to change. These are really good instructions. I was a little nervous since it didn’t have the instructions for putting the new one on, but once you take it off, it makes sense how to put the new one on. I was afraid it wouldn’t turn on given some of the comments, but I plugged mine in for about 30 minutes and then it booted up with no issues! Thanks so much for such great instructions!
Be EXTREMELY careful around that USB C port! I strongly recommend removing the hinge screws and opening that hinge to get enough clearance to slide the port out without any resistance. It's very easy to damage and a new one is about $150
IMPORTANT. You’re not removing the bottom, yet. This step is solely to separate the panel from its clips, permitting inside access.
Chris Leeds - Antwort
The screws go in tangent to the curve of the case. If you aren’t used to handling small hardware try turning the screw counterclockwise while you feel for the hole until you feel it drop, that means the threads have aligned. It takes only light finger torque when they are threaded correctly
abscate - Antwort