Zum Hauptinhalt wechseln

Ring Video Doorbell Pro Motherboard Replacement

Was du brauchst

  1. Ring Video Doorbell Pro Motherboard Replacement, Housing: Schritt 1, Bild 1 von 1
    • Start by using the star-shaped end of the included Ring screwdriver to take out the 5 mm screw on the bottom of the device.

  2. Ring Video Doorbell Pro Motherboard Replacement: Schritt 2, Bild 1 von 3 Ring Video Doorbell Pro Motherboard Replacement: Schritt 2, Bild 2 von 3 Ring Video Doorbell Pro Motherboard Replacement: Schritt 2, Bild 3 von 3
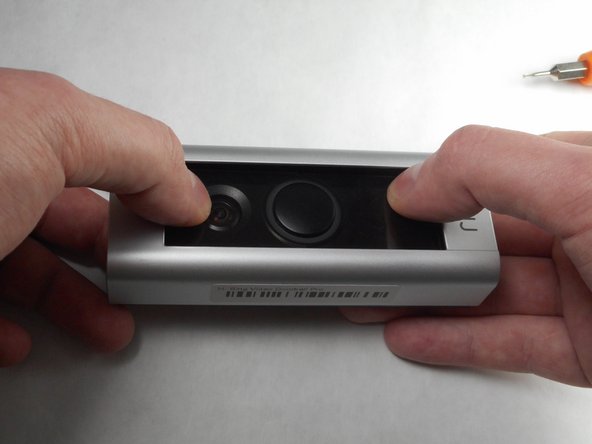
    • Use your thumbs to apply downward pressure on the glass part of the device while pulling the faceplate up and off of the device.

  3. Ring Video Doorbell Pro Motherboard Replacement: Schritt 3, Bild 1 von 1
    • Using a PH-000 screwdriver, unscrew and set aside all four of these 5.25 mm screws.

  4. Ring Video Doorbell Pro Motherboard Replacement: Schritt 4, Bild 1 von 2 Ring Video Doorbell Pro Motherboard Replacement: Schritt 4, Bild 2 von 2
    • Using a plastic pry tool, go along the edge of the device prying the device apart. While doing this, focus on the four clips, two of which are on either side of the device.

  5. Ring Video Doorbell Pro Motherboard Replacement: Schritt 5, Bild 1 von 1
    • Remove the front of the device from the back plate.

  6. Ring Video Doorbell Pro Motherboard Replacement, Speaker: Schritt 6, Bild 1 von 1
    • With the Video Doorbell Pro opened up the speaker is exposed.

  7. Ring Video Doorbell Pro Motherboard Replacement: Schritt 7, Bild 1 von 1
    • Remove this 5.25 mm screw.

  8. Ring Video Doorbell Pro Motherboard Replacement: Schritt 8, Bild 1 von 1
    • Remove this wire connection by gently prying it off with a plastic pry tool.

  9. Ring Video Doorbell Pro Motherboard Replacement: Schritt 9, Bild 1 von 1
    • Remove the speaker from the device.

    What is the model number of the speaker

    Sammy De Maertelaere - Antwort

  10. Ring Video Doorbell Pro Motherboard Replacement, Motherboard: Schritt 10, Bild 1 von 1
    • The next step is to remove the last four connections holding the motherboard in place.

  11. Ring Video Doorbell Pro Motherboard Replacement: Schritt 11, Bild 1 von 1
    • Using the plastic pry tool, carefully remove this wire connection.

  12. Ring Video Doorbell Pro Motherboard Replacement: Schritt 12, Bild 1 von 1
    • Using the plastic pry tool, gently ease this ribbon cable from its port.

    This step is not needed. The ribbon connects to a daughter board below main board (see pic for step 15) and they will move together. So this is not an obstacle to access a capacitor or battery/antenna combo.

    albert20 - Antwort

  13. Ring Video Doorbell Pro Motherboard Replacement: Schritt 13, Bild 1 von 1
    • Remove the last two wire connections shown here using the same methods utilized in the previous steps.

  14. Ring Video Doorbell Pro Motherboard Replacement: Schritt 14, Bild 1 von 2 Ring Video Doorbell Pro Motherboard Replacement: Schritt 14, Bild 2 von 2
    • Using the Phillips 000 screwdriver, remove these three 4.25mm screws.

    I’m not sure you have to remove the black screws, I think they hold the camera lens holder to the motherboard.

    Mark H - Antwort

  15. Ring Video Doorbell Pro Motherboard Replacement: Schritt 15, Bild 1 von 1
    • Take the motherboard out of the housing. Lift slowly while doing this to make sure the wires and the delicate ribbon cable are not damaged.

    What is the value of the capacitor?

    Thanks

    Daniel Kerbacher - Antwort

Abschluss

To reassemble your device, insert the new motherboard and follow these instructions in reverse order.

8 weitere Nutzer:innen haben diese Anleitung absolviert.

Jake Dixon

Mitglied seit: 11/09/17

835 Reputation

4 Anleitungen geschrieben

Team

IUPUI, Team S7-G4, Baechle Fall 2017 Mitglied von IUPUI, Team S7-G4, Baechle Fall 2017

IUPUI-BAECHLE-F17S7G4

3 Mitglieder

5 Anleitungen geschrieben

4 Kommentare

Is this the latest model

Phillip - Antwort

A pig to get apart. Prying the case open needed a glaziers flexy putty knife or spark plug feeler gauge as a plastic pry tool is not man enough . Connectors fall apart as you try to disconnect. Battery, aerial and capacitor are all glued or taped together.

You don’t need to disconnect the ribbon cable in Step 10 unless you intend to remove the camera module, which is screwed to the motherboard so comes away with it

Zam Zoo - Antwort

thank you very useful - question is i cannot fine a spare main board im after a ring pro mainboard - i open mine and looks like some of the parts are blowen its all green :) do you offer a repair service of main board ?

Sid Hepworth-Lloyd - Antwort

Where can I buy a new motherboard please?

Vicky_z - Antwort

Kommentar hinzufügen

Seitenaufrufe:

Letzte 24 Stunden: 2

Letzte 7 Tage: 14

Letzte 30 Tage: 42

Insgesamt: 9,434