Diese Version enthält möglicherweise inkorrekte Änderungen. Wechsle zur letzten geprüften Version.
Was du brauchst
-
Dieser Schritt ist noch nicht übersetzt. Hilf mit, ihn zu übersetzen!
-
Flick the two lock tabs into the unlocked positions by pushing each button forward.
-
-
Dieser Schritt ist noch nicht übersetzt. Hilf mit, ihn zu übersetzen!
-
Pop the back cover up using the groove on the top of the phone.
-
-
-
Dieser Schritt ist noch nicht übersetzt. Hilf mit, ihn zu übersetzen!
-
You can now access the phone's battery.
-
Using a spudger, remove the battery and set it aside.
-
-
Dieser Schritt ist noch nicht übersetzt. Hilf mit, ihn zu übersetzen!
-
Remove the two small rubber pieces that cover the lower screws.
-
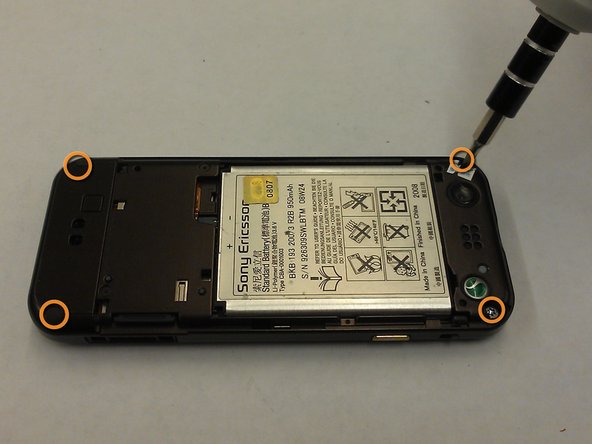
Using a T-6 Torx wrench or screwdriver, remove all four of the small screws at the top and bottom corners on the back of the phones.
-
-
Dieser Schritt ist noch nicht übersetzt. Hilf mit, ihn zu übersetzen!
-
Gently pry off the faceplate using a plastic opening tool.
-
Insert the plastic opening tool into the middle of the front and back panels of the phone.
-
-
Dieser Schritt ist noch nicht übersetzt. Hilf mit, ihn zu übersetzen!
-
Separate the front and back panels that were pryed open with the plastic opening tool.
-


Team

SUNY Cortland, Team 1-3, Getto Spring 2013 Mitglied von SUNY Cortland, Team 1-3, Getto Spring 2013
SUNYCORT-GETTO-S13S1G3
3 Mitglieder
8 Anleitungen geschrieben