Zum Hauptinhalt wechseln

Samsung Chromebook Series 3 Front Camera Replacement

Was du brauchst

  1. Samsung Chromebook Series 3 Front Camera Replacement, Screen: Schritt 1, Bild 1 von 3 Samsung Chromebook Series 3 Front Camera Replacement, Screen: Schritt 1, Bild 2 von 3 Samsung Chromebook Series 3 Front Camera Replacement, Screen: Schritt 1, Bild 3 von 3
    • Use the iFixit opening tool to get under the front cover and pop it out of place

  2. Samsung Chromebook Series 3 Front Camera Replacement: Schritt 2, Bild 1 von 3 Samsung Chromebook Series 3 Front Camera Replacement: Schritt 2, Bild 2 von 3 Samsung Chromebook Series 3 Front Camera Replacement: Schritt 2, Bild 3 von 3
    • Remove the four 2.9 mm screws with the Phillips #00 Screwdriver bit.

    • Using the iFixit opening tool, try to lift up the screen (it is held down by some adhesive).

  3. Samsung Chromebook Series 3 Front Camera Replacement: Schritt 3, Bild 1 von 3 Samsung Chromebook Series 3 Front Camera Replacement: Schritt 3, Bild 2 von 3 Samsung Chromebook Series 3 Front Camera Replacement: Schritt 3, Bild 3 von 3
    • Lift the lever to release the cable and pull the cable out.

  4. Samsung Chromebook Series 3 Front Camera Replacement: Schritt 4, Bild 1 von 1
    • You can now remove the screen.

  5. Samsung Chromebook Series 3 Front Camera Replacement, Front Camera: Schritt 5, Bild 1 von 3 Samsung Chromebook Series 3 Front Camera Replacement, Front Camera: Schritt 5, Bild 2 von 3 Samsung Chromebook Series 3 Front Camera Replacement, Front Camera: Schritt 5, Bild 3 von 3
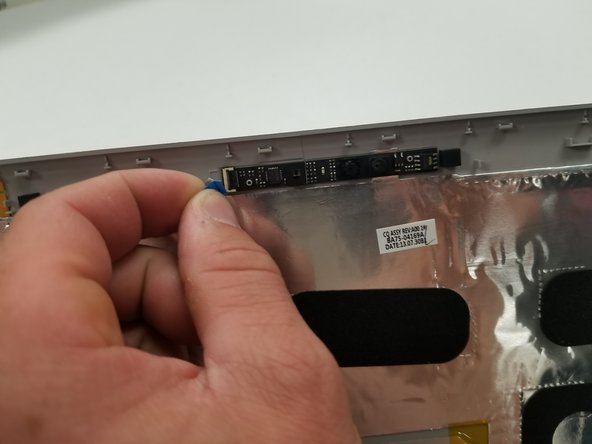
    • Disconnect the ribbon cable connected to the front camera assembly.

    • You will need to flip up the little black lever to release the cable.

  6. Samsung Chromebook Series 3 Front Camera Replacement: Schritt 6, Bild 1 von 2 Samsung Chromebook Series 3 Front Camera Replacement: Schritt 6, Bild 2 von 2
    • Use an iFixit opening tool to pry the front camera assembly from the adhesive holding it in place.

Abschluss

To reassemble your device, follow these instructions in reverse order.

Tyler Schultz

Mitglied seit: 03/25/19

528 Reputation

3 Anleitungen geschrieben

Team

IUPUI, Team S2-G1, Henning Spring 2019 Mitglied von IUPUI, Team S2-G1, Henning Spring 2019

IUPUI-HENNING-S19S2G1

3 Mitglieder

6 Anleitungen geschrieben

Ein Kommentar

Thanks for posting this! I looked all over youtube and couldn’t find anything so I am relieved to find this tutorial! I haven’t performed the repair yet, but I was wondering if removing the screen is necessary. From what I see, I can access the camera by just removing the bezel. Thanks for your feedback in advance!

Angel Knepper - Antwort

Kommentar hinzufügen

Seitenaufrufe:

Letzte 24 Stunden: 1

Letzte 7 Tage: 1

Letzte 30 Tage: 2

Insgesamt: 389