Diese Version enthält möglicherweise inkorrekte Änderungen. Wechsle zur letzten geprüften Version.
Was du brauchst
-
Dieser Schritt ist noch nicht übersetzt. Hilf mit, ihn zu übersetzen!
-
On the back panel of the phone, find the slot that is on the top left side next to the flashlight.
-
Insert your fingernail or prying tool into the slot and lift up to slightly open the top left corner of the back panel.
-
Slide your fingernail or prying tool around the outer edge of the back panel to fully release it from the phone.
-
-
Dieser Schritt ist noch nicht übersetzt. Hilf mit, ihn zu übersetzen!
-
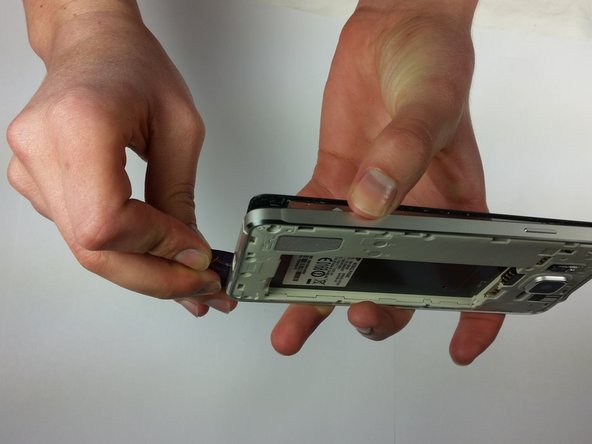
Locate the slot at the base of the battery and insert your thumb.
-
Push slightly toward the battery and out, away from the phone to free the battery.
-
-
Dieser Schritt ist noch nicht übersetzt. Hilf mit, ihn zu übersetzen!
-
To remove the back panel of the device, first find the slot next to the flashlight. Then insert your fingernail or prying tool into the slot and lift gently, around the perimeter, to fully remove the panel.
-
-
-
Dieser Schritt ist noch nicht übersetzt. Hilf mit, ihn zu übersetzen!
-
Locate slot at the base of the battery and insert your thumb.
-
Push up/toward the battery while lifting up and away to release from slot.
-
-
Dieser Schritt ist noch nicht übersetzt. Hilf mit, ihn zu übersetzen!
-
Use a JIS #000 screwdriver to remove all twelve 3mm screws that surround the back of the phone.
-
-
Dieser Schritt ist noch nicht übersetzt. Hilf mit, ihn zu übersetzen!
-
Heat your iOpener in the microwave for 30 seconds.
-
Place the iOpener on the front screen. Move the iOpener so all parts of the screen are heated evenly.
-
After multiple heating cycles, proceed to next step.
-
-
Dieser Schritt ist noch nicht übersetzt. Hilf mit, ihn zu übersetzen!
-
Slide opening pick around perimeter of the glass. Make sure not to push edge too far under the screen.
-
-
Dieser Schritt ist noch nicht übersetzt. Hilf mit, ihn zu übersetzen!
-
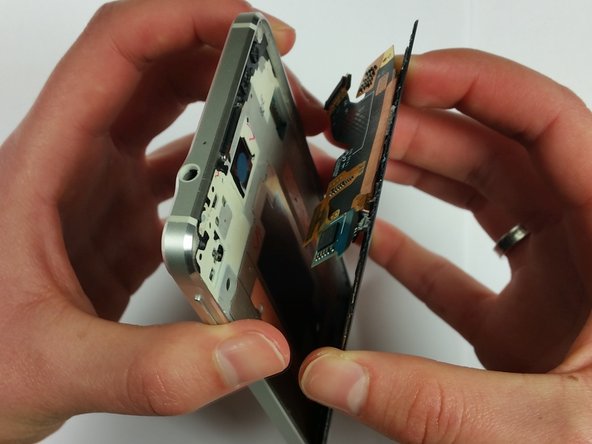
Gently pry the screen up and lift off.
-


Rückgängig: Ich habe diese Anleitung nicht absolviert.
30 weitere Nutzer:innen haben diese Anleitung absolviert.
Team

Cal Poly, Team 20-17, Maness Winter 2015 Mitglied von Cal Poly, Team 20-17, Maness Winter 2015
CPSU-MANESS-W15S20G17
4 Mitglieder
5 Anleitungen geschrieben
4 Kommentare
Do i need an adhesive for the new screen? If so what is a good brand etc for me to order? thank you for the guide broke the first screen when I replaced the usb port for charging after it got wet while charging.
Same question here. Any answer?
Hi, I did it twice with two different types of LCD. typically the LCD has a glue on the borders and so you do not need to apply additional glue. The glue you have on the borders of the new LCD is protected by a thin film: Just remove it before applying LCD to the Frame
Actually just lifting the screen will break the LCD as the LCD is double sided taped to the phone. It needs to be gently lifting the screen and the LCD while heating up the phone and softening the adhesive, doing this while preventing from cutting unnecessary connections. I had my phone sent to Samsung Service Center after breaking the LCD while I left the bottom still sticking. Guess what, the technician cut my "back" button connection, and then told me to change the power module as well(!). Apparently, they did not follow step #9 of Samsung Galaxy Alpha Teardown