Zum Hauptinhalt wechseln

Samsung Galaxy Camera Camera Flash Replacement

Was du brauchst

  1. Samsung Galaxy Camera Camera Flash Replacement, Screen: Schritt 1, Bild 1 von 1
    • Begin removing the 3/16" screws for the device.

  2. Samsung Galaxy Camera Camera Flash Replacement: Schritt 2, Bild 1 von 1
    • Turn the device and remove the additional 3/16" screws.

  3. Samsung Galaxy Camera Camera Flash Replacement: Schritt 3, Bild 1 von 1
    • Turn the device and remove the additional 3/16" screw.

  4. Samsung Galaxy Camera Camera Flash Replacement: Schritt 4, Bild 1 von 3 Samsung Galaxy Camera Camera Flash Replacement: Schritt 4, Bild 2 von 3 Samsung Galaxy Camera Camera Flash Replacement: Schritt 4, Bild 3 von 3
    • Take the white cover plate off.

  5. Samsung Galaxy Camera Camera Flash Replacement: Schritt 5, Bild 1 von 1
    • Using the plastic opening tools, pry open the camera from the bottom.

    • This may require a moderate use of force because of the sealing glue.

  6. Samsung Galaxy Camera Camera Flash Replacement: Schritt 6, Bild 1 von 1
    • Gently pull the connector away from the motherboard.

  7. Samsung Galaxy Camera Camera Flash Replacement, Lens and Motherboard: Schritt 7, Bild 1 von 1
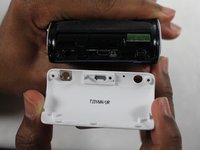
    • Unscrew the motherboard's screws. There are 4 3/32" screws and 3 5/32" screws.

  8. Samsung Galaxy Camera Camera Flash Replacement: Schritt 8, Bild 1 von 1
    • Unscrew the lens' screws. There are 1 black 4/32" screw, 3 3/16" black screws, and 2 white 5/32" screws.

  9. Samsung Galaxy Camera Camera Flash Replacement: Schritt 9, Bild 1 von 1
    • Pull these connectors away from motherboard.

  10. Samsung Galaxy Camera Camera Flash Replacement: Schritt 10, Bild 1 von 1
    • Lift the motherboard and lens out of the case.

  11. Samsung Galaxy Camera Camera Flash Replacement, Unscrew: Schritt 11, Bild 1 von 1
    • Remove all the screws circled. There is 1 1/8" screw by the flash, 1 9/32" screw that holds the flash button, 2 5/32" screw that is on the grey frame for the flash, and 2 5/32" screws that holds the cable frames on the top left.

  12. Samsung Galaxy Camera Camera Flash Replacement: Schritt 12, Bild 1 von 1
    • Unscrew the 3 5/32" screws that cover the battery plate.

  13. Samsung Galaxy Camera Camera Flash Replacement: Schritt 13, Bild 1 von 1
    • The black plates on the other side can be removed after these screws.

  14. Samsung Galaxy Camera Camera Flash Replacement: Schritt 14, Bild 1 von 1
    • Pull the flash and battery case out of the device.

Abschluss

To reassemble your device, follow these instructions in reverse order.

13 weitere Personen haben diese Anleitung absolviert.

Richard Hicks

Mitglied seit: 01/13/15

1.262 Reputation

4 Anleitungen geschrieben

Team

USF Tampa, Team 1-3, Sullivan Winter 2015 Mitglied von USF Tampa, Team 1-3, Sullivan Winter 2015

USFT-SULLIVAN-W15S1G3

3 Mitglieder

4 Anleitungen geschrieben

0 Kommentare

Kommentar hinzufügen

Seitenaufrufe:

Letzte 24 Stunden: 0

Letzte 7 Tage: 1

Letzte 30 Tage: 8

Insgesamt: 831