Zum Hauptinhalt wechseln

Samsung Galaxy J1 Glass Screen Replacement

Was du brauchst

  1. Samsung Galaxy J1 Glass Screen Replacement, Midframe: Schritt 1, Bild 1 von 1
    • Insert a finger nail or plastic opening tool between the back cover and the device.

    • Gently pry the rear cover off of the back of the phone.

  2. Samsung Galaxy J1 Glass Screen Replacement: Schritt 2, Bild 1 von 2 Samsung Galaxy J1 Glass Screen Replacement: Schritt 2, Bild 2 von 2
    • Using a finger, pull the SIM card down out of its slot.

    • Remove the SIM card.

    • The pictured device is missing the SIM card and battery.

  3. Samsung Galaxy J1 Glass Screen Replacement: Schritt 3, Bild 1 von 1
    • Using a Phillips #00 screwdriver remove the eleven 3 mm screws.

  4. Samsung Galaxy J1 Glass Screen Replacement: Schritt 4, Bild 1 von 3 Samsung Galaxy J1 Glass Screen Replacement: Schritt 4, Bild 2 von 3 Samsung Galaxy J1 Glass Screen Replacement: Schritt 4, Bild 3 von 3
    • Insert a plastic opening tool between the screen and the back of the device.

    • Starting at the bottom of the device, gently slide the tool along the edges of the screen.

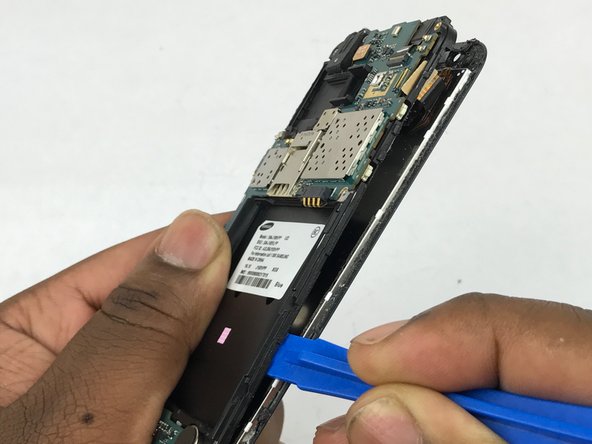
    • Gently pry the main assembly from the midframe of the device.

    • When removing the main assembly, pry gently so as to not crack the glass screen or break any clips within the device.

  5. Samsung Galaxy J1 Glass Screen Replacement, Glass Screen: Schritt 5, Bild 1 von 2 Samsung Galaxy J1 Glass Screen Replacement, Glass Screen: Schritt 5, Bild 2 von 2
    • Using the flat end of a spudger, disconnect the digitizer cable connector.

  6. Samsung Galaxy J1 Glass Screen Replacement: Schritt 6, Bild 1 von 2 Samsung Galaxy J1 Glass Screen Replacement: Schritt 6, Bild 2 von 2
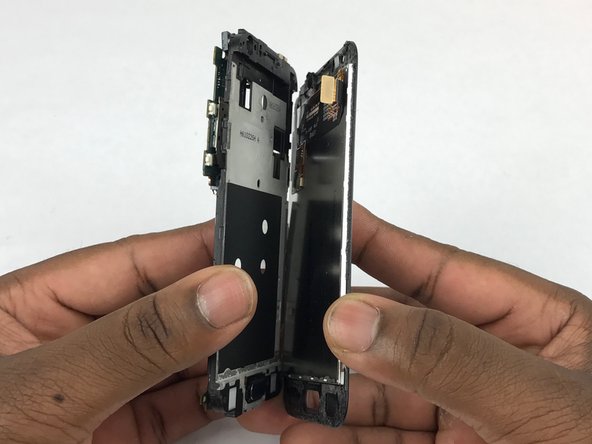
    • Using a plastic opening tool pry between silver digitizer and black back piece.

    • Slowly slide plastic opening tool around the screen to loosen the adhesive.

    • Be careful not to tear the digitizer cable when threading it through the plastic housing.

  7. Samsung Galaxy J1 Glass Screen Replacement: Schritt 7, Bild 1 von 1
    • Carefully separate display assembly from the plastic housing.

Abschluss

To reassemble your device, follow these instructions in reverse order.

19 weitere Nutzer:innen haben diese Anleitung absolviert.

Sean Kramer

Mitglied seit: 02/14/18

1.452 Reputation

6 Anleitungen geschrieben

Team

USF Tampa, Team S5-G4, Eyestone Spring 2018 Mitglied von USF Tampa, Team S5-G4, Eyestone Spring 2018

USFT-EYESTONE-S18S5G4

3 Mitglieder

6 Anleitungen geschrieben

2 Kommentare

In my Samsung J110h, Some of the right side keys in keyboard not working. They are P, Zero, In message screen, the sending button etc..

I am in desperate need for advice to rectify.

Will somebody help me.

My mail Id”: karupusolai@gmail.com

Solaimalai - Antwort

I was having the display issue. So I bought Samsung Galaxy J1 Screen replacement. And, I replaced it by myself using the information in this.

harshithaemazel - Antwort

Kommentar hinzufügen

Seitenaufrufe:

Letzte 24 Stunden: 0

Letzte 7 Tage: 11

Letzte 30 Tage: 35

Insgesamt: 4,696